
Are you going to create a blog? Or maybe would you like to start using magic Flotiq with NextJS? If you answer yes on any question, keep going reading our tutorial. You will learn how to create a new project step by step.
Hi! Today we want to show how to create a simple blog using our NextJS boilerplate. We will cover essential steps and provide code examples. Finally, we share the result as a ready to use NextJS blog starter.
1. What is NextJS?
React is a library for creating user interfaces. NextJS is a framework designed for facilitating the creation of such interfaces. For example, this tool gives a routing system based on files and CSS support.
2. What technologies will be useful?
Of course, we want to use Flotiq as our base and place to manage our content. We want to create the frontend (visual) part in this tutorial.
You should have a basic knowledge of:
But let’s show something in details
3. Flotiq Content definition
In this article, we rely on the predefined Blog post Content Type Definition. You can create it simply from the Flotiq dashboard:
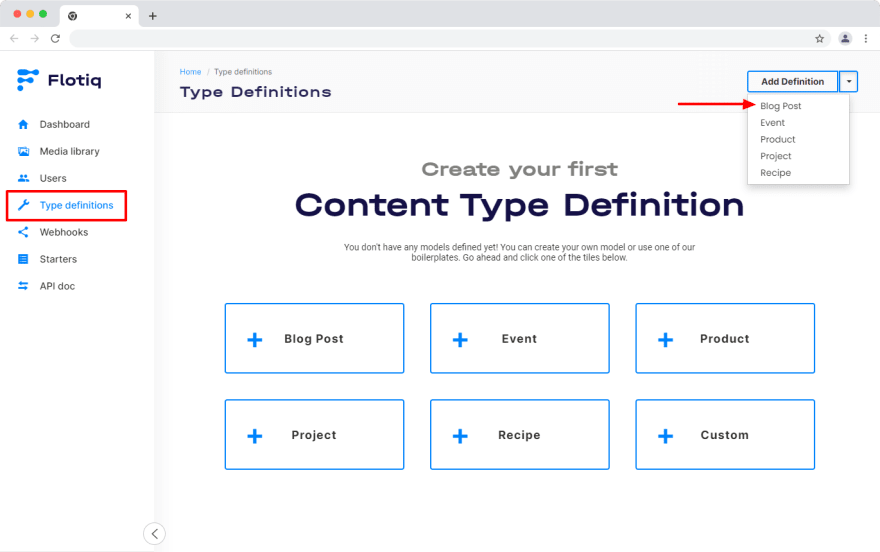
In this step you can also add a example posts to the newly created Blog Post Content Type.
Note: To create Content Type Definitions with example data in your account, you can also use the Flotiq CLI approach. Download the data from the .flotiq directory in the starter repository, and use the flotiq import command.
4. What components do we need to create?
Our blog will be composed of small elements that we will be able to reuse later. Components list in our blog:
- Header
- Footer
- CardAnnouncement
- Blog Post Author
- Blog Post FeaturedImage
- Blog post Tags
- Blog post MetaDetails
- Blog post MetaDetailsPresentation
- Blog post Navigation
But components aren’t everything. We should use some layouts. About that, in the next paragraph.
5. Let’s connect our components to Layouts/Templates
In our example, we want to create two things: A blog post layout and a basic template. Let’s start with a basic template because this will depend on all our pages.
import React from 'react';
import Head from 'next/head';
import Header from '../components/Header';
import Footer from '../components/Footer';

const Layout = ({ children, additionalClass = [], title, description }) => (
    <main className={['font-sora', 'px-4', ...additionalClass].join(' ')}>
        <Head>
            <title>{title}</title>
            <meta name="viewport" content="initial-scale=1.0, width=device-width" />
            <meta property="og:title" content={title} key="title" />
            <meta name="description" content={description} />
        </Head>
        <Header />
        {children}
        <Footer />
    </main>
);
export default Layout;
It’s a simple file containing our Header, footer, and Head HTML tag to display the title in the browser. The important thing there is {children} - where we put this element, there will be rendered all children components (our components, pages content)
Second, as mentioned, we should have a blog post layout. To create this, we should have some components defined before in our article and some from the flotiq-components-react package: Header, Content, BlogPostFeaturedImage, BlogPostAuthor, BlogPostMetaDetails and BlogPostNavigation. Of course, we cannot forget about the Layout defined in this section.
import React from 'react';
import moment from 'moment';
import { Content, Header } from 'flotiq-components-react';
import Layout from '../layouts/layout';
import BlogPostFeaturedImage from '../components/blog-post/BlogPostFeaturedImage';
import BlogPostAuthor from '../components/blog-post/BlogPostAuthor';
import BlogPostMetaDetails from '../components/blog-post/BlogPostMetaDetails';
import BlogPostNavigation from '../components/blog-post/BlogPostNavigation';
import config from '../lib/config';

const BlogPostTemplate = ({ post, pageContext }) => (
    <Layout
        title={`${config.siteMetadata.title} | ${post.title}`}
        description={post.excerpt}
        additionalClass={['bg-white px-6']}
    >
        <article className="max-w-7xl mx-auto mt-20 pb-4 rounded-2xl bg-light-gray overflow-hidden">
            {(post.headerImage && post.headerImage[0].dataUrl) && (
                <BlogPostFeaturedImage headerImage={post.headerImage} title={post.title} />
            )}

            <BlogPostMetaDetails
                date={moment(post.internal.createdAt).format(' Do MMMM yyyy')}
                readingTime=" 7 min"
                tags={['#photo', '#cookig', '#food']}
                additionalClass={['py-6']}
            />

            <Header alignement="center" additionalClasses={['px-4 md:px-12 pt-10 pb-10']}>
                {post.title}
            </Header>

            <Content
                blocks={post.content.blocks}
                additionalClasses={['px-4 md:px-12 text-sm md:text-lg']}
                fileProps={{
                    audioProps: { additionalClasses: ['px-6 md:px-12 w-full md:w-3/5 mx-auto'] },
                    imageProps: {
                        additionalClasses: ['w-full md:w-9/12 m-auto'],
                        rounded: '3xl',
                        captionAdditionalClasses: ['w-full md:w-9/12 m-auto'],
                    },
                }}
                quoteProps={
                    {
                        variant: 'dark',
                        additionalClasses: ['px-12 md:px-28 py-4'],
                        captionAdditionalClasses: ['bg-primary rounded px-8 py-1.5 opacity-100'],
                    }
                }
                paragraphProps={{ additionalClasses: ['font-light'] }}
            />
            <BlogPostAuthor authorName=" John Doe" additionalClass={['py-5']} />
        </article>
        <BlogPostNavigation
            additionalClass={['mt-3']}
            prevText="Previous post"
            nextText="Next post"
            pageContext={pageContext}
        />
    </Layout>
);
export default BlogPostTemplate;
Now we have prepared to create pages :)
6. Routings - Create Pages
First of all, we should bring closer to the routing system in NextJS - it depends on files. In the pages directory, we can create, for example, 404.js, but we can create a file named [page].js - it’s a page which gets the page parameter from the URL.
We must depend on two functions: getStaticProps and getStaticPaths. In the second one, we can save our logic to generate pages in this example, depending on pagination. In the first one, we should prepare data for each page. Of course, we should define components to render our data in the same file.
import Pagination from 'flotiq-components-react/dist/components/Pagination/Pagination';
import React from 'react';import Layout from '../layouts/layout';
import Announcement from '../components/Announcement';
import { getBlogPosts } from '../lib/blogPosts';
import BlogCards from '../sections/BlogCards';
import config from '../lib/config';

const Home = ({ posts, pageContext }) => (
    <Layout
        title={config.siteMetadata.title}
        description={config.siteMetadata.description}
        additionalClass={['bg-light-gray']}
    >
        <Announcement
            content="This is the Blog where you can find any kind of information and rich media content.
                Use it for your needs, add content and customize in any way"
        />
        <BlogCards posts={posts} />
        {pageContext.numPages > 1 && (
            <Pagination page={pageContext.currentPage} numOfPages={pageContext.numPages} rounded="md" />
        )}
    </Layout>);

export async function getStaticProps({ params }) {
    const fetchPost = await getBlogPosts(params.page, config.blog.postPerPage);
    return {
        props: {
            posts: fetchPost.data,
            pageContext: {
                currentPage: params.page,
                numPages: fetchPost.total_pages,
            },
        },
    };
}

export async function getStaticPaths() {
    const fetcher = await getBlogPosts(1, config.blog.postPerPage);
    const pages = fetcher.total_pages;
    const pathRule = (number) => `${number + 1}`;
    let paths = {};
    if (pages > 1) {
        paths = Array.from(Array(pages - 1).keys()).map((i) => ({
            params: { page: pathRule(i) },
        }));
    } else {
        paths = Array.from(Array(pages).keys()).map((i) => ({
            params: { page: pathRule(i) },
        }));
    }
    return {
        paths,
        fallback: false,
    };
}

export default Home;
We cannot create a few pages that require generation like this on the same level. We should create a new directory for our posts. Let’s create the page to generate our posts by slug. Of course, we should name our file as [slug].js
import React from "react";
import BlogPostTemplate from "../../templates/blog-post";
import {
  getBlogPostBySlug,
  getBlogPosts,
  getNextBlogPost,
  getPreviousBlogPost,
} from "../../lib/blogPosts";

const Home = ({ post, pageContext }) => (
  <BlogPostTemplate
    post={post}
    pageContext={{
      pageContext,
    }}
  />
);

export async function getStaticProps({ params }) {
  const postBySlug = await getBlogPostBySlug(params.slug);
  const createdAt = postBySlug?.data[0]?.internal.createdAt;
  const previousPost = await getPreviousBlogPost(createdAt || null);
  const previousPostSlug =
    previousPost && previousPost.data && previousPost.data[0]
      ? previousPost.data[0].slug
      : null;
  const nextPost = await getNextBlogPost(createdAt || null);
  const nextPostSlug =
    nextPost && nextPost.data && nextPost.data[0]
      ? nextPost.data[0].slug
      : null;

  return {
    props: {
      post: postBySlug.data[0],
      pageContext: {
        previous: previousPostSlug,
        next: nextPostSlug,
      },
    },
  };
}

export async function getStaticPaths() {
  const posts = await getBlogPosts(1, 10000);
  const postData = posts.data;

  return {
    paths: postData.map((post) => ({
      params: {
        slug: post.slug,
      },
    })),
    fallback: false,
  };
}

export default Home;
Summary
Now we have a functional blog using NextJS and Flotiq HeadLess CMS :). Of course, we should build it and deploy it to any cloud service/hosting in the next step, but it’s not part of this article.
If you want the same blog as we built in this tutorial, you can go to our repository on GitHub and click deploy on the selected cloud environment and start using it, it’s excellent for testing this, but for production usage, we recommend downloading project and change logo and other things to your needs.
This is a really simple example of a blog. You can, for example, extend this by creating a contact form, a page about us or something. We are waiting for your contribution to our starters :). Have a nice day or evening whenever you read this, and start your blog with FLOTIQ!


Top comments (0)