
Grok, built by xAI, is a cutting-edge conversational AI designed to give helpful, truthful answers with a dash of humor and an outside perspective on humanity. It’s powered by a large language model (LLM)—think massive neural networks trained on vast amounts of text to understand and generate human-like responses.
The latest iterations, like Grok-3, pack advanced reasoning, real-time data access (via platforms like X), and multimodal capabilities (handling text, images, and more).
In this guide, we will go over deploying a Grok Eliza AI agent on Fleek.
Prerequisites
- An XAI API key and credits in your account.
- A Fleek account if you don’t already have one.
- A Twitter account with existing authentication and login status
No prior knowledge of AI agents or Eliza is required to participate.
How to get your Grok API key
To get a Grok API key:
Navigate to the XAI console and then sign in to the console.
In the sidebar, tap the key icon labeled "API Keys." You'll find the following panel:
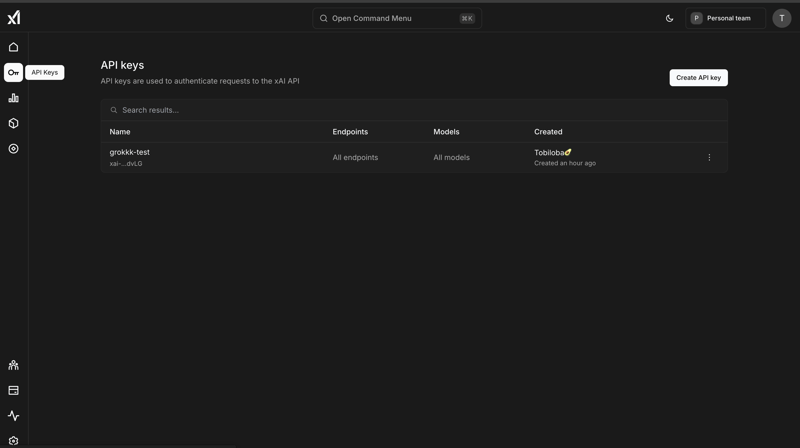
3.Next, click on "Create API key". Note that you must have API credits in your account for the API key to be valid.

Deploy your AI agent from Fleek
Start by going to fleek.xyz/eliza/. You'll find three deployment options. Go ahead and select the “Start with a template” option:

Next, select a template that fits your preferences, e.g., C-3PO template.
Click on the C-3PO button, the form on the page will be filled instantly with the necessary details.
Locate "Model providers" and click to reveal the dropdown options.
Scroll to find "Grok" in the dropdown menu as shown below::

4.After selecting Grok, no additional configuration is necessary. However, you have the option to customize your experience by adding an avatar or updating the name as desired.

5.Once ready, scroll to the bottom and click the "Continue to settings" button.
6.Fill in all the necessary information on this panel. You'll notice that some fields are already completed, which you can skip.

7.Once completed, examine your agent details carefully to ensure all provided information is correct.

Note: Advanced users can switch to the "JSON" (Characterfile) tab to manually edit or modify configuration details.
8.After review, click "Deploy agent" at the bottom. Your agent should be active in a few seconds.
Great! Your agent will be live on X and ready to interact. Tag it for responses or head back to edit its Characterfile anytime:

To learn more, check out:


Top comments (0)