When you want to organize your aws resources and components from a single stack, you can use SAM. It makes easy to share configuration between resources and deploy all things together.
Here in this article, I will show you that how to create API gateway, and lambda function in a single template.
Prerequisites:
Creating an AWS account: Open the Amazon Web Services (AWS) home page. Choose Create an AWS Account. If you signed in to AWS recently, choose Sign in to the Console. If Create a new AWS account isn’t visible, first choose Sign in to a different account, and then choose Create a new AWS account.
Configuring IAM: Configuring AWS Identity and Access Management (IAM) permissions is another prerequisite. You can not access aws from your local pc if you don’t have permission. If you don’t know how to create an IAM user and give permission on that user, please check this post
https://medium.com/@farzanajuthi08/how-to-create-user-and-give-permission-of-aws-services-using-iam-credential-42644f61fea5Install Docker (Optional): If you want to test your application locally, then you have to install docker. Otherwise there is no need to install docker.
Install Homebrew: If you are a Linux or MacOS user, then you have to install Homebrew.
Install the AWS command line interface (CLI): If you don’t have aws CLI installed on your local machine, please follow the installation process from this link https://docs.aws.amazon.com/cli/latest/userguide/getting-started-install.html.
Install latest version. Check the version by running the command
sam --version-
Configure aws CLI into your local machine: You need access key and secret access key to configure AWS CLI into your machine. You have to download your keys when go through “Configuring IAM” step.
Open your terminal and run following code one after another to configure credentials into your pc:aws configure AWS Access Key ID [None]: <your_access_key_id> AWS Secret Access Key [None]:<your_secret_access_key> Default region name [None]: <Give your region name here> Default output format [None]: Install SAM CLI: If you don’t have SAM CLI installed into your local machine, please follow step 4 of this link https://docs.aws.amazon.com/serverless-application-model/latest/developerguide/serverless-sam-cli-install-windows.html
Install Python: If you want to use python as your application language, you have to install python in your local pc.
Steps to download a SAM project and deploy:
-
Open terminal on your pc and type the following command
sam -- init
and get following information like as this image
2. Here you have to use option 1 from the above image and you will get following options to choose:
3. You can use either 1 or 2. If you want to keep your artifact as a zip uploaded to s3, you have to choose option 1. Otherwise you have to choose option 2 if you want to keep it as image uploaded into ECR image repository.
Here I will choose option 1 and get an option to choose coding language like following image:
4. Then you have to give your required python version. Here I want to use python3.8 that’s why I have used number 9. And give my project name as tutorial-backend and give an Enter.
You can rename your application name after downloading it from the cloud.
5. After giving an Enter, *you will get some *options to choose the template you want to download from cloud:
6. Here I will choose option **1 **and download the **Hello World Example **template like following image:
7. Then change our current directory by typing command in the terminal:
                    cd <project_name>
          Example:  cd tutorial-backend
8. Then type following command into terminal to build your project:
sam build
9. Then you have to run following command for the first time to deploy this project into cloud:
sam deploy — guided
10. You will get following options to configure:
Stack name: Give your project name here. You will see this name in cloudformation.
AWS region: Choose your required region.
Other options will remain same as like the following image:
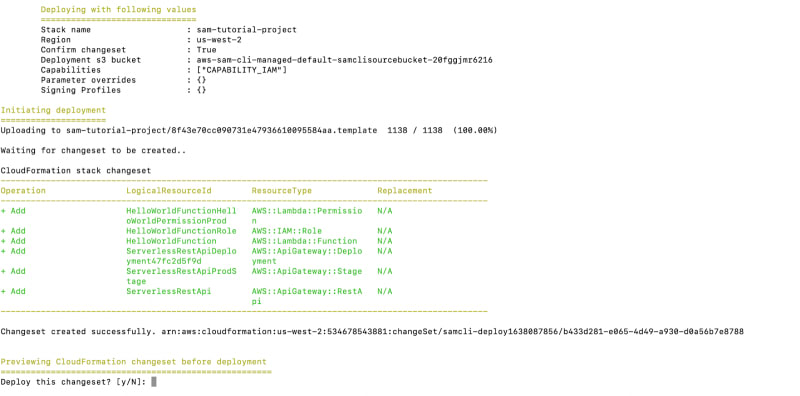
11. Then you will be asked to choose one option for deploying your code:
12. Then give y as value like Deploy this changeset? [y/N]: y
13. After successful deployment you can check your deployed project in cloudformation.
Go to aws console and search cloudformation and see your project:
14. After one successful deployment, if you change anything into your code, you don’t need to run sam deploy --guided again. Just remember you have to build it and deploy it by following commands one after another.
                    sam build
                    sam deploy
N.B: You may face problem if your code deployed region and your aws CLI configuration region is not same. So, please keep your cli configuration region and code deployment region same.


Top comments (0)