
At Streem we are on a mission to make the world's expertise more accessible. We create guidance tools to steer the discussion and ensure accurate understanding the first time. One of the guidance tools we are developing for web is a 3d cursor that can be positioned in a remote video. To accomplish this, we need to process a lot of raw pixel data and AR data per frame.

Positioning remote artifacts in AR involves a lot of computation between animation frames. It involves so much computation that it is simply too much to cover in one article. In this post, I will discuss how we used Rust to access raw pixel data from a video frame.
If you would rather jump straight to the code, then hop over here and give this repo a ⭐
What is Web Assembly?
WebAssembly (wasm) is a type of code that can be run in web browsers and mobile devices. Wasm was designed to be a compilation target for low-level languages like C, C++, and Rust. With wasm, web browsers and mobile devices can now run code written in multiple languages at near-native speeds by taking advantage of common hardware capabilities.

Wasm was introduced to all modern web browsers to help extend the capabilities of JavaScript. Since JavaScript has complete control over how WebAssembly code is downloaded, compiled and run, JavaScript developers can think of wasm as a feature for efficiently creating high-performance functions.
In this demo, we used WebAssembly to extract raw pixel data from a remote video feed. This guide will cover high level details about web assembly. It will not cover setting up a web assembly project. There are tools and tutorials to help you get started with your next web assembly project. If you are completely new to Rust, then you should watch Tensor Programming's Intro to Rust playlist
How do I process pixels from a remote video feed?
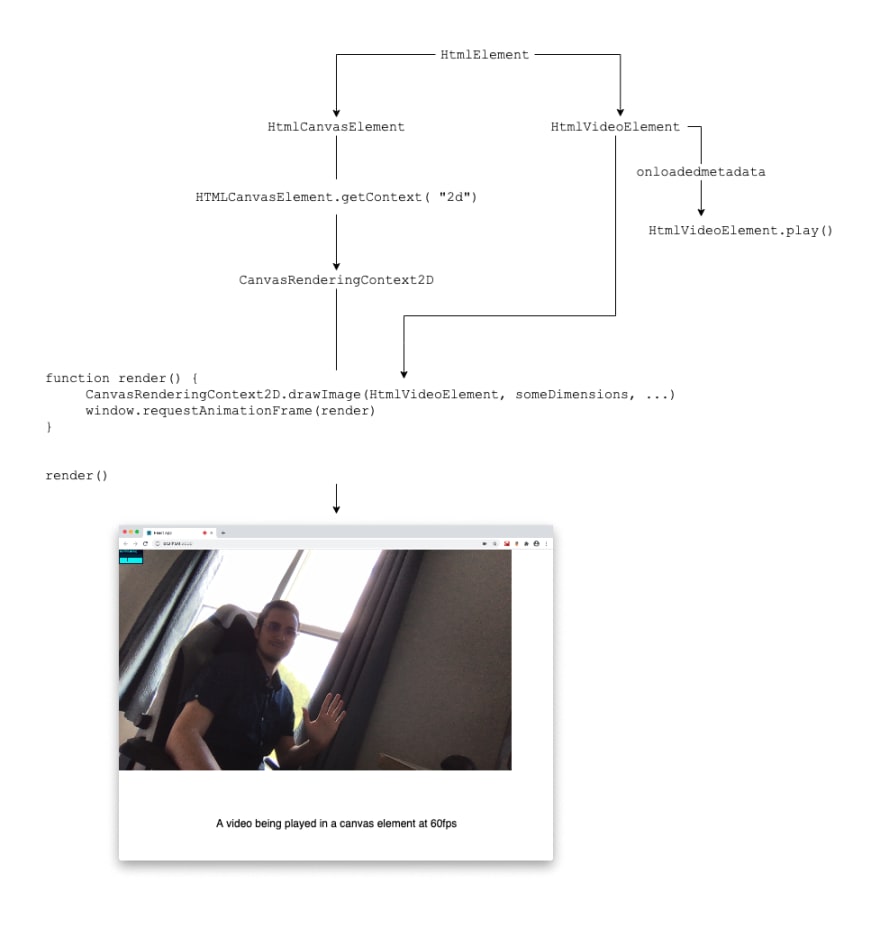
To process raw pixel data for every frame of a video, we used a video track from a MediaStream object, which was then used to create an HtmlVideoElement. The video element can then be used as a source for a canvas to draw an image with. With the image drawn onto a canvas at 60fps, we have access the raw underlying pixel data with CanvasRenderingContext2D.getImageData().
Below is a high level diagram demonstrating how you can put individual video frames onto a canvas element. With the video frame drawn onto a canvas element, you will have access to raw pixel data.
Once we knew how to access raw pixel data from a frame, we brought in Rust and wasm. We wanted the interface between JavaScript and Rust to be simple, so we had our RenderingEngine be responsible for two things
- Registering target canvases for our processed video frame to render onto
- Processing every frame from a video feed
Registering Target Canvases
A target canvas is where our processed video frames would render.

After dynamically loading our wasm, we can invoke add_target_canvas to register a rendering destination for our RenderingEngine
const renderingEngine = new wasm.RenderingEngine();
renderingEngine.add_target_canvas(canvas)
The RenderingEngine is a struct which consumes three private fields
-
canvasthe buffer canvas to parse LightShow data on -
render_targetsA vector of canvas elements to render the final frames onto -
cancelA signal to stop rendering frames onto a canvas
pub struct RenderingEngine {
  canvas: Rc<RenderingEngineCanvas>,
  render_targets: Rc<RefCell<Vec<RenderingEngineCanvas>>>,
  cancel: Rc<RefCell<bool>>,
}
Each of these fields is wrapped in Rust's Reference Counter (Rc). Rcs enable shared ownership of data. A Rc is used when we need several references to an immutable value at the same time. Rc pointers are distinct from Rust's usual references in that, while they are allocated on the heap, cloning a Rc pointer does not cause a new heap allocation. Instead, a counter inside the Rc is incremented. We will see how this is used with our animation loop. This is needed because we can't use lifetimes with wasm_bindgen. See this issue.
Inside our Rc is a RefCell, which provides us a way to mutate data when there are immutable references to that data. We will need add many render_targets and mutate our cancel flag as our application is used at runtime. In a nutshell, a RefCell let's you get &mut references of your contents. When we use Rc<RefCell<T>>, we are saying we have shared, mutable ownership of data in our application.
In Rust, add_target_canvas is a public method exposed with wasm_bindgen. It's important to note this method uses &mut self. This reference type allows you to modify self without taking ownership of it.
#[derive(Debug)]
struct RenderingEngineCanvas {
    element: HtmlCanvasElement,
    context_2d: CanvasRenderingContext2d,
}

#[wasm_bindgen]
#[derive(Debug)]
pub struct RenderingEngine {
    canvas: Rc<RenderingEngineCanvas>,
    render_targets: Rc<RefCell<Vec<RenderingEngineCanvas>>>,
    cancel: Rc<RefCell<bool>>,
}

#[wasm_bindgen]
impl RenderingEngine {

    #[wasm_bindgen(constructor)]
    pub fn new() -> RenderingEngine {
        let canvas = Rc::new(RenderingEngine::create_buffer_canvas());
        let render_targets = Rc::new(RefCell::new(Vec::new()));
        let cancel = Rc::new(RefCell::new(false));

        RenderingEngine {
            canvas,
            render_targets,
            cancel,
        }
    }

    #[wasm_bindgen(method)]
    pub fn add_target_canvas(&mut self, canvas: HtmlCanvasElement) {
// Obtain 2D context from canvas
        let context = canvas
            .get_context("2d")
            .unwrap()
            .unwrap()
            .dyn_into::<CanvasRenderingContext2d>()
            .expect("failed to obtain 2d rendering context for target <canvas>");

// Create a struct
        let container = RenderingEngineCanvas {
            element: canvas,
            context_2d: context,
        };

// Update instance of rendering engine
        let mut render_targets = self.render_targets.borrow_mut();
        render_targets.push(container);
    }
}
Processing every frame from a video feed
Processing every frame from a video feed is more involved. I will remove a lot of finer details, however, you can explore the github repo for a complete code example

From JavaScript, we can invoke our animation loop with a start method. It's only argument is MediaStream object which is obtained by requesting the user's media
const renderingEngine = new wasm.RenderingEngine();
renderingEngine.add_target_canvas(canvas)

const userMedia = await navigator.mediaDevices.getUserMedia(someContraints);
renderingEngine.start(userMedia);
In Rust, we create an HTMLVideoElement and start our animation loop. With start_animation_loop, we clone the values we will be using in our animation loop.
-
videois needed so we can obtain it's dimensions and frames from. -
canvasis our buffer canvas so we can proccess our pixel data -
cancelis a signal we can use to trigger a stop to our animation loop -
render_targetsare all the target canvases on JS that need render our final image onto.
There's also two new constants f and g. We want to call requestAnimationFrame every frame until our video ends. After the video source ends we want all our resources cleaned up. We will use f to store our closure we want to execute on each frame, and g to kick it off for us.
The closure we create is stored on g for the first frame. We call borrow_mut to get a mutuable reference to value inside RefCell::new(None).
We learned a lot about this from this PR at rustwasm and how to capture an environment within an anonymous function
    #[wasm_bindgen(method)]
    pub fn start(&self, media_stream: &MediaStream) {
        let video = RenderingEngine::create_video_element(media_stream);
        &self.start_animation_loop(&video);
    }

   fn start_animation_loop(&self, video: &Rc<HtmlVideoElement>) {
        let video = video.clone();
        let canvas = self.canvas.clone();
        let cancel = self.cancel.clone();
        let render_targets = self.render_targets.clone();

        let f = Rc::new(RefCell::new(None));
        let g = f.clone();

        *g.borrow_mut() = Some(Closure::wrap(Box::new(move || {
          // clean up f when cancel is set to true
          if *cancel.borrow() == true {
                let _ = f.borrow_mut().take();
                return;
          }
          // continuously animate with the value of f.
          RenderingEngine::request_animation_frame(
            f.borrow().as_ref().unwrap()
        }) as Box<dyn FnMut()>));

// start the animation loop here for 1 frame, drop g.

RenderingEngine::request_animation_frame(g.borrow().as_ref().unwrap());
  }


// Note this method call, which uses `as_ref()` to get a `JsValue`
// from our `Closure` which is then converted to a `&Function`
// using the `JsCast::unchecked_ref` function.
   fn request_animation_frame(n: &Closure<dyn FnMut()>) {

      RenderingEngine::get_window()
         .request_animation_frame(n.as_ref().unchecked_ref())
         .expect("should register `requestAnimationFrame` OK");
   }
With a function wrapped in a Closure for JavaScript to execute, we can process our video frames' pixel data. I will make the code example below simple, however, you can find the original code here.
// inside our animation loop

// obtain video dimensions
let video_dimensions = Dimensions {
  width: video.video_width() as f64,
  height: video.video_height() as f64,
};

// draw frame onto buffer canvas
// perform any pixel manipulation you need on this canvas
canvas.element.set_width(video_dimensions.width as u32);
canvas.element.set_height(video_dimensions.height as u32);
canvas.context_2d.draw_image_with_html_video_element(&video, 0.0, 0.0).expect("failed to draw video frame to <canvas> element");


// render resulting image onto target canvas
for target in render_targets.borrow().iter() {
// Use scrollWidth/scrollHeight so we fill the canvas element.
  let target_dimensions = Dimensions {
    width: target.element.scroll_width() as f64,
    height: target.element.scroll_height() as f64,
  };
let scaled_dimensions = RenderingEngine::get_scaled_video_size(
                        &video_dimensions,
                        &target_dimensions,
                    );
let offset = Dimensions {
  width: (target_dimensions.width - scaled_dimensions.width) / 2.0,
  height: (target_dimensions.height - scaled_dimensions.height) / 2.0,
  };

// Ensure the target canvas has a set width/height, otherwise rendering breaks.                 target.element.set_width(target_dimensions.width as u32);
target.element.set_height(target_dimensions.height as u32);
target.context_2d.draw_image_with_html_canvas_element_and_dw_and_dh(
  &canvas.element,
  offset.width,
  offset.height,
  scaled_dimensions.width,
  scaled_dimensions.height,
  ).expect("failed to draw buffer <canvas> to target <canvas>");
}
If you liked this example and want to learn more about Rust, WebAssembly, and TypeScript then let me know! Leave a comment here or find me on Twitter

Top comments (8)
On the
// perform any pixel manipulation you need on this canvaspart, could you give an example of what that manipulation might look like? For example setting the red-value of every pixel to 0.Great article though! I'm just not exactly sure how to access the pixels
Hey Jeff,
you have access to a 2D context of the canvas when the image is rendered onto a canvas element (assuming the browser is modern).
With the 2D context, you can invoke the method
getImageDatadeveloper.mozilla.org/en-US/docs/W...
This will return
ImageDatadeveloper.mozilla.org/en-US/docs/W...With the
dataproperty, you will have one-dimensional array containing the data in the RGBA order, with integer values between 0 and 255. You can process this data as you please, then create a newImageData, and put this new data onto your buffer canvas withputImageDatadeveloper.mozilla.org/en-US/docs/W...
Thanks! That's exactly what I needed.
Nice article!
If you want to reduce some boilerplate (e.g. animation loop setup,
Rc+RefCellwrappers, etc.), you can try to use Seed. We have examples with MediaStream, Canvas and many others.This is awesome. I have not heard of Seed before. I will check this out!
I want more about Rust, I started learning it last week. I think it's a great tool!
For my next article, I am working on a performance comparison of WebAssembly, Vanilla JS, and WebWorkers.
In the mean time, I have a rust + react template for you to learn Rust and WebAssembly with. github.com/Fallenstedt/wasm-react-...
Wowwww