Intro
A lot of niche websites have this PointCloud thing

At the end of FlatIron's software engineering prework, they basically say "alright, we taught you how to teach yourself, make a website".
Given this opportunity I wanted to make the PointCloud thing.
Side-note:
This is being written 2~3 weeks after I wrote the code for this project, so this probably wont read too well. In retrospect, I should've probably written this post as I was writing the PointCloud code. Future posts will likely be better.
My Process
To start off I knew I just needed to figure out how to draw a line and a point, but its nowhere near that simple. How do I even get to the point where I can start drawing?
A proper blank canvas
After some googling, I found that I needed a "canvas" html element.
const canvas = document.querySelector('canvas');
const ctx = canvas.getContext('2d');
ctx.fillStyle = 'green';
ctx.fillRect(10, 10, 100, 100);
https://developer.mozilla.org/en-US/docs/Web/HTML/Element/canvas
Alright Easy enough...
I wanted this to span the whole background, so spent a lot of time fiddling around with css, and eventually found this stackoverflow answer.
You can just insert the following in to your main html page, or a function:
canvas.width = window.innerWidth;
canvas.height = window.innerHeight;
Then to remove the margins on the page
html, body {
   margin: 0 !important;
   padding: 0 !important;
}
That should do the job
And with that, you finally have a canvas to draw on.
Circles and Lines
Now that that is out of the way, points and lines.
Simple enough right?
No.
- There is no
circle(x, y, radius) - There is no
line(x1, y1, x2, y2)
Skipping past 10~20 minutes of googling, I made these.
// Drawing functions
function drawPoint(point) {
    ctx.beginPath(); // start a new path
    ctx.arc(x, y, radius, 0, 360); // go along arc of a circle of radius at position from the angle 0 to the angle 360 (draw a circle)
    ctx.fill(); // fill path that we just made (fill in the circle)
}
function drawLine(x1, y1, x2, y2) {
    ctx.beginPath(); // start a path
    ctx.moveTo(x1, y1); // move cursor here
    ctx.lineTo(x2, y2); // drag to here
    ctx.stroke(); // draw a line along that path
}
Wholeeeee bunch of constants and math methods
These are all pretty self explanitory. I will just be using them later and it feels best to define them here and now.
// Constants used in math and stuff
const width = window.innerWidth;
const height = window.innerHeight;
const screenMaxLength = Math.sqrt(Math.pow(width, 2) + Math.pow(height, 2));

// PointCloud Settings
const numpoints = 30;
const maxspeed = 0.25;

// Math Functions
function rand(min, max) {
    return Math.random() * (max - min) + min;
}
function mod(num, val) {
    return ((num % val) + val) % val;
}
function dist(point0, point1) {
    return Math.sqrt(Math.pow(point0.x - point1.x, 2) + Math.pow(point0.y - point1.y, 2));
}
Initalizing the points
Now that we have all that out of the way, time for actual code.
We define point objects because it makes the code feel cleaner than if we were to have a 2d array or 5 seperate arrays.
Standard iterator to generate the defined number of floating points we want, literally identical to the java iterator but with let instead of int
points = [];
// Initalize points with random positions, velocities, and sizes
for (let i = 0; i < numpoints; i++) {
    points.push( {
        x: rand(0, width),
        y: rand(0, height),
        xV: rand(-maxspeed, maxspeed),
        yV: rand(-maxspeed, maxspeed),
        size: rand(3, 5)
    });
}
Render method base and loop for animation.
Here is what my initial plan looked like for the render code, reads like english to me, I dont know how to comment this further.
function renderFrame() {
    // clear canvas for frame we are drawing
    ctx.clearRect(0, 0, canvas.width, height);

    // for each point...
        // step position of point

    // for each point...
        // drawPoint(point)

        // for each point // somehow optimize so you dont have to draw the same line twice
            // drawLine(pointA, pointB
}
setInterval is a cool function that runs a specified function every n miliseconds.
*still not sure what the correct vocab is for these functions you pass into stuff. In minecraft modding you do something similar passing a lambda into an event listener, but I have no idea if thats correct for javascript.
// for 144fps each frame should take (1s/144) = 6.94444444ms
setInterval(renderFrame, 6.94);
To help with debugging I often switched between commenting out setInterval and a call to renderFrame on its own.
This helped alot because some issues were lots easier to diagnose while the points were moving, and others were lots easier to diagnose while everything was static.
//renderFrame();
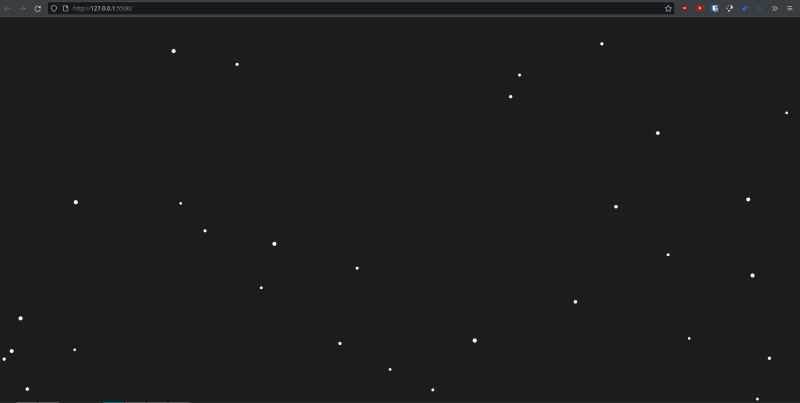
Throwing some dots down.
I threw a standard iterator into the render method, calling drawPoint inside.
I save point into a variable because we are going to be doing some math to it later and will need it.
function renderFrame() {
    // clear canvas for next frame
    ctx.clearRect(0, 0, canvas.width, height);

    for (let i = 0; i < numpoints; i++) {
        point = points[i];

        // draw point at new position
        drawPoint(point);
    }
}
*I modified the methods to accept points instead of raw (x,y) and (x1,y1,x2,y2). Not showing that, pretty simple.
and with that, we finally have something begining to resemble the PointCloud we are after
Connecting the dots.
With another iterator within the first, we can easily draw lines between all the points.
While adding this would work, we would end up drawing each line twice, leading to unnecessary lag and calculations
for (let c = 0; c < numpoints; c++) {
    drawLine(point, points[c]);
}
After thinking through it for awhile, I found a super simpile way to optimize this involving replacing let c = 0; with let c = i+1
Its super difficult to explain why this works, but it does, trust me.
Heres the code after adding this if you are following along.
function renderFrame() {
    // clear canvas for next frame
    ctx.clearRect(0, 0, canvas.width, height);

    for (let i = 0; i < numpoints; i++) {
        point = points[i];

        // draw point
        drawPoint(point);

        // draw lines between all points
        for (let c = i+1; c < numpoints; c++) {
            drawLine(point, points[c]);
        }
    }
}
Taking a look at what this gives us...
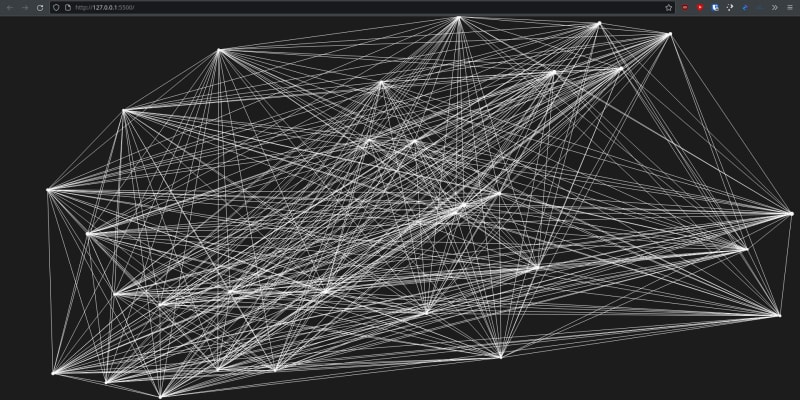
absolute garbage, We gotta fix that.
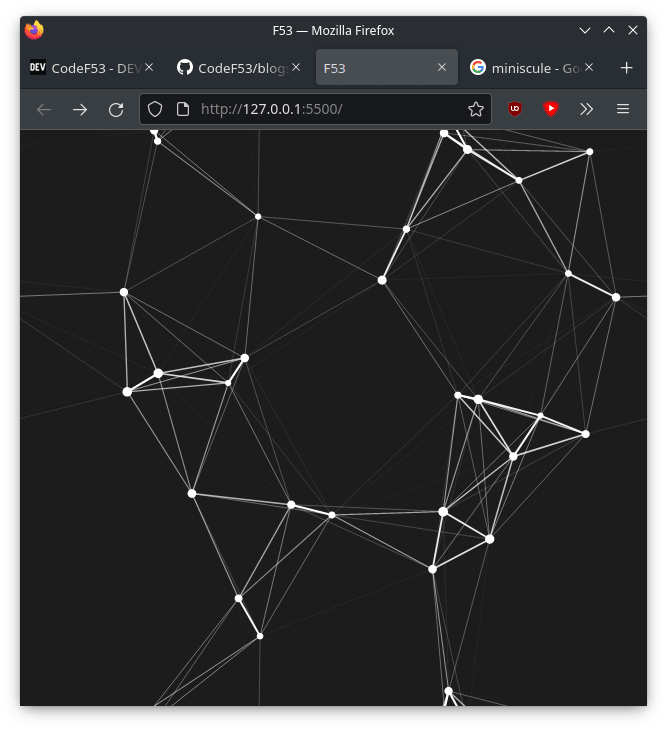
Line Aesthetics
NOTE: If you want more detail on this segment, here is a very detailed explaination on how I planned this out, including a dive into the very complex lines. I cut it out because it felt a bit too in the weeds.
Here is a well commented summary of how I fixed it.
// distance is a usefull number because all our logic centers around it.
distance = dist(point0, point1);

// normalize our distance to a number between 0 and 1.25
transparency = ((1-(distance / screenMaxLength))-0.75)*5;
if (transparency > 0) {
    // lines get thicker the closer they are.
    ctx.lineWidth = transparency*2;

    // but make sure transparency never goes above 100%
    if (transparency>=1){
        transparency=1;
    }
    // convert transparency from 0-1 to 0-255 in hexadecimal,
    // inorder to use it in a hex color code for our line
    ctx.strokeStyle = `#FFFFFF${(parseInt(transparency*255)).toString(16)}`;

    // draw the line.
    ctx.beginPath();
    ctx.moveTo(point0.x, point0.y);
    ctx.lineTo(point1.x, point1.y);
    ctx.stroke();
}
With that we have a very nice looking pointcloud.

Animation
Our pointcloud still doesnt move, lets fix that.
We already have our velocities baked into our points, so all we need to do is apply them.
The proper way to do this would be the following:
function renderFrame() {
    // clear canvas for next frame
    ctx.clearRect(0, 0, canvas.width, height);

    // move the points
    for (let i = 0; i < numpoints; i++) {
        // ... move code
    }

    // render the circles and lines
    for (let i = 0; i < numpoints; i++) {
        // ... render code
    }
}
Optimization
While that works fine, we want to minimize the amount of time it takes to calculate these frames so it doesnt hog your computer resources.
So, while technically wrong, this is a more optimized approach.
*its ok to take this shortcut because our points have such small velocities that the difference between a point that has and hasnt been updated is so miniscule that it doesnt really effect how a line to it would be rendered.
function renderFrame() {
    // clear canvas for next frame
    ctx.clearRect(0, 0, canvas.width, height);

    // move the points and render the circles and lines
    for (let i = 0; i < numpoints; i++) {
        // ... move code
        // ... render code
    }
}
Actual implementation
Now that that is settled, lets implement point moving.
for a single point, its as simple as the following
point.x = point.x + point.xV
point.y = point.y + point.yV
With this implementation, our points will all eventually drift off screen.
To fix that, we will make it so when a point goes past one of the edges of the screen, it will "wrap" around to the other side.
This is SUPER simple with the modulus operator
* I am not explaining how the modulus operator works.
point.x = mod((point.x + point.xV), width);
point.y = mod((point.y + point.yV), height);
Here is that implemented into our render code.
function renderFrame() {
    // clear canvas for next frame
    ctx.clearRect(0, 0, canvas.width, height);

    for (let i = 0; i < numpoints; i++) {
        // apply velocity 1 step and save new position
        point = points[i];
        point.x = mod((point.x + point.xV), width);
        point.y = mod((point.y + point.yV), height);
        points[i] = point;

        // draw point
        drawPoint(point);

        // draw lines between all points
        for (let c = i+1; c < numpoints; c++) {
            drawLine(point, points[c]);
        }
    }
}
This gives us a nice looking animated pointcloud. \
(Your going to have to just trust me on this because I dont have a way of recording this at the moment)
Wrapping
Sure it looks nice, but something feels wrong. When a point touches the edge, it wraps to the other edge, as we want and expect. Problem is, when that point wraps, all the lines connecting to it suddenly disapear!
This sudden change heavily conflicts with the otherwise neat, smooth nature of our pointcloud.
So how do we fix this?
We could make the lines wrap as well, so points connect to points on the "other side" of the wrap "wall"
How would you go about implementing that?
The answer to this question is one that took me hours of work to figure out because I kept overthinking it. The solution turned out to be quite simple.
I have no idea how to explain this properly without having another sub-article on it like I did with Line Aesthetics, so I am going to try and keep this short.
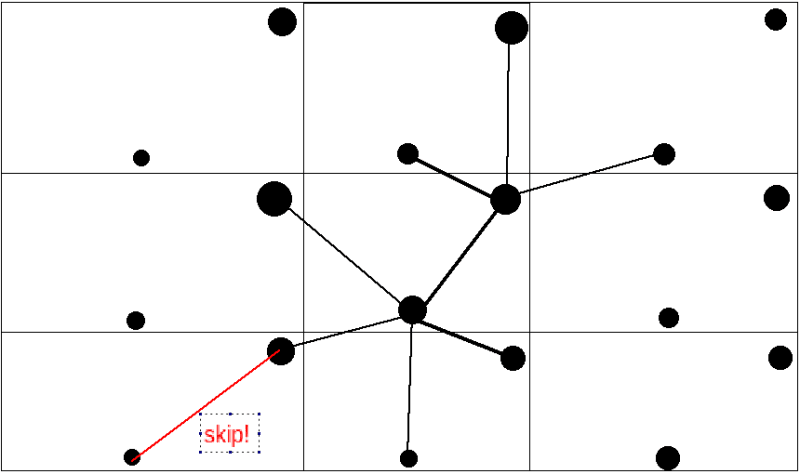
(I dont have any proper drawing software yet, so please excuse the quality of the following screenshots)
This is your screen. we have 2 points on it, one on the upper right, and another in the bottom middle
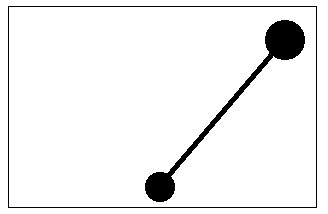
Now imgine if that screen was surrounded by 8 other screens, forming a 3x3 grid. These have points in the same relative postition.

the centermost "sector" is what you actually see
To acheive the effect we want, we can just run our line method for all of these points as well.
We dont care about the connections inside of these outer sections though, so we can skip the connections between points that are out of the screen
Implementation of 3x3 grid.
To handle one of these "sectors", we can simpily do a drawline call from our current point, to a second point with an offset to change its position
// we cant do the c = i+1 optimization for offset sectors because
// repeats are required for guaranteeing connections are calculated.
for (let c = 0; c < numpoints; c++) {
    // top leftmost "sector"
    drawLine(point,
        { // create a new point at this offset sector
            x:-(width-points[c].x), // hard to explain these, but it works out
            y: -(height-points[c].y)
        }
    )
}
then we just do that for all of the sectors
// draw lines between all points
for (let c = 0; c < numpoints; c++) {
    // left 3 "sectors"
    drawLine(point, {x:-(width-points[c].x), y: -(height-points[c].y)})
    drawLine(point, {x:-(width-points[c].x), y: points[c].y})
    drawLine(point, {x:-(width-points[c].x), y: height+points[c].y})

    // middle 3 "sectors"
    drawLine(point, {x:points[c].x, y: -(height-points[c].y)})
    // we add back in our c=i+1 optimization here with the extra if statement
    if (c > i) { drawLine(point, points[c]); } // uses original code from before
    drawLine(point, {x:points[c].x, y: height+points[c].y})

    // right 3 "sectors"
    drawLine(point, {x:width+points[c].x, y: -(height-points[c].y)})
    drawLine(point, {x:width+points[c].x, y: points[c].y});
    drawLine(point, {x:width+points[c].x, y: height+points[c].y})
}
Conclusion
With that everything is done!
To view the whole source take a look at the code for my personal site
To see what it looks like in action, take a look at the github pages of my personal site

Top comments (1)