
Register a Domain - Static Website Hosting Part 2
This is part 2 of Static Website Hosting for beginners. In the first section we setup a basic website with a AWS generated url. In this section we will replace that URL with our own domain.
Checkout Part 1 if you haven't done so.


To host your static site on AWS, the first thing you need to do is register a domain for it. This can be done in multiple different ways. "Registering" a domain basically means claiming ownership of it for a specified period of time.
The bucket names we use must match the names of the website that we are going to be hosting. For example, to host your example.com website on Amazon S3, you would create a bucket named example.com. To host a website under www.example.com, you would name the bucket www.example.com.
- In the AWS console, dropdown the 'services' table and navigate to route 53

If you don't already have a domain name you can purchase one directly from here
Type in a domain name of your choice and choose a TLD (top-level-domain) e.g .com
Check to view availability of the domain
Different TLD's have different costs associated with them e.g .com vs .ninja

Once you've found an available domain that you like, add it to your Route 53 cart and click "Continue"
Follow the next few steps and complete your purchase of the domain.

- It should now be listed in your route 53 console list
Alternative: Importing from a third party domain-provider
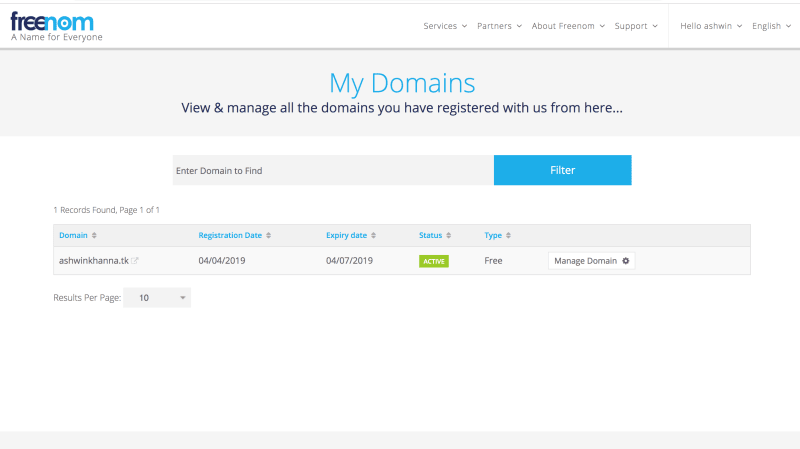
If you were like me and got a domain from freenom.com or any other third party domain-provider, do the following:
Go to Route 53 and select "create a new hosted zone"
In the form field, enter the domain name you own e.g "yourDomain.com"
Leave the "Type" as public and create
- Open up your new hosted zone and copy your Name server values

- Paste your name server values within the domain providers custom name server settings so that the DNS resolution can be passed in AWS hosted zone

Create a Wildcard Certificate
We now need to setup a SSL certificate so that our domain is secure and verified
- In the AWS console search for "ACM", stands for: AWS Certificate Manager. This is where all your SSL certificates are going to be maintained.
- Click "Request a Certificate"
- On the subsequent page select "Request a Public Certificate"

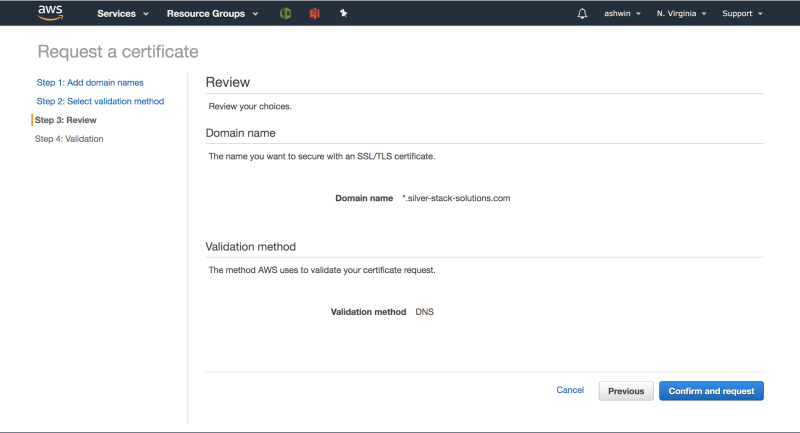
In the domain name text field, we are going to enter a wildcard domain. Enter your newly purchased domain name but add
*.
at the front e.g *.silver-stack-solutions.comWildcards handle subdomains for you. This means that
www.
will be handled as part of the wildcard for our domainTip: Using the "add another domain" button, you can add protect multiple domain addresses to a single ACM. Wildcards only protect your domain name and any prefix placed before it. They don'y actually protect the naked domain e.g silver-stack-solutions.com is not protected but www.silver-stack-solutions.com is. We will get more in to this concept later on in the tutorial series, specifically when we handle redirects.

- Click "Next"
- You will now be on a page showing two options. Checkmark the "DNS validation"

- Carry on and click "Review"
- On the last set-up page click "Confirm and Request" after skimming over your details

- You should now have your wildcard domain listed in your ACM console that is pending validation
Verify Ownership of Domain Certificate
From your ACM console select your certificate and expand it by clicking on the dropdown arrow
-
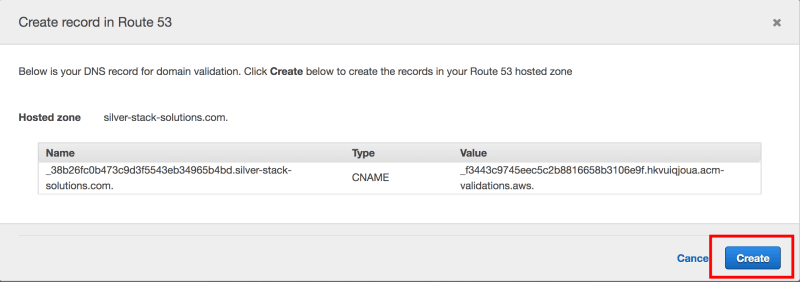
You should see a big blue button saying "Create Record in Route 53", click it
- Each record contains information about how you want to route traffic for one domain (such as example.com) or subdomain (such as www.example.com or test.example.com). Records are stored in the hosted zone for your domain.

A modal will open showing you details of your DNS record for domain validation
Simply click "Create"
Wait patiently as this may take a little while
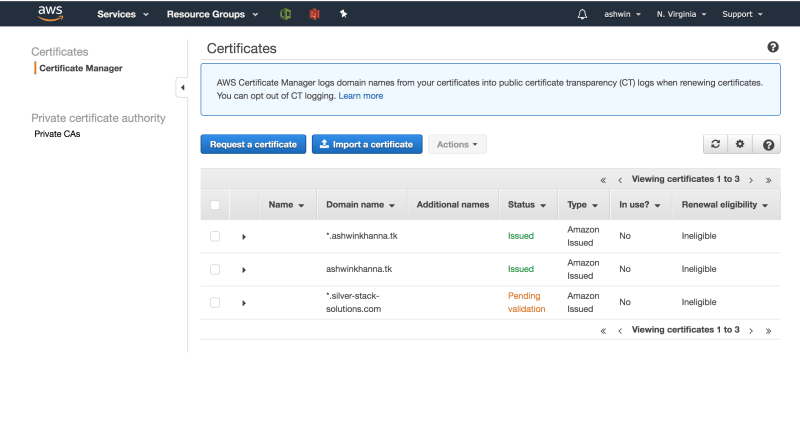
By the end of it, you should have an issued ACM for your domain. It should be listed in your ACM console as status: "issued"
Repeat the process a second time and issue a second ACM except this time, don't make it a wildcard, just use the bare naked domain i.e yourDomain.com (or if you have already don so by adding another domain to your existing certificate, skip this step)
- Having the wildcard ACM certificate is essential for our next step in CloudFront distribution
Create a CloudFront Distribution
This will do two things: make your website load fast anywhere in the world and allow you to use HTTPS, the secure version of HTTP. Just like S3 is organised into "buckets", CloudFront is organised into "distributions". You need to create a distribution for your website and point it at your S3 bucket, so that it can use the contents of your S3 bucket.
- Navigate to CloudFront

- Click on the "Create Distribution" button to get started, and select that you want a Web distribution, instead of RTMP.

You should now see a long form with multiple configuration options.
Select the dropdown for "Origin Domain Name".
You should see your S3 buckets listed. Do NOT select any of these
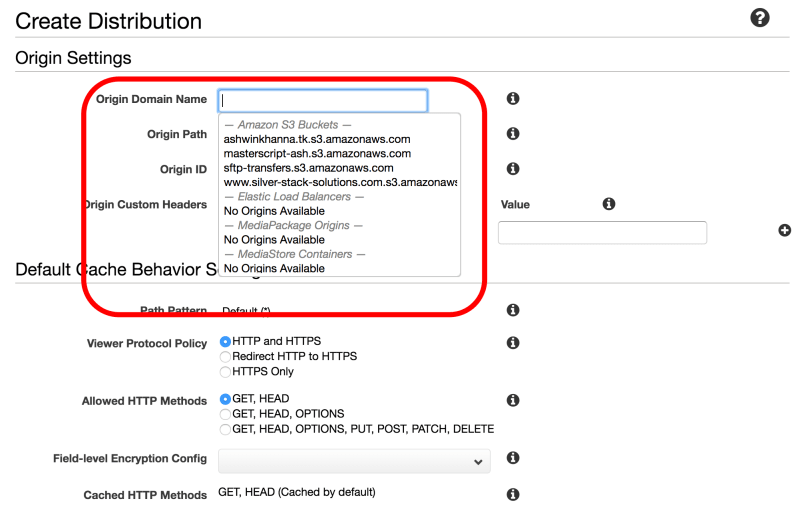
- Instead you will need to copy the endpoint of your S3 bucket, located in the S3 properties tab under static web hosting

Find the endpoint URL in the "Static Website Hosting" section of the properties and paste that into the "Origin Default Name" field. Remove the "http://" from the front of the endpoint. The origin ID text field will auto generate your S3 bucket name in the text field.
In the "Viewer protocol policy" options, checkmark the "Redirect HTTP to HTTPS"

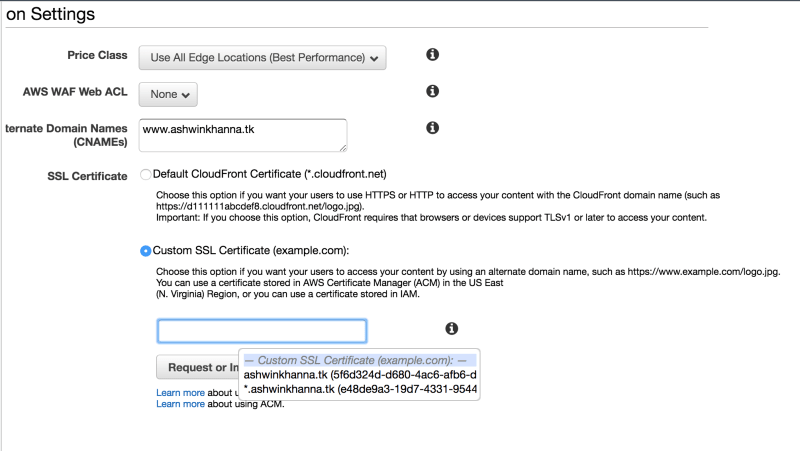
The next field we need to fill out is "Alternate Domain Names (CNAMEs)"
Enter your domain name into the CNAME field, for example, "www.ashwinkhanna.tk"
This should match your bucket name
Below the CNAME we need to link it with the appropriate ACM certificate, checkmark the "Custom SSL certificate" option
A dropdown with all your ACM certificates will be listed, choose the appropriate certificate. If your CNAME has www. then you should select the wildcard ACM we generated in the last section.
In the dropdown text field, select your newly created public wildcard certificate
Scroll further down the form and find the "Default Root Object" field and enter "index.html"
Click "Create Distribution"

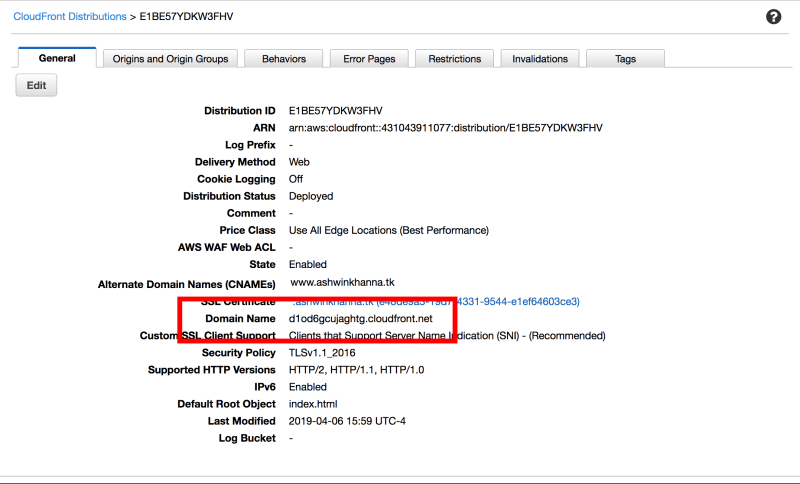
- Go back to your CloudFront console. You should now see the distribution status in progress. The deployment can take anywhere from 5 to 20 mins, just be patient.
- Once the progress is completed, the distribution status should be "enabled

Point Domain to CloudFront
- Navigate back to Route 53 and select hosted zone
- We need to add a new record set to point to CloudFront
- Click on "Create Record Set"

In the "Name" text field set our domain with prefix www
In the "Type" dropdown field select "A-iPv4 address"
-
There's an "Alias" field below with two options
- Select "Yes"
- This will cause the "Alias Target" field to appear
-
Over here we need to paste in the cloudfront domain name, it will end with a .net
- To find the cloudfront domain name, go to the CloudFront console and click into your newly listed distribution, you should be taken to the details page. Copy your domain name field from here and paste it into the"Alias target"
- "Create" the new record

This may take a little while to create because DNS uses a technique called caching to avoid overloading the system
Enter in your domain into your web browser
It should open up your website with "https://" at the start of the URL

- Notice that the URL is now our domain and not the old one generated for us by AWS
Conclusion
I hope this tutorial was helpful to readers and expanded on the content of my first tutorial. In future I plan to also add tutorials on file transfer protocols to upload files to S3 using the AWS cli and Cloudfront cache invalidation.

Top comments (1)
Amazing!! Thanks for great tutorial.