
In the previous blog, we set up a basic React development environment using Parcel. Parcel enables us to write modern Javascript and JSX without having to set up a transpiler like Babel manually, and it also provides a development server with hot reloading and hot module replacement if we only change the CSS. This drastically improves the development experience.
We will build on top of the setup we had previously configured and add linter and code formatter.
Code formatting with Prettier
Code formatting is essential for teams that want to maintain a codebase with a consistent style. These code style choices might include whether or not to use the semicolon (given that it is optional in Javascript), single quote vs double quote for strings etc. Most of these decisions have little influence on the logic of the code and are based on stylistic preference and thus can be pretty subjective. It's not difficult to imagine how tedious it is to manually add a semicolon to each statement's end. Fortunately, we have code formatting tools like Prettier, which enable us to configure our preference in the JSON file, and it will do the heavy lifting to format the code for us.
Let's install Prettier as a dev dependency
npm i -D prettier
Create a Prettier config file that allows us to specify our stylistic preferences.
.prettierrc
{
  "semi": false,
  "singleQuote": true
}
Here I configure Prettier to format our code to use a single quote instead of the double quote and omit the semicolon. Prettiter offers a lot of options.
To run Prettier against all our Javascript and JSX files, let's set up an npm script.
  "scripts": {
    "start": "parcel",
    "build": "parcel build",
    "format": "prettier --write \"src/**/*.{js, jsx}\""
  },
Here we find all files recursively in with the src ending with either js or jsx. You can refer to here for more about pattern matching.
Linting with ESLint
Now we have configured our formatter, it's time to set up a linter.
In contrast to a formatter, which takes care of stylistic problems, a linter takes care of code quality. It ensures our code follows certain best practices, for example, not having unused variables floating around, using let or const rather than var for variable declarations ...etc.
Install ESlint as a dev dependency.
npm i -D eslint
First, create an ESLint config file .eslintrc.json with an empty object.
{}
To see how ESlint can help, let's create a Javascript file with a bunch of bad code.
src/badcode.js
var a = 'asdf'
var b = 'qwer'
const c = '123'

if (1) {
  console.log('Hello')
}

function f() {
  b = 123
}

f()
To run ESLint against our bad code, let's run npx eslint src/badcode.js
The result is nothing. No warning or error message.

Even though we have ESlint installed, we have not told ESlint what linting rules we want to use.
By default, no rules apply.
Let's configure ESLint to check for unused variables.
{
  "rules": {
    "no-unused-vars": "error"
  }
}

Now ESLint is shouting at us that our code violates the no-unsed-vars we defined in the config file.
The number of rules can be overwhelming and impractical to configure it one by one. Fortunately, there are many pre-existing configurations presets for us to use directly, eslint:recommended is one of them and provides a good starting point.
To use eslint:recommended, we specify it using the extends key.
https://eslint.org/docs/developer-guide/shareable-configs
.eslintrc.json
{
  "extends": "eslint:recommended"
}
Let execute ESlint to check our src/badcode.js again.
Notice that despite the errors for unused variables, it also reports other errors. Extending eslint:recommended automatically enables a bunch of rules.
Side note:
If you are using VSCode, I recommend installing ESLint extension. Once you enable the extension, there will be a red squiggly line underneath the parts that violates the rules.

Tip:
If you prefer not to be distracted by the pop-up menu when you hover, you can disable the default setting by opening the setting.json file.

{
    ...
    "editor.hover.enabled": false,
}
And map your key preferred key binding to trigger the pop-up.

keybindings.json
    {
        "key": "shift+k", // Your preferred key binding.
        "command": "editor.action.showHover",
        "when": "editorTextFocus"
    },
Specifying environment and parserOptions
One thing that might surprise you is that ESLint complains about console not existing.
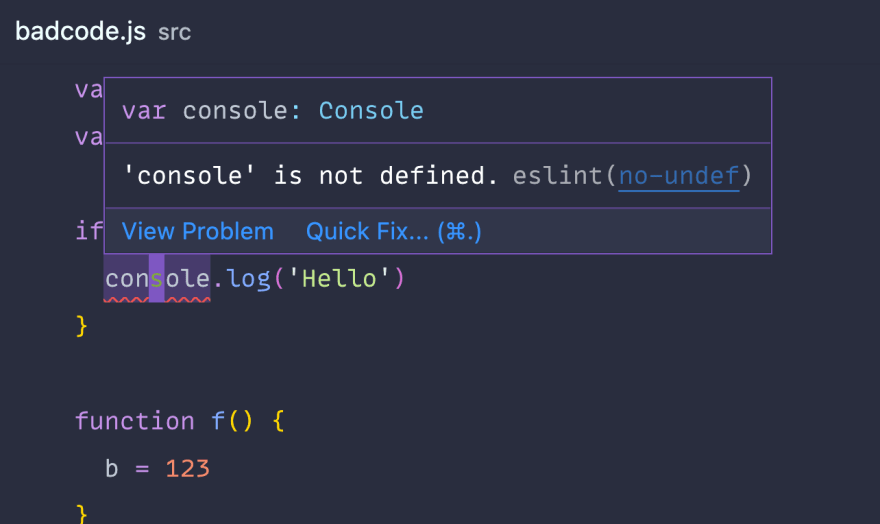
ESLint does not have any assumption on the environment your code is running in and thus does not know what global variables shall be available.
Since our code will be running in the browser, let's tell ESLint.
{
  "extends": "eslint:recommended",
  "env": {
    "browser": true
  }
}
Now the error is gone.

https://eslint.org/docs/user-guide/configuring/language-options#specifying-environments
Now suppose are want to use syntax in modern JS like const and let.
The editor shows Parsing error.
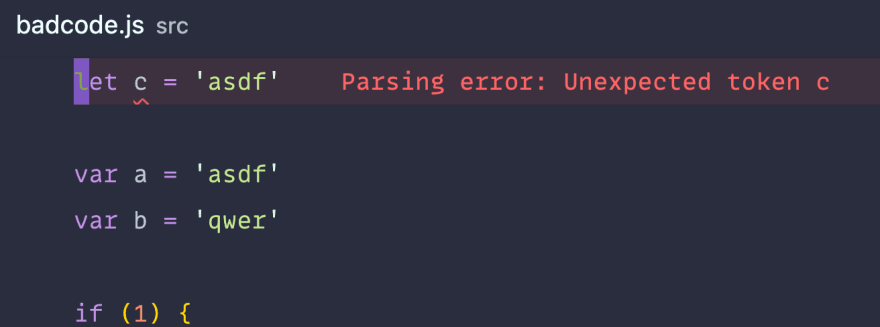
And instead of giving as linting error it actually break.

This is because ESLint cannot parse our code. By default, ESLint expect ES5 syntax. And let and const are part of the ES6 syntax.
https://eslint.org/docs/user-guide/configuring/language-options#specifying-parser-options
To fix that, we have to tell ESLint the version of Javascript we want it to support by setting the parserOption.
.eslintrc.json
{
  "extends": "eslint:recommended",
  "parserOptions": {
    "ecmaVersion": 2022
  },
  "env": {
    "browser": true
  }
}
Now ESLint should be working as expected.

Let's also configure ESLint to support global variables in ES6; these include things like Promise.
.eslintrc.json
{
  "extends": "eslint:recommended",
  "parserOptions": {
    "ecmaVersion": 2022
  },
  "env": {
    "browser": true,
    "es6": true
  }
}
Like what we did for Prettier, let's add an NPM script for linting our code.
  "scripts": {
    "start": "parcel",
    "build": "parcel build",
    "format": "prettier --write \"src/**/*.{js,jsx}\"",
    "lint": "eslint --fix \"src/**/*.{js,jsx}\""
  },
Now we have a basic setup for our code formatter and linter.
In the next part of the series, I will dive into React specific linter setup and git hook for running Prettier and ESLint automatically before each commit.
Until next time, bye.
References
https://parceljs.org/features/development/
https://dev.to/myogeshchavan97/how-to-configure-eslint-for-your-project-from-scratch-4kg
https://btholt.github.io/complete-intro-to-react-v7/lessons/js-tools/prettier
https://prettier.io/docs/en/comparison.html

Top comments (0)