Understanding the inner workings of Flutter is crucial to crafting bug-free and performant apps. While working on performance optimisation of ente's mobile app, I encountered some intriguing behaviour, prompting me to write this blog. This blog isn’t focused on how to make performant apps but understanding the concepts written here will indirectly help with it. In this blog post, I’ll primarily delve into,
- How Elements and RenderObjects are reused in Flutter.
- An overview of the three trees in Flutter.
- An example that illustrates a state management issue which can be easily debugged from the insights of the first two.
Links to resources that might help you understand this blog better if you find it difficult is at the end.
The Example
Let’s create a StatefulWidget for a container which accepts a parameter name and has a colour which is randomly generated. The colour will be stored in its state.
class CustomContainer extends StatefulWidget {
  final String name;
  const CustomContainer(this.name, {super.key});

  @override
  State<CustomContainer> createState() => _CustomContainerState();
}

class _CustomContainerState extends State<CustomContainer> {
  final color = getRandomColor();

  @override
  Widget build(BuildContext context) {
    return Container(
      height: 100,
      width: 150,
      color: color,
      child: Center(
          child: Text(
        widget.name,
        style: const TextStyle(
          color: Colors.black,
          fontSize: 24,
        ),
      )),
    );
  }
}

Color getRandomColor() {
  final Random random = Random();
  return Color.fromRGBO(
    random.nextInt(255),
    random.nextInt(255),
    random.nextInt(255),
    1,
  );
}
Now create another StatefulWidget which has a list of three CustomContainers and one extra CustomContainer in its state and use this list as children for a Column.
class MyHomePage extends StatefulWidget {
  const MyHomePage({super.key});

  @override
  State<MyHomePage> createState() => _MyHomePageState();
}

class _MyHomePageState extends State<MyHomePage> {
  final List<Widget> containers = [
    const CustomContainer("1"),
    const CustomContainer("2"),
    const CustomContainer("3"),
  ];

  Widget extraContainer = const CustomContainer("Extra");

  @override
  Widget build(BuildContext context) {
    return Scaffold(
      body: Center(
          child: Column(
        mainAxisSize: MainAxisSize.min,
        children: containers,
      )),
    );
  }
}
Now let’s add a toggle button to insert and remove the extraContainer at index 0 from the list.
Widget build(BuildContext context) {
    return Scaffold(
      body: Center(
          child: Column(
        mainAxisSize: MainAxisSize.min,
        children: containers,
      )),
      floatingActionButton: FloatingActionButton(
        onPressed: () {
          setState(() {
            if (containers.length == 3) {
              containers.insert(0, extraContainer);
            } else if (containers.length == 4) {
              containers.removeAt(0);
            }
          });
        },
        child: const Icon(
          Icons.change_circle_outlined,
          size: 42,
        ),
      ),
    );
  }
Now here is when the weird stuff happens
We expect the extraContainer to have a different colour and get inserted on the top of the Column. The name of each Container changes as expected. But the colours are acting weird.
How and why this happens
In Flutter, there are three trees that you should know of. The Widget tree, Element tree and RenderObject tree. Each Widget in Flutter has a corresponding Element and a RenderObject. A more accurate way to say it would be - each Element has a corresponding Widget and a RenderObject.
An Element keeps references to both of them. So we’ll keep the Element in the middle.

The State object is held by the Element. A StatefulWidget will have a Stateful Element and a StatelessWidget will have a Stateless Element. In this example, we have a StatefulWidget, CustomContainer which has state, its colour.
Flutter recycles the Elements and RenderObjects to keep Flutter performant. The Widgets are rebuilt or created quite often, and are less expensive. RenderObjects are re-created along with Elements and are expensive to create.
How Flutter reuses Elements and RenderObjects
When a frame is getting built, Flutter goes through nodes in the Element tree and sees if the Elements can be reused. How Flutter does this:
- An Element has a reference to its corresponding Widget. The Element checks if the new Widget from the new frame and it’s previously referenced Widget’s type and key are the same.
- If yes, the Element is reused and reference is updated to the new Widget.
- If not, a new Element and RenderObject are created.
For Example, if you replace a Container widget in a node in the Widget tree with a SizedBox widget, the Element corresponding to that node in the Widget tree will be disposed and a new one will be created. The same will happen if you give it a different key. All the Elements down the Element tree from that node will also be re-created - this can be very bad for performance if the node is up a big tree.
The image below shows how the Elements and RenderObjects change for a Widget on the next frame, depending on the Widget’s type and key on the next frame.

Now let’s try to understand what’s happening in the main example. Let’s not think about the name of the Containers for now. Let’s focus on what’s going on with the colours.
When the list is built, each child Widget will have a corresponding Stateful Element which holds the state (colour) of the Containers.
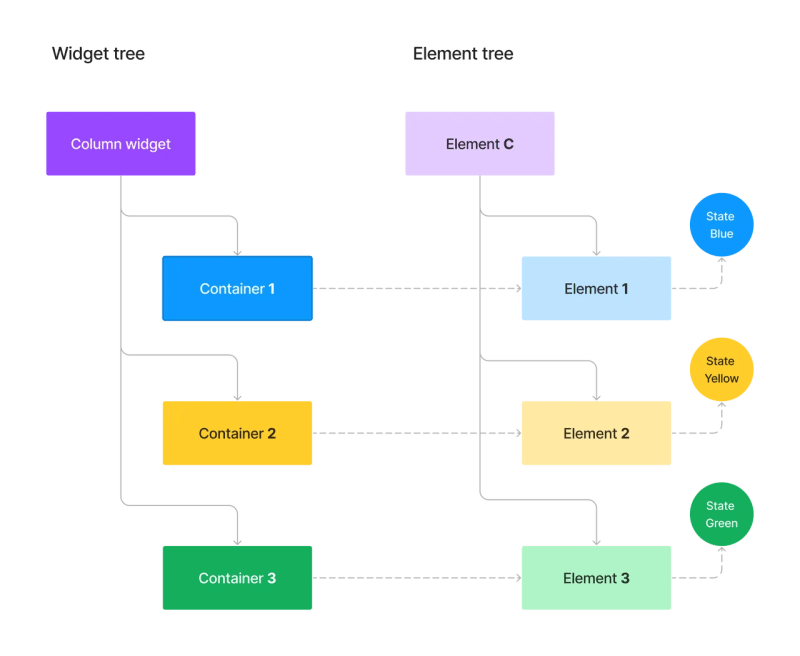
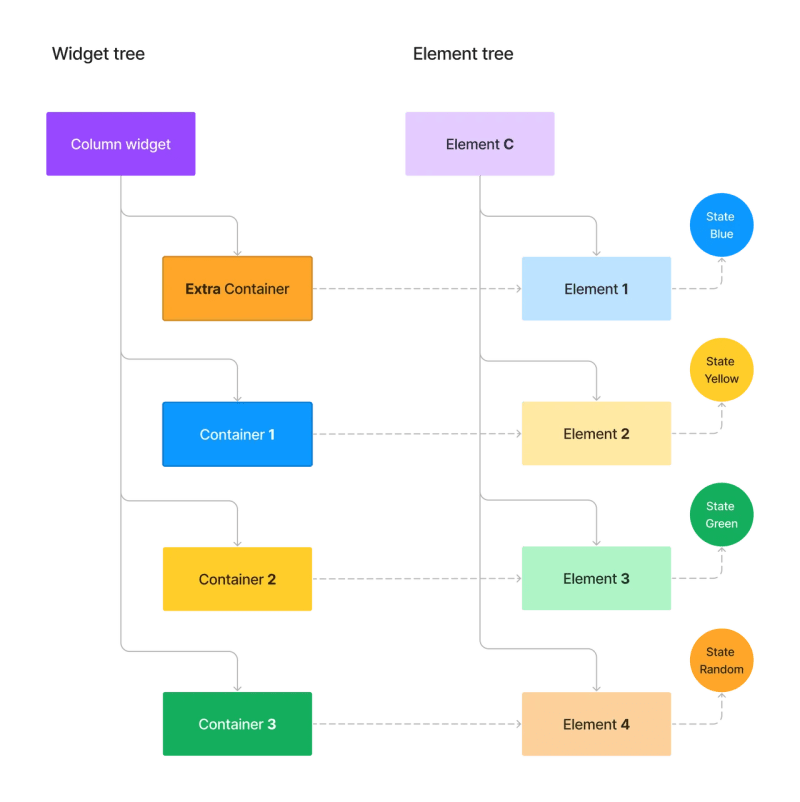
Now, when we add the extraContainer there are 4 children, 4 Widgets and 4 Elements. When this frame is being built, Flutter on every child Element here will do this check - Is the Widget corresponding to the Element matching based on type of Widget and key? If yes, reuse. If not create new Element.
The colours of Widgets in the Widget tree above are the expected colours. The colour each actually takes will be the colour from the state objects of their corresponding Elements.
For the first three children, Widgets get matching Elements, which are same Elements used when the list had 3 children. These Elements have state objects which were initially created when the list had 3 children. The same state objects are being reused since the Elements are reused. This is why the colours at indexes 0, 1 and 2 remain the same because the colours are from the state objects which are held by the reused Elements.
Now when Flutter builds the 4th child, there are no Elements that can be reused for this Widget as there are only three Elements and all have been taken. For the 4th Widget, a new Element is created with a new state object with a new random colour.
Now when the extraContainer is removed from index 0, the same repeats for the first three children. There is no 4th Widget now, so the 4th Element is disposed because if an Element cannot be reused in the very next frame, it is disposed. So the next time the extraContainer is added back, it has to create a new Element with new state and new random colour. This is why the 4th child has a different colour every time.
Since that is clear now, why are the container names changing as expected? This is because it is passed as a parameter to the Widget and it’s not stored in CustomContainer’s state object.
The RenderObject is responsible for layout and painting on the screen. If the Element is reused, the associated RenderObject often remains attached to that Element and thus is reused as well. When properties of children change here, the RenderObject is just updated by its Element by using its updated Widget’s properties, instead of creating a new one. The RenderObject will be disposed and a new one gets created for the 4th child on toggling since the 4th Element is not reused.
Using keys to preserve state
When Flutter builds frames, it checks each Element and its corresponding Widget to decide If the Element can be reused. In case of lists, Flutter checks for matching widget types and keys within the children. If index 1 doesn’t have the same key for the Widget and Element, Flutter deactivates its Element from the Element tree. Same is repeated for other children with no matches too. Then Flutter looks for matching widget type and keys within the children, reorder the deactivated Elements and activate them in the Element tree with matching Widgets.
Till now in the example, the problem was that all the Containers have the same widget type (CustomContainer). Flutter doesn’t reorder the Elements here because, it finds matching Elements and Widgets in each level based on just widget type.
Now let’s add keys.
final List<Widget> containers = [
    const CustomContainer(
      "1",
      key: ValueKey(1),
    ),
    const CustomContainer(
      "2",
      key: ValueKey(2),
    ),
    const CustomContainer(
      "3",
      key: ValueKey(3),
    ),
  ];

  Widget extraContainer = const CustomContainer("Extra");
This is what happens in both trees when the extraContainer is added:

Now all the Elements will get reordered based on keys and each container shows the expected state.
Conclusion
Alright, so we've taken quite the deep dive into Flutter's inner workings today. By understanding Elements, RenderObjects, and the magic of Keys, we get a clearer picture of what's going on behind the scenes when our Flutter app runs. It's a lot to take in, I know, but having this knowledge up our sleeves can be super helpful in tackling those tricky bugs and performance hiccups.
For those who are hungry for more, there's always so much more to learn with Flutter. Maybe next time we can dive into another fun Flutter topic. Feel free to reach out to me at ashil@ente.io. Until then, happy coding!

Top comments (0)