
Introduction
There is one functionality JavaScript has, which is the DOM. the Dom is a vital aspect of JavaScript programming that shouldn’t be neglected. As far as I’m concerned you can’t achieve much in JavaScript without knowing what the DOM is all about. JavaScript is widely growing and becoming versatile the use of the DOM becomes more Essential and strongly needed.
in this tutorial, I'm going to walk you through the things you should know about the DOM. I promise you that if you stick with me until the end and practice all that I write about, the whole DOM thing won't be an issue for you ever again.
Without wasting much of your time, let’s jump straight in.
DOM Definition and Fundamental Principles
The DOM is an acronym which stands for Document Object Model. The Document Object Model (DOM) is a programming interface for HTML and XML documents. It represents the structure of a document as a tree of objects, with each object representing a part of the document, such as an element, attribute, or text node.
JavaScript can be used to interact with the DOM, allowing developers to create dynamic web pages that can update and respond to user input. The JavaScript DOM allows you to manipulate and access the elements, attributes, and content of an HTML or XML document, changing the structure, layout, and content of a web page without reloading it.
the image below explains what the DOM trees look like.
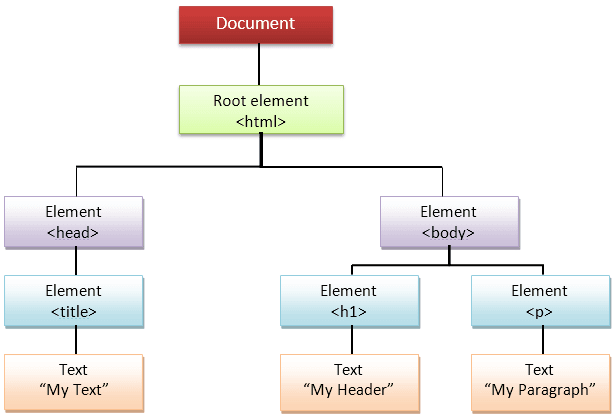
The document object is shown here. This serves as the DOM's foundation and core. You must first gain access to the document object in order to carry out any kind of DOM modification.
The HTML root element, a subclass of the document object, comes next.
The bodyand headelements, which are cousins and offspring of the HTML element, are listed next.
You may probably agree that the title element, which is located underneath the head element, is the parent of the text node “my text” and a child of the head element.
Two components (a tag and an h1 tag) that are siblings and offspring of the body element are located immediately underneath the body element.
Last but not least, the tag's descendants include the href property and the text node “my link.” The text node “My header” belongs to the h1 element in the same exact way.
If you're just getting started, this could seem a little difficult, but it always gets easier (with the practice of course).
How to Select Elements in the DOM
You must choose that specific element in the DOM before you can make changes to it. We have four main approaches to choosing components, which is fortunate for us.
How to Use the getElementById Method to Choose DOM Elements
Using the element's id is the most used method of accessing an HTML element.
The getElementById() function in the example below utilized the parameter id="master" to locate the element.
<p id="controller">i'm a javascript lover</p>

 <script>
const controllerEl = document.getElementById('controller')
console.log(controllerEl) //<p id="controller">i'm a javascript lover</p>
 </script>
The ID takes the case into account. For instance, the ids "master" and "Master" are completely different.
After choosing an element, you may modify its properties, apply styles to the element, and navigate to its parent and child elements.

Choosing Elements within the DOM using the getElementsByClassName() Technique.
This function returns a collection of all the document components that belong to the given class.
Our HTML page below, for instance, has three components with the class="master2" attribute, and I chose the button with the id of btn.
When you click the button, all the elements with the class name master2 are selected, and the innerHTML of the third element is changed.
 <p class="master2">i'm a javascript lover</p>
      <p class="master2">i love react too well</p>
      <h1 class="master2">i want a remote job</h1>

        <button id="btn">click me</button>

 <script>

 const btn = document.getElementById('btn')

        btn.addEventListener('click', function master(){
            var master = document.getElementsByClassName("master2");
            master[2].innerHTML = 'i need a remote job';
        })

</script>
You see the following before the button is clicked:

Clicking the button results in the following:

Choosing DOM elements using the getElementsByTagName() method
This function takes a tag name as an input and returns every element of the given tag name in the order in which they occur in the document.
The following code retrieves all of the p elements on the page and modifies the content of the second element to demonstrate the syntax of the getElementsByTagName() function.
<p>GitHub</p>
<p>Firebase</p>
<p>HTML</p>
<button id="btn">click me</button>

  const btn = document.getElementById("btn");
btn.addEventListener("click", function master() {
  let master = document.getElementsByTagName("p");
  let masterEl = (master[1].innerHTML = "Code editors");
  console.log(masterEl); //Code editors
});
How to Use CSS Selectors to Choose DOM Elements
. querySelector()
This gives back the first value that matches the specified selection. By accepting all CSS style selectors, this approach enables selection by tag, class, or ID.
<div id=master>i am a frontend developer</div>

<script>
const master = document.querySelector("#master")
</script>
The first element that matches the CSS selector is returned by the method above, which only accepts one input, a selection.
.querySelectorAll()
Similar to the previous method, this one also provides a node list collection of all matched items.
     <p class="director">Coffee Script</p>
     <p class="director">Typescript</p>
     <p class="director">Next.js</p>

<script>
const director = document.querySelectorAll(".director")
console.log(director[1])  //<p class="master">Typescript</p>
</script>
Overview of How to Choose DOM Elements
There are four alternative approaches to doing a certain task (selecting an element or elements) when you need to select a DOM element.
So you use the second if you can't recall the first. And you still have alternatives 3 and 4 if you somehow forget both. Does JavaScript really make our life simpler, or is that just me?
Personally, I advise sticking with Option 1 or Option 4a (querySelector with an Id). When you first started learning HTML, you probably realized that elements shouldn't have the same id; an element's id is a unique identifier within a page.
In light of this, choosing an element based on its id is a "safe bet" as you can't apply the same "modification" to several items at once (unless perhaps that's what you want to do in which case feel free to utilize other possibilities).
Getting Around the Document
Hopefully, at this point, you've realized that every node in an HTML document is a node. Additionally, text nodes are what makeup HTML components' text.
With the HTML DOM, you may access nodes in the tree using the node relationships we discussed previously (parent, child(ren), sibling(s), etc.) and browse the node tree.
A little review
Except for the top node, each node has exactly one parent (which has no parent).
More than one kid can be born to a node.
Brothers and sisters are nodes that share the same parent.
This section will demonstrate how to obtain an element's parent element, siblings, and offspring. To accomplish these goals, I'll be using the following node properties:
parent
Node youngsters
firstElementChild last Nodes
next ElementChild
prior ElementSibling
ElementSibling
Furthermore, I'll simply utilize the HTML page below to demonstrate how to use each of these node features. I'll also demonstrate how to alter the DOM using the information from part 4 above.
This article's goal is to teach the reader how to alter the DOM. If you don't know how to control the DOM, it doesn't really matter if you can pick elements and navigate them. Understanding how to add CSS style, make and add elements, set innerHTML, and manage events is crucial.
Please stick with me because it is the article's main point. Let's go on.
 ```<div id="parent">
        <div id="firstchild">i am a first child</div>
        <p id="secondchild">i am the second child</p>
        <h4>i am alive</h4>
        <h1>hello world</h1>
        <p>i am the last child</p>
    </div>

    const parent = document.getElementById('parent').lastElementChild
    console.log(parent) //<p>i am the last child</p>

    const parent2 = document.getElementById('parent').children[3]
    console.log(parent2) //<h1>hello world</h1>

    const secondchild = document.getElementById('secondchild')
    console.log(secondchild) //<p id="secondchild">i am the second child</p>

    console.log(secondchild.parentNode) //<div id="parent">...</div>

    console.log(secondchild.nextElementSibling) //<h4>i am alive</h4>

    console.log(secondchild.previousElementSibling) //<div id="firstchild">i am a first child</div>
How to Manipulate Elements in the DOM
We will examine the following in this section:
- ways to make components
- How to modify an element's innerHTML/text content
- How to add a component
- Putting one element before another: How to do it
- Replace a child element with this
- Getting rid of a child element
<div id="parent">
            <div id="firstchild">i am a first child</div>
            <p id="secondchild">i am the second child</p>
            <h4>i am alive</h4>
            <h1>hello world</h1>
            <p>i am the last child</p>
        </div>
How to Create Elements
A parent element and five children elements are displayed in the code above. Let's imagine that we wish to use JavaScript to create another div tag. We would undoubtedly need to use the createElement() function to create a new element, like in:
 const createEl = document.createElement('div')
 console.log(createEl) //<div></div>
How to Set innerHTML
Despite the fact that we successfully built a div element, it does not yet have a text node. To add its text node, we'll utilize the .innerHTML() attribute.
const innerhtml = createEl.innerHTML = 'i am a frontend developer'
console.log(createEl) //<div>i am a frontend developer</div>
How to Add Styling with CSS
We learned how to build an element and add it to the designated parent element from the examples before.
Therefore, we must add a CSS class to an element in order for it to have a style. In this instance, JavaScript will be used.
I'll demonstrate more than just how to add a class. I'll also demonstrate how to delete a class and switch between classes.
Relax; it's not tough. Every step of the way, I'm here to help you.
How to Add a CSS Class
Currently, there is no style given to a standard HTML button with the id "master." Look at the picture below:

The CSS style for the button will be created as our first task.
In order for JavaScript to automatically apply the CSS style with the class of "button" when you click the button, I will next add an event listener to the button in our JavaScript.
<style>
body {
  background-color: blue;
  display: flex;
  margin: 30%;
  justify-content: center;
  align-items: center;
}
.button {
  background-color: blueviolet;
  width: 200px;
  border: none;
  font-size: 2rem;
  padding: 0.5rem;
  border-radius: 5px;
  cursor: pointer;
}
</style>

<button id="master">Click me</button>

<script>
const buttonEl = document.getElementById('master')
buttonEl.addEventListener('click', addFunction)
 function addFunction(){
     buttonEl.classList.add('button')
  }
  </script>
You'll see the following after clicking the button. Wonderful, huh?

How to Remove a Class
The CSS style will be eliminated using the same example as earlier, but this time we'll use JavaScript's classList.remove() function. Most likely, you already knew what would occur.
Yes, the button will return to its original condition.
const buttonEl = document.getElementById('master')
buttonEl.addEventListener('click', addFunction)

function addFunction(){
    buttonEl.classList.remove('button')
 }
How to Toggle a Class
Let's imagine you don't want the CSS style to be fully removed. Toggling between the stylized and unstyled button is what you need.
You may do it using the JavaScript function classList.toggle().
Most social media networks, including Twitter, commonly employ the classList.toggle() function. It gives you the option to always like and dislike posts using the same button.
JavaScript then determines if the button has the CSS class.
If the class is present and you click the button, it is RELEASED. When you click the button if the class is missing, it is added.
const buttonEl = document.getElementById('master')

buttonEl.addEventListener('click', addFunction)

function addFunction(){

    buttonEl.classList.toggle('button')

 }
Event handling
What are HTML events?
HTML events are "things" that happen to HTML components, such as a button being clicked, the text being entered into a text box, etc. You may write JavaScript code, which we refer to as an event handler, that will be performed when an event like the one mentioned above happens.
JavaScript functions are used as these event handlers. As a result, the handler function is called whenever an event happens on an element.
Event listeners
So far, we have used event listeners in pretty much all of the examples given. This ought to demonstrate the significance of event listeners in DOM manipulation.
We need a method called addEventListener in order to add an event listener to an element or any other DOM object (). This approach is preferred to the previous one, in which the event to be handled was included in the HTML markup.
This separates JavaScript from HTML markup, making the code simpler and easier to comprehend.
If you're like me and appreciate the notion of separate JS, separate CSS, and so on, you'll like this event listener.
A listener for events accepts three parameters.
- The first is the category of the event, such as "click" and so on.
- The function will be used as the second parameter.
- A boolean value indicating whether to employ event capturing or event bubbling is the third argument. This element is not required.
Conclusion
Wow! Finally, we have come to the end of this tutorial hope you’ve learned a lot from this tutorial. Knowing how to manipulate the DOM is an essential part of JavaScript that is necessary and you going through this tutorial will help you achieve it.
You might be able to create small JS applications if you comprehend the examples and pictures I provided above. The value of developing projects cannot be emphasized enough if you want to be a skilled developer.
Till next time Enjoy!
About The Author
Emmanuel Okolie is a full-stack laravel developer with 2+ years of experience in the software development industry.
He has grown full-blown skills in combining Software Development, Writing, and Teaching others what he does. His stacks include JavaScript, PHP, ReactJs, Laravel, and more.
He is currently freelancing, building websites for clients, and writing technical tutorials teaching others how to do what he does.
Emmanuel Okolie is open and available to hear from you. Kindly visit and follow him on Linked-In, Facebook, Github, Twitter, or his Website.

Top comments (2)
great tutorial, thank you!!!
You're welcome 😊
Thank you for the applaud 👏