The Web as I envisaged it, we have not seen it yet. The future is still so much bigger than the past. -Tim Berners-Lee
At some point in time, we have all encountered conversational agents -Siri, google assistant, Alexa, and others.
In this article, I'm going to show how to build a simple conversational agent in python using the pre-trained Blenderbot model.
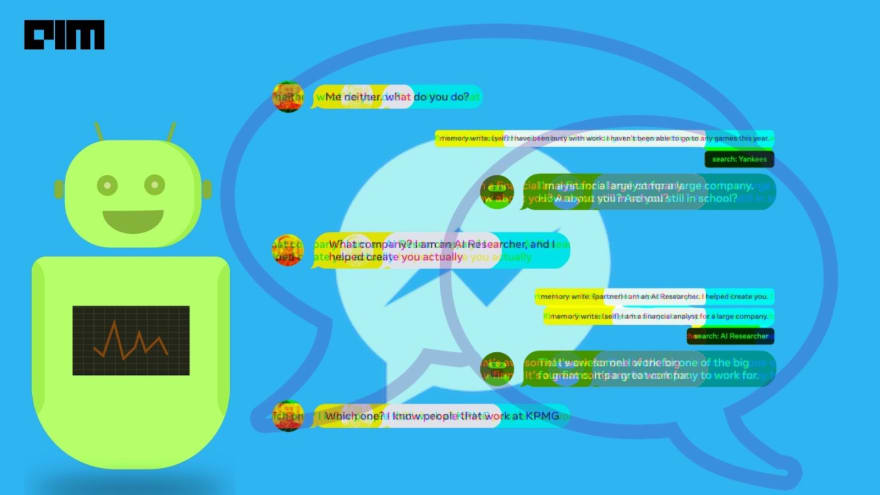
*image credits: google photos *
What is a Conversational Agent
According to Wikipedia, a conversational agent (CA), is a computer system intended to converse with a human.
In other words, conversational agents are automated systems(mostly powered by AI) that are built to converse with humans using natural language.
Common examples of conversational Agents include - Siri , google assistant , Alexa , Cortana
What is Blenderbot
Since this tutorial is built around Blenderbot, it's only fair we get to know what it is.
Blenderbot is an Open Source language generation model built by Facebook AI.
It is capable of articulately expressing itself, carrying on meaningful conversations in natural language(human-readable language) when given a particular context.
For example, if it's asked a question like -who is Cristiano Ronaldo, it can then carry on a conversation about who Cristiano Ronaldo is, what he does, etc.
It is very similar to Open AI's GPT3.
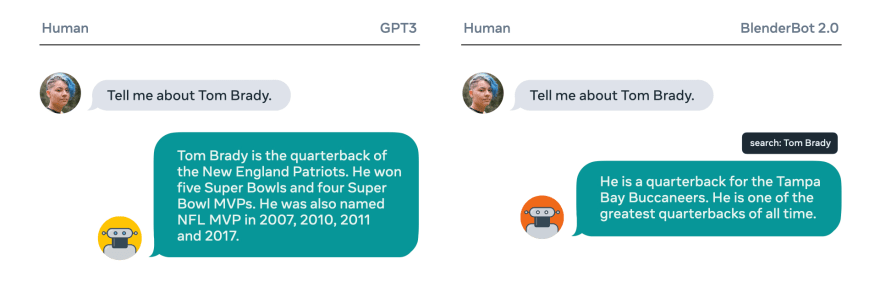
*image credits: Facebook AI *
Time to Build
Prerequisites
You must :
- Have python Installed
- Have an IDE / Text Editor ( Visual Studio , PyCharm , Jupyter Notebook )
- Internet Connection
Here is the Github Repository for the project.
Install Dependencies
Here we are going to download two libraries that are going to be needed to make use of Blenderbot
Installing Transformers
We are going to make use of Hugging Face to download the pre-trained blenderbot model.
#In a jupyter notebook
!pip install transformers

#In terminal
pip install transformers
Installing Pytorch
We are going to install the PyTorch deep learning library because Blenderbot tokenized and Torch tensors (Facebook Right😅)
If you want to install your specialized version of PyTorch visit the PyTorch website and install your specialized version.
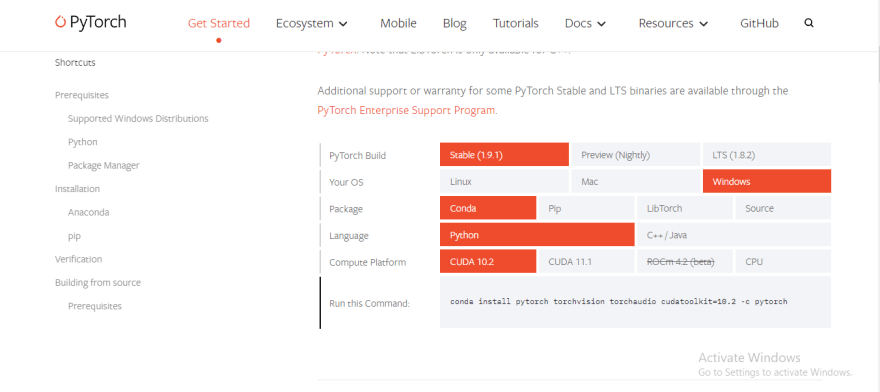
*Image Credits: PyTorch *
Below is my installed version of PyTorch
#install in jupyter notebook
!pip3 install torch==1.9.1+cu111 torchvision==0.10.1+cu111 torchaudio===0.9.1 -f https://download.pytorch.org/whl/torch_stable.html

#Install in Terminal
pip3 install torch==1.9.1+cu111 torchvision==0.10.1+cu111 torchaudio===0.9.1 -f https://download.pytorch.org/whl/torch_stable.html
Import Model
Here we are going to import and download the pre-trained Blenderbot model from Hugging Face
To begin with, we are going to import the model class and the tokenizer.
from transformers import BlenderbotTokenizer, BlenderbotForConditionalGeneration
Now we are going to install and setup the blenderbot model and the tokenizer
#download and setup the model and tokenizer
model_name = 'facebook/blenderbot-400M-distill'
tokenizer = BlenderbotTokenizer.from_pretrained(model_name)
model = BlenderbotForConditionalGeneration.from_pretrained(model_name)
Above we got the name of the model in Hugging face which is facebook/blenderbot-400M-distill, the name of the model begins with the creator of the model and in this case, it's Facebook, it is then followed by the name of the model which is blenderbot-400M-distill
Next, we instantiated the tokenizer and the model itself on the model name.
Conversing with our model
Now we are going to actually make conversation with our conversation agent.
Firstly, we are going to put up an utterance, an utterance is like a sentence used to begin the conversation with the conversation agent (like hey google).
#making an utterance
utterance = "My name is gold, I like football and coding"
Next, we are going to turn the utterance into a token so the model can process it.
#tokenize the utterance
inputs = tokenizer(utterance, return_tensors="pt")
Above we tokenized our utterance and returned the token as a PyTorch Tensor so it can be processed by the blenderbot model.
Next up, we are going to generate our conversational agent's response result.
#generate model results
result = model.generate(**inputs)
Above we instructed the model to generate a response for our tokenized utterance.
Remember our result response is still in the form of a PyTorch Tensor so now we are going to decode it back to a human-readable form (Natural Language).
tokenizer.decode(result[0])
Above we instructed the tokenizer to decode the result response.
Once you run the code above you'll see your agent's response.
Summary
Blenderderbot is a really interesting library, it is able to carry on conversations based on the given context with close similarity to normal human conversation due to the fact that, unlike other conversational agents, it's able to store responses long term, unlike others that have goldfish brains.
Due to this, the model takes important information gotten during conversation and stores it in long-term memory so it can then leverage this knowledge in ongoing conversations that may continue for days, weeks, or even months. The knowledge is stored separately for each person it speaks with, which ensures that no new information learned in one conversation is used in another.
Natural Language Processing Technology is growing fast and blender bot is a huge example of that.


Top comments (2)
Thanks for introducing me to BlenderBot. I'm so excited to have fun with it!
Haha, It's a really cool model!!