
I am actually very happy with the outcome of the previous blog for my production: it has a proxy, it serves on HTTPs, sqlite3 is not so bad after all... and for my 7.5 users, it is just great.
Your definition of "great" might be slightly different...
What about defining production greatness as a setup that will give satisfaction based on:
- performance (covered in this blog)
- ease of maintenance (covered in next blog)
- reliability (not sure that this will fit into the scope of the Tutorial)
Soooo... let's start with performance.
Philosophy
I am not going to dive into the depth of the performance theme, too many things to cover. Let me just suggest this path: to focus on setting up a toolbox that will allow you
- to run performance/load tests easily (one command sounds good, as usual; it will be
make gatling) - to view the output metrics easily (like in a web browser, thank you gatling!)
The idea behind is to base our decisions upon relative metrics, which means we are going to compare the results of the tests before and after making some changes (idealy: any change). Changes will be validated according to the variation of the results
But enough talking, let's make sure we are ready to go...
Pre-requisites
a) from the previous episodes...
I will make the assumption that you have been through my two first blogs:
- Part I : localhost, that gets you familiar with the main commands of the Makefile, and focus on localhost
- Part II : HTTPs is the norm, that shows you how to spawn ghost instances fearlessly on one server
There are no new dependencies, which means you are good to go with docker, make and the two repos prod-stack and ghost-in-a-shell.
b) if you wish to send emails (probability is high)
The Ghost Team makes some recommendations to send email, one solution being to leverage MailGun. Follow the link, and the steps behind this link.
That will give you credentials to send emails through their platform. Those credentials will go into ./etc/prod.env:
$ cp etc/prod.env.sample etc/prod.env
$ vi etc/prod.env
  ...
  # see https://docs.ghost.org/docs/mail-config#section-mailgun
  # you will find an updated screencast to understand exactly where to find these details
  MAILGUN_LOGIN=(Sandbox) default SMTP Login
  MAILGUN_PASSWORD=(Sandbox) default Password
Those variables will be used when spawning an instance in "production mode", as we can see within the Makefile:
prod:
    ...
    -e mail__transport=SMTP \
    -e mail __options__ service=Mailgun \
    -e mail __options__ auth__user=${MAILGUN_LOGIN} \
    -e mail __options__ auth__pass=${MAILGUN_PASSWORD} \
    ...
Because we are now dealing with a 'production' environment, the setup is not as easy as it was when using your SMTP server... hence a few "surprises" on the way:
- MailGun will ask you for a credit card, even if you keep using their free plan
- With the default login and password, you will have to declare all the recipients you wish to send emails to (and they will have to approve receiving those emails)
- To go around this limitation, you will have to set up your domain within MailGun. (and you will need to modify your DNS zone for this)
Therefore, if you prefer not using MailGun, you can remove the 4 lines above from the make prod command, or adapt it to another service provider (let me know how it went if you do, please!)
Next step is setting up the DB...
Switching the DB
a) objective
We wish to make use of MySQL instead of sqlite3, because it is recommended by the Ghost team. Fair enough.
b) setup
The prod-stack already runs a MariaDB in a container, as defined in the docker-compose.yml file:
  db-shared:
    image: mariadb:latest
    container_name: db-shared
    restart: always
    env_file:
      - $PWD/etc/db.env
    volumes:
      - db_data:/var/lib/mysql
There is only one piece of customization, the db.env file which holds the MYSQL_ROOT_PASSWORD. This file has been generated for you when you installed the prod-stack by running make. Here is the reminder:
# from prod-stack root directory
$ make
cp etc/traefik.toml.sample etc/traefik.toml
cp etc/db.sample.env etc/db.env
sed -i s/password/auMr9jsMrPnX0Oatb9j4yX2AYBN2jTQV/g etc/db.env
Generated etc/db.env
...
Well, I guess you know what is coming: copy the value from prod-stack/etc/db.env and paste it in your ghost-in-a-shell/etc/prod.env file. It now should look like:
# password set for db-shared, as defined in prod-stack/etc/db.env
MYSQL_ROOT_PASSWORD=auMr9jsMrPnX0Oatb9j4yX2AYBN2jTQV

# see https://docs.ghost.org/docs/mail-config#section-mailgun
# you will find an updated screencast to understand exactly where to find these details
MAILGUN_LOGIN=postmaster@your.domain.com
MAILGUN_PASSWORD=your-key
Done? You are ready to make use of a MariaDB instead of sqlite3 thanks to the following line in the Makefile.
prod:
    ...
    -e database__client=mysql \
    -e database __connection__ host=db-shared \
    -e database __connection__ user=root \
    -e database __connection__ password=${MYSQL_ROOT_PASSWORD} \
    -e database __connection__ database=${NAME} \
    ...
As a note, you can see that the connection to the DB server is hard-coded: it is made through the container name db-shared which is defined in the prod-stack/docker-compose.yml as seen previously.
make prod
In the two sections above, we have created a etc/prod.env file with three environment variables. This allow us to call make prod, which creates a ghost instance:
- behind the Nginx+Traefik proxy (same as with
make qa) - accessible through HTTPs (same as with
make qa) - using MailGun to send emails ( new )
- using a MariaDB instead of sqlite3 ( new )
Because we are in a relative mindset (remember the philosophy?), we are going to compare our new set up, performance-wise, with the old one...
- define a new blog NAME for the exercise:
export NAME=fire-at-blog - spawn the instance with sqlite3:
make qa(we will use the default content to keep it simple) - measure performance (and produce our first report):
make gatling

- start again same blog using MariaDB:
make stop prod(you could also go formake stop prod logstarget to follow the logs and see when the instance is ready) - measure performance again:
make gatling
- compare the two reports written in the folder ./gatling-results
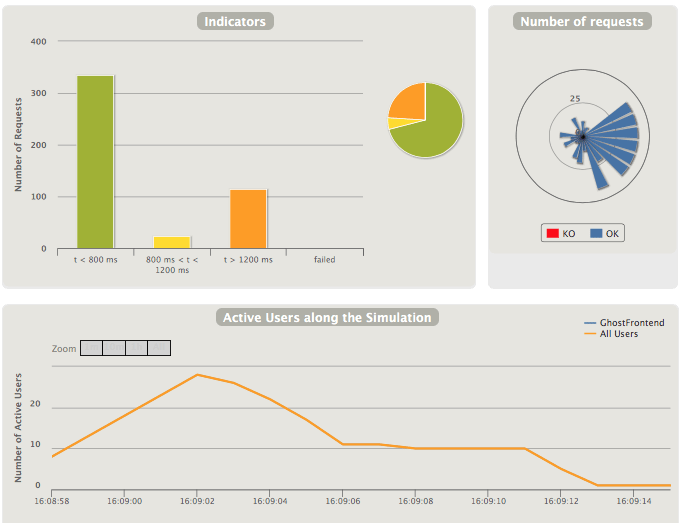
We do not really care about the absolute values of any of the two reports. We are interested by the differences. Whatever the expectations were.. we now have the detailed figures with one command. And we can access directly in our browser the reports.
For illustation purpose, I have only shown the high level figures for requests and active... but you have much more (thank you gatling!)
Of course, that will not alone make a decision. Let's not forget that we also want ease of maintenance (sqlite3 might be better here), and reliability (MariaDB gets several good points there)
Most important: we have a clear view on the performance of one solution vs the other
make gatling
The magic in the section above come from the command make gatling, which is actually quite simple:
gatling:
    docker run -it --rm \
        -v $(shell pwd)/etc/gatling-conf.scala:/opt/gatling/user-files/simulations/ghost/GhostFrontend.scala \
        -v $(shell pwd)/gatling-results:/opt/gatling/results \
        -e JAVA_OPTS="-Dusers=${GATLING_USERS} -Dramp=${GATLING_RAMP} -DbaseUrl=${GATLING_BASE_URL}" \
        --network=proxy \
        denvazh/gatling -m -s ghost.GhostFrontend
We are using a docker container which encapsulate all the (Java) layers needed by gatling.
-
-v $(shell pwd)/etc/gatling-conf.scala ...and mounts a few volumes for input (scenario file) -
-v $(shell pwd)/gatling-results ...mounts the volume for the output. -
-e JAVA_OPTS="-Dusers=${GATLING_USERS} ...adapts the script according to the environment variables (more details below) -
--network=proxyallows the container to directly load-test its beloved siblings (e.g. the blog instances)
The scenario file, ./etc/gatling-conf.scala, has 4 sequences (self explicit):
atOnceUsers(nbUsers),
constantUsersPerSec(5) during (myRamp seconds),
rampUsers(nbUsers) over (myRamp seconds),
heavisideUsers(10) over (myRamp seconds)
You can see that two variables (nbUsers & myRamp) are available to give you a bit of flexibility in the loads you are expecting. Default values are provided in the Makefile and can ve overridden as usual.
GATLING_BASE_URL?=${PROTOCOL}://${NAME}:2368/${URI}
GATLING_USERS?=3
GATLING_RAMP?=5
By default, the galing container which targets the container that runs your blog instance. (hence the --network=proxy parameter in the gatling command). Here is a more realistic example:
GATLING_BASE_URL=https://your.qa.com/blog GATLING_USERS=20 make gatling
You might wonder what will be the "full URL(s)" since we make use of a "..._BASE_URL". You will have to change the configuration file here (or use another one). They are so far coded as the following array, which is use as many time as necessary (thanks to the last bit .circular).
  val uriFeeder = Array(
    Map("URIKey" -> s"welcome"),
    Map("URIKey" -> s"the-editor"),
    Map("URIKey" -> s"using-tags"),
    Map("URIKey" -> s"managing-users"),
    Map("URIKey" -> s"private-sites"),
    Map("URIKey" -> s"advanced-markdown"),
    Map("URIKey" -> s"themes")
  ).circular
By the way, we could have chosen some other strategy than .circular (e.g. random), but I have chosen a repeatable + predictable strategy here, for the purpose of being able to compare the results with a controlled scenario.
Let's apply this knowledge to load-test our proxy
Playing a bit with Nginx
Keeping in line with this methodology, we could have a closer look at the proxy (Nginx + Traefik) and compare our configuration with another one with NGinx cache... We will use the configuration prod-stack/etc/000-proxy-with-cache.conf.sample for this purpose:
proxy_cache_path /var/cache levels=1:2 keys_zone=STATIC:10m inactive=24h max_size=1g;

server {
  listen 80 default_server;
  listen [::]:80 default_server;
  server_name _;

  location / {
    proxy_pass http://traefik/;
    proxy_set_header Host $host;
    proxy_buffering on;
    proxy_cache STATIC;
    proxy_cache_valid 200 1d;
    proxy_cache_use_stale error timeout invalid_header updating http_500 http_502 http_503 http_504;
  }
}
The tricky part is
- to continue playing around locally, while
- making gatling access the blog through NGinx, and not directly from his container to the other container...
For this purpose, we are going to use the GATLING_BASE_URL variable along with the internal IP of our computer. This will make the gatling container query the blog through the host (which means through Nginx and Traefik) instead of heading straight at the ghost container.
Watch out: 127.0.0.1 will not work (neither localhost) since the container will query itself in that case, not the ghost instances.
Let's say our internal IP is 192.168.178.93... here is the process:
- run a first container without cache:
NAME=no-cache-blog make qa logs - once launched, run a gatling container:
NAME=no-cache-blog GATLING_BASE_URL=http://192.168.178.93/no-cache-blog make gatling - activate Nginx cache in the prod stack
$ cd /your/path/to/prod-stak/etc/conf.d
$ rm 000-default.conf
$ cp ../000-proxy-with-cache.conf.sample 000-proxy-with-cache.conf

# at this point you can stop and start the stack again,
# or simply go inside the nginx container and reload the conf:
$ docker exec -it nginx-entrypoint bash
root@bef39f4ad198:/# nginx -s reload
... signal process started
- run a second container with cache:
NAME=with-cache-blog make qa logs - once launched, run gatling again:
NAME=with-cache-blog GATLING_BASE_URL=http://192.168.178.93/with-cache make-blog gatling - look at the results (no cache on left hand side, with cache on right hand side)

Performances are better with cache (as expected), but content could now "lag" and that could impact negatively the user experience... On the other end it could also impact positively the ease of maintenance, allowing us minor downtime of the blog itself (if well cached).
Again, the final choice will depend on you. At least, you will have metrics to compare the performances of the various solutions.
Keep in mind, and avoid...
Avoid changing multiple criteria when comparing performances.
For instance, doing the following comparison is a bad idea :
make dev |
make qa |
make prod |
|---|---|---|
| some performance | other perf. | yet-another perf. |
The results are actually useless because you have multiple changes between the different sets of configurations: you are changing at the same time the DB, the proxy, and the email settings (potentially some cache layer). Therefore you will be blind of the individual effects of each of them.
Conclusion
You now can run three modes of ghost instances, for development, testing or production:
| Command | Description | Remarks |
|---|---|---|
make dev |
straightforward (local) installation if you simply wish to bridge a container port on your host (3001 by default) | also known as make
|
make qa |
The former being not really convenient if you wish to serve on standard ports (80 or 443), and if you want anyone to access your blog easily, this command sets up a traefik router | recommended usage of prod-stack |
make prod |
Same as above, using a MariaDB instead of SQLite and an email provider (Mailgun) | requires a (free) account at Mailgun |
The (more) important get-away of this blog though, is the simple command make gatling, and using it to validate (small and well identified) changes along the way.
A good practice would actually be to integrate the command in the continuous integration workflow, and to raise alerts if the performance goes down
In the next blog, I will introduce a few helpers for the maintenance... in order to keep a bit of order in all the instances we can now spawn here and there


Top comments (0)