

This article was originally published at https://www.blog.duomly.com/node-js-course-building-fintech-banking-app-lesson-4-user-login-authentication/
Intro to Node.js Course - Login and User Authentication
In previous weeks we started a Node.js Course, where we are building a fintech banking application. In this course, we are using the Nest.js framework and Typescript.
In the first lesson of this Node.js Course, we started a project and done migrations to set up the database.
In the second and third lesson, I focused on user registration, creating a new user in the database, and displaying the proper response from the endpoint.
Now, it’s time to create login and authentication endpoints.
If you would like to try building a similar backend, you can try our Golang Course, where we are creating the same application.
Feel free to create a front-end for this application that we are building in the Angular 9 Course.
And for those who prefer learning from video tutorials than reading posts, so I have a video version for you.
If you don’t have a code from the previous lesson, feel free to get it from our Github repo for lesson three.
Let’s open the code in your favorite code editor, and let’s start!
1. Update user entity
In the beginning, we will add two lines of code to our user.entity.ts file, where we need to define the connection between user and accounts. Let’s open the user entity file and at the bottom, add the following code.
@HasMany(() => Accounts, 'UserId')
public accounts: Accounts[];
Also, pay attention if you have the Accounts entity imported; if not, do it at the top of your file.
And now, we can jump into creating the login function.
2. Create the login function
Let’s open the user.service.ts file, and we will start by doing a small change in our register function. We are going to change the code inside the jwt.sign() function.
const jwtToken = jwt.sign({id: user.id, username: user.Username, email: user.Email}, process.env.JWT_KEY, jwtConfig);
When it’s ready, we can start by building our login logic. Below the register() function define a new login() function with credentials parameter. In the beginning, let’s find the user in the database with the same username as in our credentials.
public async login(credentials: any): Promise<object> {
    const user = await Users.findOne<Users>({
      where: { Username: credentials.Username },
      attributes: { exclude: ['createdAt', 'updatedAt'] }
    });
}
When the user should be defined, it’s worth remembering that sometimes it may happen that the user with the given username doesn’t exist, and this is the place to handle this kind of error. That’s why, just below the user constant, we will create a conditional statement that will return the error if the user is not defined.
if (!user) {
  return {
    success: false,
    message: 'User does not exist.'
  }
}
Great, the user's situation is pretty clear right now, so let's find out how about the password. To login the user, we need to check if the password passed in the login form is the same as the one save in the database.
Before saving it to the database, we did some changes to the password, and now to be able to compare those two values, we have to make the same operations on the password from the login form.
const inputPassword = crypto.createHmac('sha256', credentials.Password + user.Salt.trim()).digest('hex');
const isPasswordCorrect = user.Password.trim() === inputPassword.trim();
Both passwords were compared in the same format, so now it's clear if the user can be logged in or not. In case that the passwords are different, we have to handle it with another conditional statement.
if (!isPasswordCorrect) {
  return {
    success: false,
    message: 'Password is not correct.'
  }
}
At the beginning of the login() function, we've got a user from the database, but we weren't able to get the user's account, as the only value we had had was the username. That's why we have to get the accounts separately. We don't have any function prepared in our AccountsService file; that why we are going to use a non-existing name of the function, and later we'll jump to the accounts.service.ts file and create a getAccountsByUserId() method. Let's create the code for the accounts and a jwt token to return it in the response.
const accounts = await this.accountsService.getAccountsByUserId(user.id);
const jwtToken = jwt.sign({ id: user.id, email: user.Email, username: user.Username }, process.env.JWT_KEY, jwtConfig);
So, the last thing to do here is to prepare the response object and return it.
const response = {
  user: {
    id: user.id,
    username: user.Username.trim(),
    email: user.Email.trim(),
    accounts,
  },
  token: jwtToken,
  success: true,
}

return response;
Great, our login function is ready. Don’t forget that we need to create a missing function to get user’s accounts now.
Also, take a look at the whole code of the login() function to make sure it looks the same.
public async login(credentials: any): Promise<object> {
  const user = await Users.findOne<Users>({
    where: { Username: credentials.Username },
    attributes: { exclude: ['createdAt', 'updatedAt'] }
  });

  if (!user) {
    return {
      success: false,
      message: 'User does not exist.'
    }
  }

  const inputPassword = crypto.createHmac('sha256', credentials.Password + user.Salt.trim()).digest('hex');
  const isPasswordCorrect = user.Password.trim() === inputPassword.trim();

  if (!isPasswordCorrect) {
    return {
      success: false,
      message: 'Password is not correct.'
    }
  }

  const accounts = await this.accountsService.getAccountsByUserId(user.id);
  const jwtToken = jwt.sign({ id: user.id, email: user.Email, username: user.Username }, process.env.JWT_KEY, jwtConfig);
  const response = {
    user: {
      id: user.id,
      username: user.Username.trim(),
      email: user.Email.trim(),
      accounts,
    },
    token: jwtToken,
    success: true,
  }

  return response;
}
2. Create getAccountsByUserId function
Now, let’s go to the accounts.serivce.ts file, and let’s update it to add the missing function.
public async getAccountsByUserId(UserId: number): Promise<object> {
  const accounts = await Accounts.findAll<Accounts>({
    where: { UserId },
    attributes: { exclude: ['createdAt', 'updatedAt'] }
  });

  return accounts ? accounts : [];
}
After it’s done, you can make sure, there is no error in the UserService anymore.
3. Create login endpoint
It’s time to open our UserController and create the actual endpoint with the login path. We are going to use the POST method.
@Post('login')
public async login(@Res() res, @Body() credentials: any): Promise<any> {
  const result: any = await this.usersService.login(credentials);
  if (!result.success) {
    throw new HttpException(result.message, HttpStatus.BAD_REQUEST);
  }
  return res.status(HttpStatus.OK).json(result);
}
Soo, we can start the first testing, but don’t forget to run your backend first with npm start.
4. Test login
If your application is up and running, open any tool that will allow you to test our API. I’m using Postman for this purpose. My Node.js app is running on the http://localhost:3000, and I have the existing user that I can test.
If you don’t have any user, feel free to use register endpoint to create one. Below you can see my result.

If everything is fine, let’s go back to our code and create the authentication function that will give us the user data after checking the token.
5. Create an authentication function
In this step, we will create another function in our UserService that will get a jwt token and user id, next it will check if the token is valid and based on that, return user data.
Let's start by defining the authenticate() function just below the login() function, and inside the function, let's start by getting the user with his/her accounts.
public async authenticate(id: number, token: string): Promise<any> {
  const user = await Users.findOne<Users>({
    where: { id },
    include: [
      {
        model: Accounts,
        where: { UserId: id },
        required: true,
      }
    ],
  });
}
When it's ready, we can verify the token using jwt.verify() function that will return us the data used to code the token, user id, username, and user email. Then we will compare the id from the token with the id passed to the function.
const decodedToken = jwt.verify(token, process.env.JWT_KEY, jwtConfig);
const isTokenValid = decodedToken.id === Number(id);
If the comparison of ids is ready, we know if the user data can be passed or not. If they can’t be passed, we need to create a conditional statement returning what’s wrong.
if (!isTokenValid) {
  return {
    success: false,
    message: 'User is not authorized.'
  }
};
When that’s done, the last thing to do here is to create and return the response object. So, let’s do it.
const response = {
  user: {
    id: user.id,
    email: user.Email.trim(),
    username: user.Username.trim(),
    accounts: user.accounts,
  },
  token,
  success: true,
}

return response;
And at the end, take a look at the whole code of the authenticate() function to make sure nothing is missing.
public async authenticate(id: number, token: string): Promise<any> {
    const user = await Users.findOne<Users>({
      where: { id },
      include: [
        {
          model: Accounts,
          where: { UserId: id },
          required: true,
        }
      ],
    });

    const decodedToken = jwt.verify(token, process.env.JWT_KEY, jwtConfig);
    const isTokenValid = decodedToken.id === Number(id);
    if (!isTokenValid) {
      return {
        success: false,
        message: 'User is not authorized.'
      }
    };

    const response = {
      user: {
        id: user.id,
        email: user.Email.trim(),
        username: user.Username.trim(),
        accounts: user.accounts,
      },
      token,
      success: true,
    }

    return response;
  }
6. Create authentication endpoint
As previously, we are going to create the endpoint, but now for the authentication. Our endpoint will consist of the id variable.
Here we will also use the POST method, but additionally, we will use the @Headers() and @Param() here. Remember to import them at the top of the file.
Headers will be useful to get the authorization header, as that's how the token should be sent.
@Post(':id')
  public async authenticate(@Param() params, @Res() res, @Headers() headers): Promise<any> {
    const token = headers.authorization.replace('Bearer ', '');
    const result: any = await this.usersService.authenticate(params.id, token);
    if (!result.success) {
      throw new HttpException(result.message, HttpStatus.BAD_REQUEST);
    }
    return res.status(HttpStatus.OK).json(result);
  }
Great, it seems like we are ready to test it!
8. Test authentication
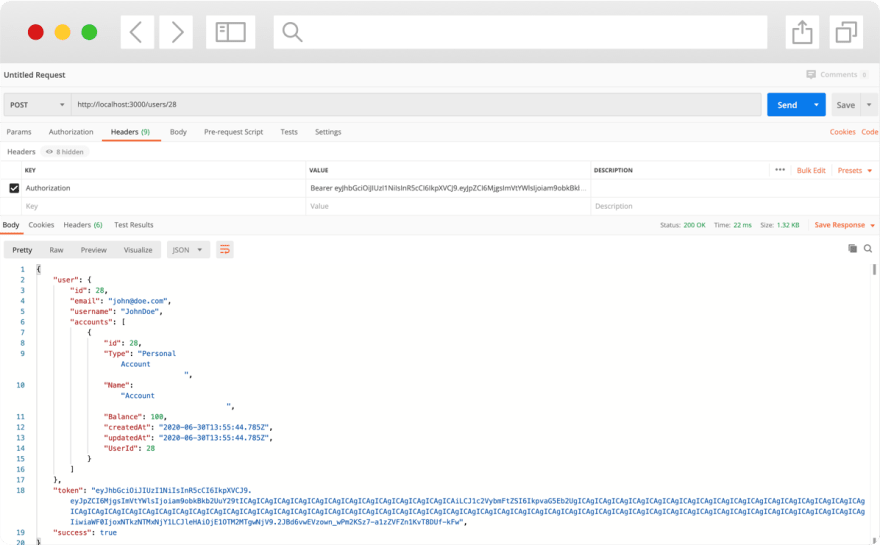
Now, rerun your application and open the tool you are using for API testing.
The first thing that is necessary in this case is the token because we have to pass it to test our endpoint, so make sure you copied one from the login response.
While setting the authorization header, remember about adding the "Bearer" before the token.
Conclusion
Congratulations! You’ve just created user login and authentication using Node.js and Nest.js framework.
If you missed some code, take a look at our Github.
I hope you’ll find this Node.js Course useful.

Thank you for reading,
Anna from Duomly


Top comments (0)