
In the last post we got a new application up and running. We’re now going to expand on this and look at modules and components. We’ll cover how to create them, their relationship to each other, and finish off with a discussion of stand-alone components.
What is a Module?
A module is simply a class marked by an @NgModule decorator. The @NgModule decorator takes an object containing information on what that module can provide when it is being used. There are a lot of options for what can be configured through a modules, but relevant to us here is the ability to define which components can be used as part of the module. We can see an example of this in the application we generated last time. If we open app.module.ts we will see:
@NgModule({
  declarations: [
    AppComponent
  ],
  imports: [
    BrowserModule,
    AppRoutingModule
  ],
  providers: [],
  bootstrap: [AppComponent]
})
export class AppModule { }
Lets go through the data that’s being provided to the module:
Declarations
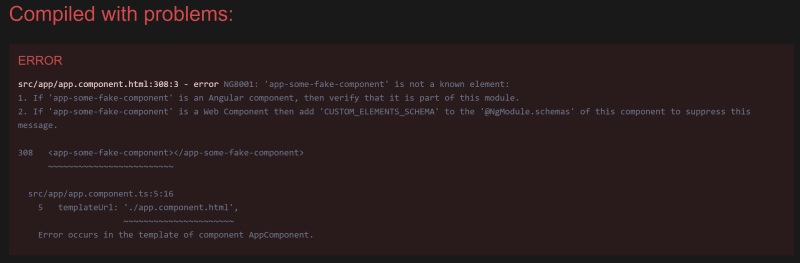
This is where we define any components, pipes, or directives that need to be included as part of this module. If we try and use a component in this module that hasn’t been included here (or via the imports list) we’ll get an error when running the application. Like so:
Imports
A list of other modules to include as part of this module. This makes all components, pipes, and directives that have been exported by the other modules availble for use within this one. We’ll cover exporting in a moment.
Providers
Any services that the module requires can be defined here. Once they’re defined here they can be injected in to any component (or other service) within this module. This is only one of the ways to specify services in an Angular application, and frankly the least used. We will cover services and the methods for defining how they’re provided in a future post.
Bootstrap
The components here are the top level components that are required by the index.html page. These serve as the entry point to the Angular components in our application, without defining a component here we will get an error when we run it. While it is possible to provide multiple components for bootstrapping (with matching elements in index.html for each), we typically define a single component as the entry point and build the component tree out from there.
These are the options that are included by default, but there are more options available:
Exports
The set of components, pipes, and directives that is made available to any other module making use of this one. Earlier we discussed imports, this is the other side of that. Importing a module that hasn’t defined any exports would be pointless. This will be used a lot by any libraries we include, and especially by anything included with Angular by default. We can also make use of it to create “Shared” or “Core” modules, something to provide custom components that need to be used across the entire application.
Schemas
A list of schemas that define the rules around custom non-Angular elements in your application. A good example of this is the built-in NO_ERRORS_SCHEMA. By default Angular will throw errors for any elements it doesn’t have a record for, this can be useful for discovering components we’ve forgotten to include in the declarations. It can become awkward when it comes to writing tests though, as there’s not always a lot of value in declaring every used component if it’s not relevant to our test. The NO_ERRORS_SCHEMA will bypass that and prevent any errors. Outside of testing it’s typically not a good idea to ignore these errors, it affects the Angular tooling as well as the built version so it can be hard to spot typos in the template.
Id
As the name suggests this is a string value to uniquely identify the module. The module can then be retrieved by using the built-in getNgModuleById.
JIT
A boolean value to exclude the module from AOT (Ahead of Time) compilation. This means the module will be compiled at runtime.
So we’ve covered what a module is and how we configure it, but what else can we do with them? Well, the module we’ve been looking at is actually called a Root Module. The root module is the one that sits at the top level of the application and configures the entry point in to in. Below this we can create Feature Modules.
Feature Modules
Feature modules exist underneath the root module. They allow us to declare components, pipes, and directives outside of the root module. While this is not a requirement (everything would work fine if it was all configured in the root module) there are some other benefits to splitting them out in to feature modules.
Code Organization
The ability to organize the code in some structured way can help to keep an application understandable and maintainable as it grows. This allows us to keep items that are related to different features separate and makes it clear which features they belong to.
As with any tool that helps with structuring applications this is only really a benefit if it’s done sensibly. If the feature separation doesn’t make any sense then the modules won’t either.
Lets take a look at an example. We’ll use the example of an e-commerce app. The pages we’ll include are:
- Shopping basket
- Product page
- Account management
While there would be many more required, we’ll stick with these to keep the examples simple. Using just a root module would look something like this:
@NgModule({
  declarations: [
    AppComponent,
        ShoppingBasketComponent,
        ShoppingBasketItemComponent,
        ProductComponent,
        ProductDetailsComponent,
        ProductReviewsComponent,
        AccountManagementComponent
  ],
  imports: [
    BrowserModule,
    AppRoutingModule
  ],
  providers: [],
  bootstrap: [AppComponent]
})
export class AppModule { }
This looks fairly manageable, but as more functionality is added the list in here will keep expanding with no easy way to discern which components work with which others. Say we added ProductImageComponent, does that work with the shopping basket, the product page, or both?
If we split these up in to separate modules we get this:
@NgModule({
  declarations: [
    AppComponent
  ],
  imports: [
    BrowserModule,
    AppRoutingModule
  ],
  providers: [],
  bootstrap: [AppComponent]
})
export class AppModule { }
@NgModule({
  declarations: [
        ShoppingBasketComponent,
        ShoppingBasketItemComponent
  ]
})
export class ShoppingBasketModule { }
@NgModule({
  declarations: [
        ProductComponent,
        ProductDetailsComponent,
        ProductReviewsComponent
  ]
})
export class ProductModule { }
@NgModule({
  declarations: [
        AccountManagementComponent
  ]
})
export class AccountManagementModule { }
Now we can add the ProductImageComponent to just the ProductModule and it becomes much clearer where it’s being used. If we load up the application and take a look at the product page, it would be much easier to figure out which components are being used on the page and where just by scanning through the included components in the module.
Code Bundling
In this context code bundling is referring to the ability to group related items that may not be for a single feature. For example, if we’re using a library such as Angular Material there are components that need to be pulled in for most components. We can use a feature module to declare all the common components, re-export them, and just import that single module in all the others using the components. These are more like utility modules than feature modules, but functionally they’re the same.
Let’s expand on the example above. What happens if the ProductImageComponent contains a flag to switch it between displaying a full-size image and and a thumbnail? Maybe we want to include that for both the shopping basket and the product page. So we could declare this in both components:
@NgModule({
  declarations: [
        ShoppingBasketComponent,
        ShoppingBasketItemComponent,
        ProductImageComponent
  ]
})
export class ShoppingBasketModule { }
@NgModule({
  declarations: [
        ProductComponent,
        ProductDetailsComponent,
        ProductReviewsComponent,
        ProductImageComponent
  ]
})
export class ProductModule { }
This would work, but what if we want to include that in another module? Maybe the account management page has an order history and we want to show the thumbnail against purchased items. With one component this isn’t too much of a problem. If we add a ProductPriceComponent that displays the base price with any discounts applied, well now we have 2 components we need to include across multiple modules. Alternatively, we could define a shared module and just imports that:
@NgModule({
  declarations: [
        ProductImageComponent,
        ProductPriceComponent
  ],
  exports: [
        ProductImageComponent,
        ProductPriceComponent
  ]
})
export class SharedModule { }
@NgModule({
  declarations: [
        ShoppingBasketComponent,
        ShoppingBasketItemComponent
  ],
    imports: [
        SharedModule
    ]
})
export class ShoppingBasketModule { }
@NgModule({
  declarations: [
        ProductComponent,
        ProductDetailsComponent,
        ProductReviewsComponent
  ],
    imports: [
        SharedModule
    ]
})
export class ProductModule { }
Now any new components that need to be shared between multiple modules can just be declared and exported in SharedModule. Anything importing it will automatically have them included.
Lazy Loading
This is probably the biggest advantage from making use of feature modules. By default all items defined in modules are eagerly loaded, or loaded when the application is first loaded by the client. This is fine for small applications, but as more components are added it just increases the first load requirements and takes the client longer to access the page.
By taking advantage of the routing configuration (which we’ll discuss in a later post) we can set up feature modules to be lazy loaded. This means that the modules, and anything defined in it, won’t be loaded on the client until something on the page needs to use it.
There’s no easy way to demonstrate how this works at this point. To configure lazy loading of modules we’ll need to understand the routing in our application. We’ll cover this in the next post.
Creating New Modules
Now we’re sold on the benefits of using feature modules, lets take a look at how to create them. We can either just create them ourselves, they follow the same structure as the root module we already have in place, or we can use the Angular CLI to create them for use. So if we go back to the command line and move to the root directory of our application and run:
ng generate module
This will then ask us for the name of the module and create it for us. This is a simple way to get a new module but means we need to go and set up our own routing and links for it. The command above accepts several flags to automatically configure the new module for us. If we expand the command to:
ng g module Product --module app --route product
This will set up a few things for us:
- Create a new module for us called
ProductModule - Create routing for the new module
- Create and new component called
ProductComponent - Declare the new component in the new module
- Configure the routing in
AppRoutingModuleto point to the new module on/product
So it’s handled all the hard work for creating the module for us, and even configured the routing to it that sets the new module up for being lazy loaded. What could be easier?
You may have noticed that there’s another use for module that we haven’t covered here; the routing module. In the next post we’ll cover routing and how we can configure our routes to be lazy loaded.

Top comments (0)