Previous tutorial described an overview of the 9VAe interface. This tutorial shows how to create a quick example animation.

First Step

Let's make a simple animation shown above. The steps we'll take are:
- Start 9VAe.
- Draw three circles.
- Add the second page.
- Change the color of the left circle to red and change the color of the right circle to blue.
- Select the red and blue circles together, resize them and move them to touch the center circle.
- Click Play button to see the animation.
1. Start 9VAe.
9VAe will open a single window with a default page size.
2. Draw circles

- Click 'Filled circle'(A) in the Tool Box on the upper left of the 9VAe window.
- Click and drag the pointer from the center(A1) to the outside of the page area to draw the first circle.
- Click and drag the pointer from the center(A2) to the outside of the page area to draw the second circle.
- Click and drag the pointer from the center(A3) to the outside of the page area to draw the third circle.
3. Add the next page
- Click '+' button (B) on the right side of the first page in the Page Bar shown above.
- Click 'Add Next Page' on the menu. Now the first page will be copied to the second page . The second page will appear on the right side of the first page as follows.

Copy is important in 9VAe. Copied objects are connected to the original objects. Only connected objects can make in-between shapes or colors automatically.
4. Change color
- Click 'Select Object' button (A) shown above to select objects.
- Click the left circle (B) to select it.
- Click Fill Color (C). Now the Color palette will appear. > Click 'red'.
- Click the right circle (D) to select it.
- Click Fill Color (C). Now the Color palette will appear. > Click 'blue'.
The button on the right side of the 'Fill Color'(C) is the 'Gradation' button. You can choose the second color of gradation by clicking the 'Second color' button on the right side of the 'Gradation' button. Please try to add color gradation to your center circle.
5. Multiple selections
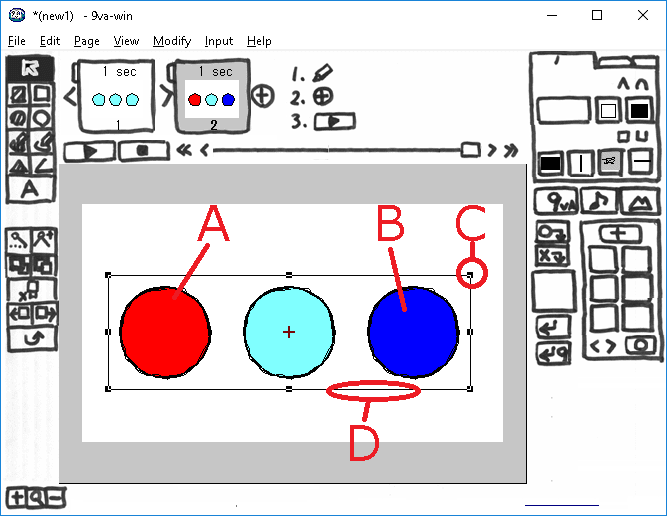
- Click the red circle (A) to select it.
- Holding down the Shift key click the blue circle (B) to select it. > Now the red and blue circle will be selected together as shown above. Selection frame will appear around selected objects .
Shift+clicking on a selected object excludes it from the selection.
6. Resize, Move
- You can Resize the red and blue circles by dragging the corner handle of the selection frame(C) shown above.
- You can Move the red and blue circles by dragging the frame of the selection frame(D).
Move and resize the red and blue circle to touch the center circle as follows.

7. Play
- Click 'Play' button(A) to see animation.
Final Words
This article explained 'Input figures', 'Select objects', 'Change Color', 'Move and Resize objects. You will understand it is very easy to make animation using keyframes in 9VAe.
The next article '9VAe Beginner Tutorial 2' shows how to create an ' AnimeCast'.
Related article
9VAe Introduction
- 9VAe Free SVG/GIF Animation editor: Introduction
- 9VAe Download and Install
- 9VAe's Frequently Asked Questions

Top comments (0)