Originally published on my blog.
Note: This is part 8 of the Let’s Build Chuck Norris! series.
If you came this far after reading part 1 to 7, congrats!
In this article, we’ll use everything we learnt so far and write an iOS application able to show Chuck Norris facts. We’ll also learn a few things specific to iOS and Xcode. Let’s dive in!
Introduction: CocoaPods
There are many ways to achieve our goal. Several tools exist, but for this post we’ll concentrate on CocoaPods. 1
CocoaPods can be used in two modes:
First, you can run pod lib create foo. This will create a Foo.podspec file. The podspec describes how to build the foo library, a bit like a Conan recipe. You can then upload the podspec file and the associated sources to a repository.
Second, you can run pod init next to an existing Xcode project. This will create an Xcode workspace and a Podfile file. You can specify one or several dependencies in the Podfile. Then, when you run pod install, the podspecs will be fetched and the workspace will be configured so that you can build and use those dependencies in the original Xcode project.
That way you minimize the interactions with Xcode through its GUI and use code instead.
So, here’s the plan:
- Create a CocoaPods library called
ChuckNorrisBindingsinios/bindings/ChuckNorrisBindings. - Create a blank iOS application with in the
ios/app/ChuckNorrisdirectory, called ChuckNorris. - Use CocoaPods to create a dependency between ChuckNorrisBindings and ChuckNorris.
- …
- Profit!
The Bindings
We run pod lib create ChuckNorrisBindings and answer a few questions:
$ pod lib create ChuckNorrisBindings
Cloning `https://github.com/CocoaPods/pod-template.git` into `ChuckNorrisBindings`.
...
What platform do you want to use? [iOS / macOS]
> ios
What language do you want to use? [Swift / ObjC]
> ObjC
Would you like to include a demo application with your library? [Yes / No]
> No
Which testing frameworks will you use? [Specta / Kiwi / None]
> Specta
Would you like to do view based testing? [Yes / No]
> No
What is your class prefix?
CK
...
Running pod install on your new library.
...
Analyzing dependencies
Fetching podspec for `ChuckNorrisBindings` from `../`
Setting up CocoaPods master repo
...
 Ace! you're ready to go!
 We will start you off by opening your project in Xcode
  open 'ChuckNorrisBindings/Example/ChuckNorrisBindings.xcworkspace'
You will note CocoaPods has created lots of files. Among them:
-
ChuckNorrisBindings/Sources: the sources of the library. -
ChuckNorrisBindings.podspec: the podspec used to build and depend on the ChuckNorrisBindings library -
Example/ChuckNorrisBindings.xcodeprojthe Xcode project to build the sources -
Example/ChuckNorrisBindings.xcworkspacethe Xcode workspace which we can use to:- build the library
- build the test framework
- build and run the tests themselves.
If we try to run the tests directly from Xcode, it won’t work right away, instead we get this error message:
Scheme "Pods-ChuckNorrisBindings_Tests" is not configured for testing.
Edit the scheme to enable testing, or cancel the action.
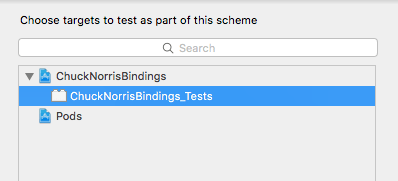
We have to fiddle with the schemes CocoaPods generated for us:
Open the scheme editor:

Show the test scheme:
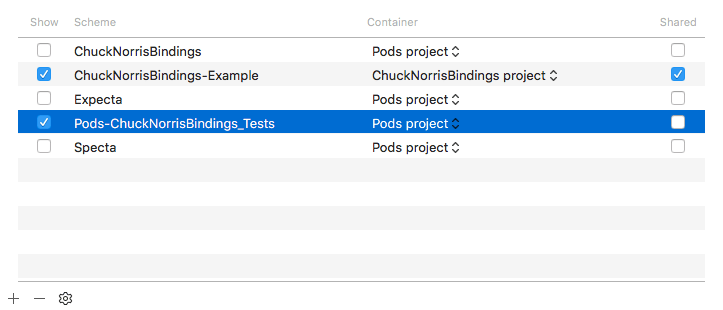
Click the + bottom at the bottom and select the test target.
This time we get an other error message:
Could not find test host for ChuckNorrisBindings_Tests ...
Edit the project settings, under “General” and switch the Host application form “Custom” to “None”:

And it works: a simulator is started and the tests run.
Cross-compiling ChuckNorris for iOS
Our plan to bind the C++ library for iOS is a combination of techniques we already seen in Part 5: Python with cffi and Part 6: Cross compilation for Android.We’ll cross-compile ChuckNorris as a static library from macOS to iOS. And then we’ll compile the Objective-C code by giving it the paths to the libchucknorris.a file, the conan dependencies, and the chucknorris.h C header.
Before anything, let’s make sure Xcode command line tools are installed by running xcode-select --install. If you are following this tutorial at home, make sure to run thing or nothing will work.
Let’s create a conan profile called ios and add a build dependency:
# In ~/.conan/profiles/ios
[settings]
os=iOS
os.version=9.0
arch=x86_64
compiler=apple-clang
compiler.version=9.0
compiler.libcxx=libc++
build_type=Release
os_build=Macos

[build_requires]
darwin-toolchain/1.0@theodelrieu/stable
For now, we’ve hard-coded the x86_64 architecture, because we’ll run everything in simulators, and Xcode simulators require this architecture. In order to run the code on actual devices, we’ll invoke conan with the correct --settings arch=<arch> flag. This is similar to what we did in Part 6.
Note that this time we don’t need to write the toolchain recipe ourselves, there is already one on conan-center.2
Then, as we did for Android, we run conan create for sqlite3.
cd conan/sqlite3
conan create . dmerej/test --profile ios --settings arch=x86_64
As we did for Android with the libc++shared.so file, we patch the ChuckNorris recipe to deal with the copies of all the .a files, both in the imports() and package() methods:
def imports():
      if self.settings.os == "Android":
          self.copy("*libc++_shared.so", dst="lib", keep_path=False)
      if self.settings.os == "iOS":
          self.copy("*.a", dst="lib", src="lib")

def package(self):
      self.copy("bin/cpp_demo", dst="bin", keep_path=False)
      self.copy("lib/*.so", dst="lib", keep_path=False)
      self.copy("lib/*.a", dst="lib", keep_path=False)
Then we can create the ChuckNorris package:
cd cpp/ChuckNorris
conan create . dmerej/test --profile ios --settings arch=x86_64
So far so good.
The podspec
Note that all the .a files are somewhere inside ~/.conan/data/. Let’s copy them into a nativelibs/x86_64 directory next to the bindings code:
mkdir -p nativelibs/x86_64/
cp \
  ~/.conan/dataChuckNorris/0.2/dmerej/test/package/<id>/*.a
  nativelibs/x86_64/
So that we don’t forget, let’s add nativelibs to the .gitignore.
Next we can edit the podspec to specify:
- The include directory: it’s inside a directory called
pod_target_xcconfig. - The vendored libraries: that’s our
libchucknorris.aandlibsqlite3.a. They are called “vendored” because they won’t be compiled by CocoaPods itself, and are not already present on the target operating system either.
Pod::Spec.new do |s|
  ...

  s.pod_target_xcconfig = {
    'HEADER_SEARCH_PATHS' => "${POD_ROOTS}/../../cpp/ChuckNorris/include/",
  }

  s.vendored_libraries = Dir["out/*.a"]
Two remarks:
- Since CocoaPods recipes are written in Ruby, we can use the overloaded
[]operator forDirobjects to get the full list of files matching theout/*.aglob pattern. - The
HEADER_SEARCH_PATHSstring contains a${POD_ROOTS}extension, that will be set by CocoaPods.
Note how it does not matter if we are building the ChuckNorrisBindings CocoaPods library or the ChuckNorris application: the resulting HEADER_SEARCH_PATHS will be the same.
Anyway, we can now run pod update from the Example directory to update the Xcode projects and workspace configurations.
Objective-C
We can use C code directly in Objective-C.
It’s still dangerous to expose C code directly, so here’s how we can proceed:
- Write a CKChuckNorris class. (It’s a convention to prefix all the classes in a pod library with the initials of the projects)
- Write a CKChuckNorris+Private category to hide the C code from the consumers of the CKChuckNorris class.
/* In CKChuckNorris.h */
@interface CKChuckNorris: NSObject

@property void* ckPtr;

-(instancetype)init;
-(NSString*) getFact;

@end
/* In CKChuckNorris.m */
#import "CKChuckNorris.h"
#import "CKChuckNorris+Private.h"

@implementation CKChuckNorris

-(instancetype)init {
  self = [super init];
  return [self createCkPtr];
}

-(NSString *)getFact {
  return [self getFactImpl];
}

@end
/* In CKChuckNorris+Private.h */
#import "CKChuckNorris.h"

@interface CKChuckNorris (Private)

-(instancetype) createCkPtr;
-(NSString*) getFactImpl;

@end
So far we have just declared the createCKPtr and getFactImpl methods.
It’s time to define them in the CKChuckNorris+Private.m file:
/* In CKChuckNorris+Private.m */
#import "CKChuckNorris+Private.h"

#include "chucknorris.h" // <- Our C header file

@implementation CKChuckNorris (Private)

-(instancetype)createCkPtr {
  self.ckPtr = chuck_norris_init();
  return self;
}

-(NSString*)getFactImpl {
  const char* fact = chuck_norris_get_fact(self.ckPtr);
  return [NSString stringWithCString:fact encoding:NSUTF8StringEncoding];
}
@end
Note how the only file that depends on the chucknorris.h C header file is the private implementation of the CKChuckNorris class.
There’s a similar technique known as “PIMPL” (pointer to implementation) you can use in C++ code to achieve the same kind of isolation.
It’s now time to edit the tests:
/* In Tests.m */
describe(@"ChuckNorris", ^{

  it(@"can get version", ^{
    expect([CKChuckNorris versionString]).to.equal(@"0.1");
  });

  it(@"can get a fact", ^{
    CKChuckNorris* ck = [[CKChuckNorris alloc] init];
    NSString* fact = [ck getFact];
    expect(fact).toNot.beEmpty();
    NSLog(@"Got fact: %@", fact);
  });

});
And see if they pass:
Undefined symbols for architecture x86_64:
  "operator delete(void*)", referenced from:
      _chuck_norris_version in libchucknorris.a(c_wrapper.cpp.o)
ld: symbol(s) not found for architecture x86_64
clang: error: linker command failed with exit code 1 (use -v to see invocation)
Whoops, we forgot to add the dependency to the C++ library. It’s less hard than in the Android case, since they always have the same name for iOS:
Pod::Spec.new do |s|
  ...

  s.vendored_libraries = ...
  s.libraries = ['c++', 'c++abi']
end
libc++ and libc++abi are found on the target operating system, hence we use the libraries variable.
We can now try again, and this time the tests pass \o/.
The GUI
We create the Objective-C application from Xcode.

Then we edit the main storyboard to add a stack view, a text field and a button:
We drag and drop the components from the designer view to the code, while keeping the ctrl key pressed.
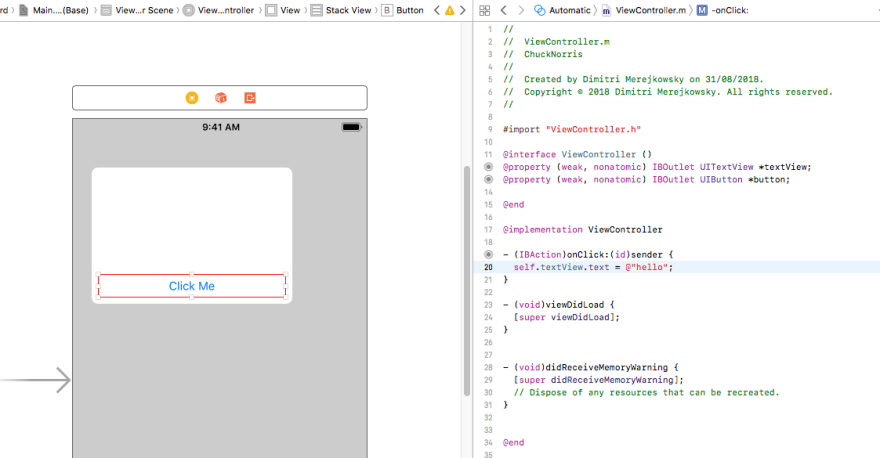
For now, we’ll just set the text view to the string Hello when the button is clicked:
/* In ViewController.m */
- (IBAction)onClick:(id)sender {
  self.textView.text = @"Hello";
}
OK, that works.
Now we can run pod init and edit the Podfile:
target 'ChuckNorris' do
  pod 'ChuckNorrisBindings', :path => '../bindings/'
end
We took a small shortcut here. Rather than deploying the ChuckNorrisBindings to a spec repository, we just tell the Podfile to get the podspec directly from the file system.
Let’s check this works:
$ cd ios/app
$ pod update
...
Downloading dependencies
...
Sending stats
Looks OK.
All that’s left to do is add a CKChuckNorris* pointer to the controller, set it in viewDidLoad and call the getFact() method when the button is clicked:
/* In ViewController.h */
#import <UIKit/UIKit.h>
#import "CKChuckNorris.h"

@interface ViewController : UIViewController

@property CKChuckNorris* ck;

@end

- (void)viewDidLoad {
  [super viewDidLoad];
  self.ck = [[CKChuckNorris alloc] init];
}

-(IBAction)onClick:(id)sender {
  self.textView.text = [self.ck getFact];
 }
We can now run the application inside a simulator:
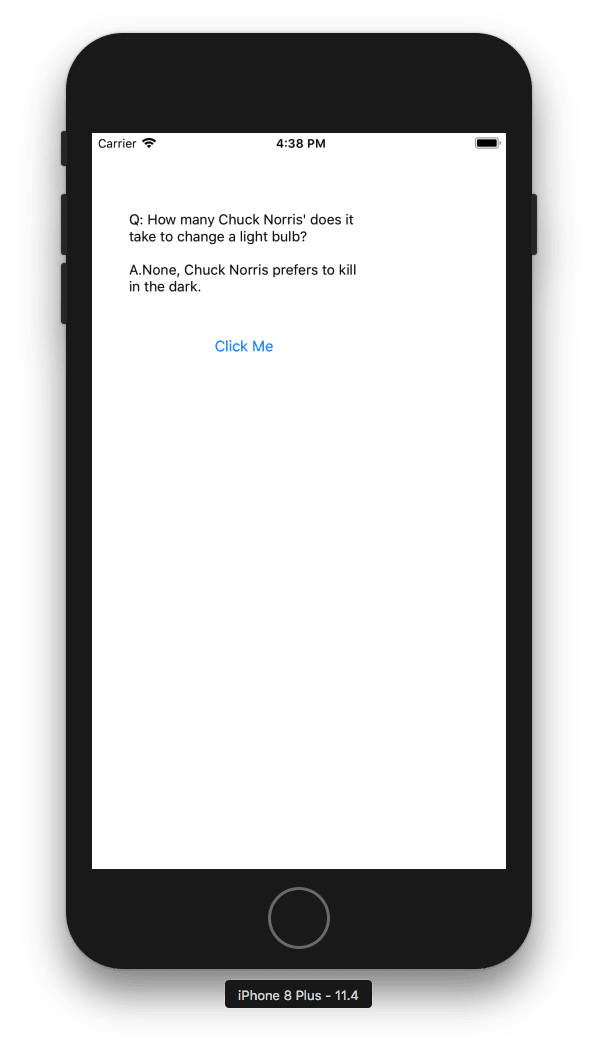
Yippee!
Dealing with the other architectures
Let’s try to build an .ipa, i.e an application file that can be installed on real devices.
The first step is to generate an archive of our application. To do this, we can use the “Archive” entry in the “Product” menu.
Right now it’s disabled, but we can fix this by selecting the “Generic iOS Device” next to the play/stop buttons in the bottom left.
Let’s click on it:
ld: warning: ignoring file /nativelibs/x86_64/libchucknorris.a, file was built
  for archive which is not the architecture being linked (arm64)
error: Undefined symbols for architecture arm64:
  "_chuck_norris_version", referenced from:
  +[CKChuckNorris(Private) versionStringImpl] in
    libChuckNorrisBindings.a(CKChuckNorris.o)
You read this right: the fact the .a was not build for the correct CPU architecture is a warning, and after that we get a generic error about the symbol being not found. The morale of the story is: when you have a compilation failure, start at the top of the compiler output :)
So, let’s try and add support for Arm 64bits. We can start by cross-compiling sqlite3 like so:
cd sqlite3
conan create . dmerej/test --profile ios --settings arch=armv8
Note that Conan and Xcode use different names for this architecture (armv8 and arm64 respectively).
Now, for the x86_64 architecture we manually copied files from .conan/data to nativelibs/x86_64. This is not ideal. Instead, we can use conan install (to install the deps), then conan build (to build the ChuckNorris library), and finally conan package to copy the libraries and headers (to run the code that was in the package() function of the recipe, remember?):
$ cd cpp/ChuckNorris
$ conan install . --profile ios --settings arch=armv8 \
    --install-folder build/ios/armv8
$ conan build . --build-folder build/ios/armv8
$ connan package . --build-folder build/ios/armv8 \
    --package-folder nativelibs/armv8
Note how the “install folder” for conan install matches the “build folder” for conan build and conan package.
Also note how the profile and settings are only used by conan install. After this, everything conan needs to know can be found in the build directory.
Let’s do the same for ‘armv7’, ‘armv7s’, and ‘x86’. Armv7 and armv7s are architectures used by older iOS devices, and x86 is used by 32 bits simulators.
Since this is a bit tedious by hand, we’ll use the build_ios.py script. 3
Now, instead of trying to build the ChuckNorrisBindings several times, once per architecture, (which is hard to do when using CocoaPods), we can use fat libraries instead. Fat libraries are just like regular libraries, except they can contain code for multiple architectures.
So let’s create a nativelibs/universal folder containing fat liqsqlite3.a and fat libchucknorris.a libraries:
cd nativelibs/universal
lipo -create -output libsqlite3.a ../*/lib/libsqlite3.a
lipo -create -output libchucknorris.a ../*/lib/libchucknorris.a
We can check with lipo -info that this worked:
$ lipo -info libchucknorris.a
Architectures in the fat file: libchucknorris.a are:
  armv7 armv7s i386 x86_64 arm64
Then we fix the podspec:
- s.vendored_libraries = Dir["nativelibs/x86_64/*.a"]
+ s.vendored_libraries = Dir["nativelibs/universal/*.a"]
We re-generate the Xcode project with pod update --ro-repo-update. This time the “Archive” step triggers no errors, and we are faced with this window:

Signing the archive
We now need to build a re-distributable application from the archive. The depends on your Xcode profiles and certificates. Here’s what worked for me, your mileage may vary:
- Select “export” on the right pane
- Choose “Ad Hoc” method of distribution
- Then tick the “Rebuild from Bitcode” option.
- Let Xcode do the signing and save the
.ipain a folder named based on the current date.
Finally, go to Xcode “Window” menu, select “Devices”, and drag and drop the “.ipa” from the date folder to the list of applications installed on this device.
And here’s the result (taken from my crappy Android phone):
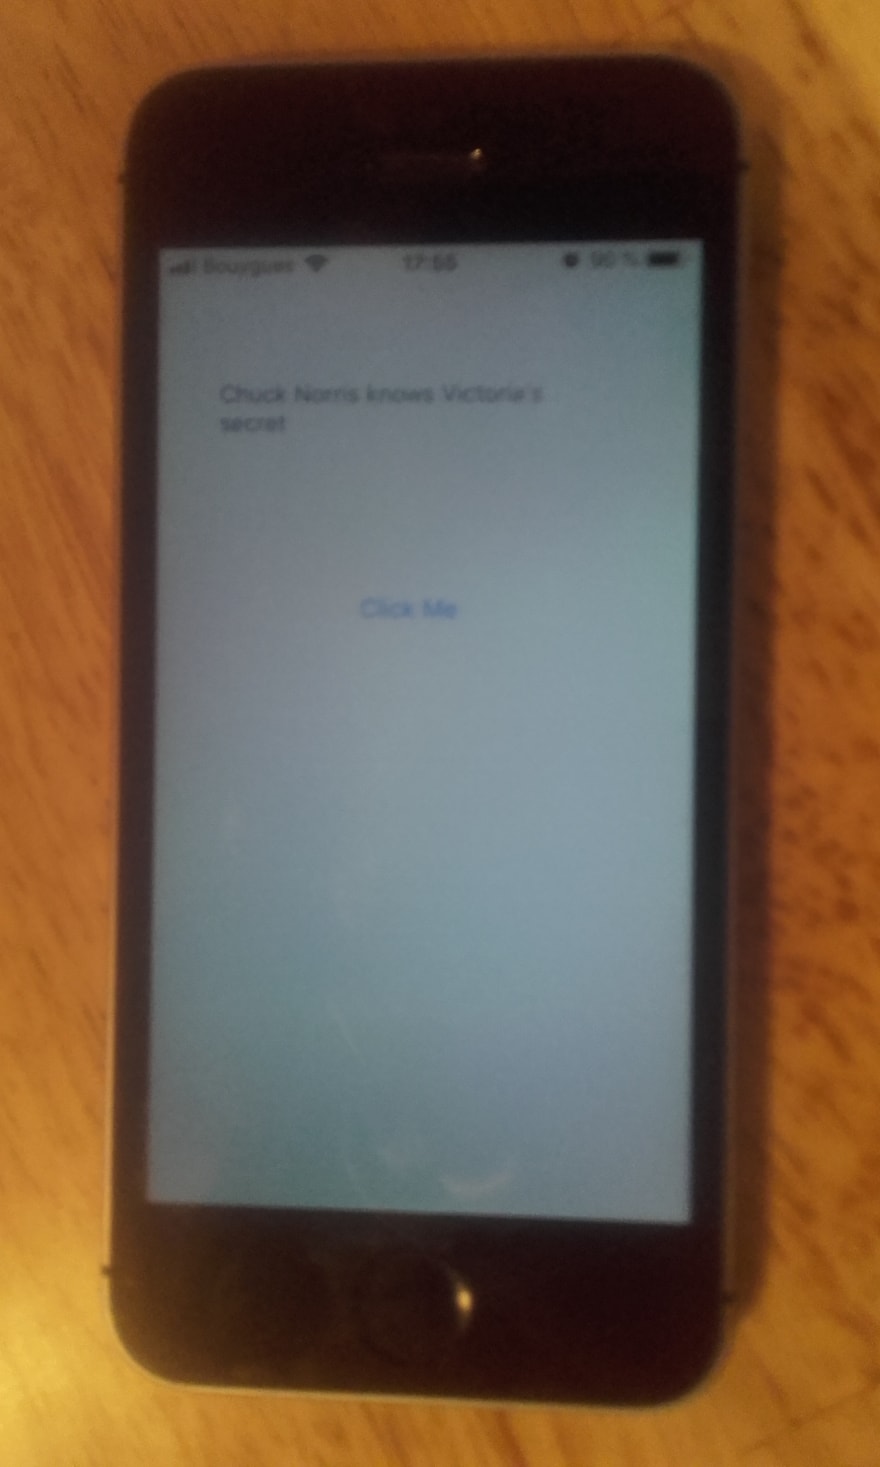
Victory!
Conclusion
That’s the end of the Chuck Norris series. I hope you had fun, I hope you learned something new. See you next time!
I'd love to hear what you have to say, so please feel free to leave a comment below, or check out my contact page for more ways to get in touch with me.
-
I heard Carthage is also a good option. Did not try it, though. ↩
-
This recipe was written and shared by my nice colleague Théo Delrieu from tanker.io. Say thanks! ↩
-
Which is not far from the CI script we use at work by the way. ↩

Oldest comments (0)