
Dig deeper into static site generation with Scully and use the most out of it
If you haven't heard about Scully yet, you should first check out my introduction article about it: »Create powerful fast pre-rendered Angular Apps using Scully static site generator«.
In my last blog post I gave you a short introduction to Scully and how to easily set up a very simple blogging website that is server-side rendered and ready to be shipped for production.
In the following article I will introduce some more advanced things you can do with Scully.
You will learn how you can setup a custom Markdown module or even use Asciidoc instead of Markdown.
I will guide you through the process of how to handle protected routes using a custom route plugin.
This blog post is based on versions:
@scullyio/ng-lib: 1.1.1
@scullyio/init: 1.1.4
@scullyio/scully: 1.1.1
Generate a post with a meta data template
As we already created our blogging site using Scully, we want to fill it with content now.
We already learned how we can use the @scullyio/init:post schematic to easily generate a new blog post.
Often posts do not only need the content, but also some meta information like thumbnail or author.
This meta information can be processed by the ScullyRouteService and it will be converted to JSON.
It can be quite handy to always remember to add such information right after creating a new post.
To make things easier we can specify a YAML template file with the meta information that will always be added when creating a new blog post using the schematic, like the following one:
description: <fill in a short description for the overview page>
published: false
author:
  name: Danny Koppenhagen
  mail: mail@k9n.dev
updated: dd.mm.yyyy
keywords:
  - Angular
language: en
thumbnail: assets/images/default.jpg
We can use the template when calling the @scullyio/init:post schematic:
ng g @scullyio/init:post --name="a new post" --meta-data-file=meta.yml
When we check our blog directory now we will see that the schematic added our YAML template to the meta data section of the newly created post file a-new-post.md.
If you have trouble remembering to add the
meta-data-fileoption, just add a script to yourpackage.jsonwithout thenameoption.
When you call the script usingnpm run <script-name>you will be prompted to input the file name.
Generate a custom Markdown module
Let's assume we want to add another module to our blogging website.
We want to have a projects section in our site that lists some information about current projects we are working on.
Like for our blog section, we want to easily write our content using Markdown.
To do so, we can use the @scullyio/init:markdown schematic:
ng g @scullyio/init:markdown --name=projects --slug=projectId --sourceDir=projects --route=projects
Let's have a look at the options we set:
-
name: This is the base name for the generated Angular module that Scully created for us. -
slug: Here we define the placeholder name for the URL that will be filled with the basename of the Markdown files. -
sourceDir: That's where we will store our Markdown files whose content is rendered by the Scully Markdown file plugin. -
route: This is the name for the route before the:slugin the URLs where we can see our rendered content later.
Good to know: Under the hood the
@scullyio/init:blogschematic just calls@scullyio/init:markdownwith default options set. So in fact it's just a shortcut.
The basic things we need for our projects page are now available.
Let's have a look at it and see if it's working:
npm run build                   # Angular build
npm run scully -- --scanRoutes  # generate static build and force checking new routes
npm run scully serve            # serve the scully results

The AsciiDoc File Handler Plugin
Scully provides another File Handler Plugin out-of-the-box: The AsciiDoc plugin.
When you want to put the generated post files in a specific directory (not blog), you can define this via the target option.
ng g @scullyio/init:post --name="asciidoc example" --target=projects
The generated file will be a Markdown file initially.
Let's change the file extension, rename it to *.adoc and add a bit of content after it has been generated:
:title: 2020-01-21-projects
:description: blog description
:published: false
= 2020-01-21-projects
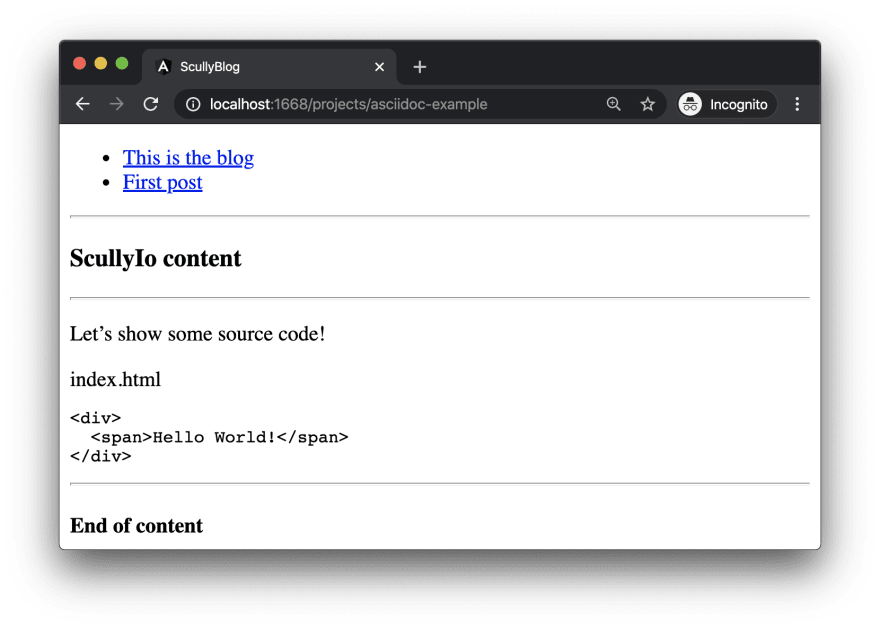
Let's show some source code!
.index.html
[#src-listing]
[source,html]
----
<div>
<span>Hello World!</span>
</div>
----
And finally we build our project again and see if it works:
npm run build                   # Angular build
npm run scully -- --scanRoutes  # generate static build and force checking new routes
npm run scully serve            # serve the scully results
Great, as we can see: AsciiDoc files will be rendered as well out-of-the-box.
You can also define your own File Handler Plugin for other content formats.
Check out the official docs for it to see how it works.
Protect your routes with a custom plugin
Let's assume we have a protected section at our site that should only be visible for specific users.
For sure we can secure this space using an Angular Route Guard that checks if we have the correct permissions to see the pages.
Scully will by default try to identify all available app routes.
In fact it will also try to visit the protected pages and pre-render the result.
When Scully tries to do this, the Angular route guard kicks in and redirects us to an error or login page.
The page shown after the redirect is the page Scully will see and render.
This default behaviour is pretty okay, as Scully won't expose any protected information by creating static content from the protected data.
However, on the other hand, we don't want to pre-render such pages at all, so we need a way to tell Scully what pages to exclude from the rendering.
Another scenario you can imagine is when a page displays a prompt or a confirm dialog.
When Scully tries to render such pages it runs into a timeout and cannot render the page:
...
Puppeteer error while rendering "/secure" TimeoutError: Navigation timeout of 30000 ms exceeded
To prevent Scully from rendering specific pages we can simply create a custom plugin that will skip some routes.
To do so, we will create a new directory extraPlugin with the file skip.js inside:
const { registerPlugin, log, yellow } = require('@scullyio/scully');

function skipPlugin(route, config = {}) {
  log(`Skip Route "${yellow(route)}"`);
  return Promise.resolve([]);
}

const validator = async conf => [];
registerPlugin('router', 'skip', skipPlugin, validator);
module.exports.skipPlugin = skipPlugin;
We will import the function registerPlugin() which will register a new router plugin called skip.
The last parameter is the plugin function skipPlugin() that will return a promise resolving the routes.
It receives the route and options for the route that should be handled.
We will simply return an empty array as we won't proceed routes handled by the plugin.
We can use the exported log() function from Scully to log the action in a nice way.
Last but not least we will use the skip plugin in our scully.scully-blog.config.ts configuration file and tell the plugin which routes to handle:
import { ScullyConfig } from '@scullyio/scully';

require('./extraPlugin/skip');

export const config: ScullyConfig = {
  // ...
  routes: {
    // ...
    '/secure': { type: 'skip' },
  }
};
Checking the plugin by running npm run scully will output us the following result:
 ☺   new Angular build imported
 ☺   Started servers in background
Finding all routes in application.
...
Skip Route "/secure"
...
Perfect! As you can see the route is ignored by Scully now.
You can have a look at a more detailed example in my scully-blog-example repository.
Conclusion
In this follow-up article you learned how to add a custom Markdown module to Scully and how you can use the AsciiDoc plugin for rendering adoc files.
What is more, you can now handle protected routes by using a custom Scully route plugin.
Thank you
Special thanks go to Jorge Cano from the Scully core team and Ferdinand Malcher for revising this article.

Top comments (0)