
Hey everyone! Lately, I've been diving into REST APIs, and I wanted to share my perspective on the topic. However, I realized that to grasp the concept indeed, it's essential to have a solid understanding of HTTP. In this article, we'll explore the fundamentals of HTTP, covering key concepts, and its inner workings, and providing examples and illustrations along the way.
Let's dive right in 😉
What is HTTP ?
HTTP stands for Hypertext Transfer Protocol. And it is simply a powerful protocol that is designed to facilitate communication between computers (client and server) over the internet. it is used to transfer data between web servers and web browsers.
it is also a stateless protocol, meaning each request-response cycle is independent and lacks inherent memory. To maintain user sessions and stateful interactions, HTTP utilizes cookies. Cookies are small pieces of data stored on the client's side, which the server can access and modify during subsequent requests, enabling personalized and dynamic web experiences.
Later in this article, we'll delve into the inner workings of HTTP and explore how it operates in detail. But Let's take a quick look at how it works. Imagine you want to visit a website, like https://twitter.com/. You simply type this URL https://twitter.com/, known as a Uniform Resource Locator, into your web browser. Your computer, playing the role of the client, sends a message called a request to the website's server. The server then responds with a message, known as a response, that contains the data you requested.
💡 In this article, we'll be using two important terms frequently: "Client" and "Server." It's essential to understand their roles. The Client refers to your web browser, the program you use to access websites. On the other hand, the Server represents the website's hosting server that you're visiting. These terms will help us better understand the interaction between your browser and the website's server. So, keep in mind that the Client is you, browsing the web, while the Server is the powerful machine serving the website's content.
What is HTTPS?
HTTPS, short for Hypertext Transfer Protocol Secure, is an enhanced version of HTTP (Hypertext Transfer Protocol) that encrypts the communication between a client and a server using a security layer known as SSL (Secure Socket Layer). If you intend to create a website involving user interactions that entail transmitting sensitive information like credit card details, opting for HTTPS is strongly recommended.
Key Concepts in HTTP
Learning HTTP involves understanding the fundamentals of how data is exchanged between a client and a server. Here are some key concepts to get started with understanding HTTP faster and better 👇🏽
1. Understanding HTTP
1.1. Client-Server Model
The client-server model is basically a way of thinking about how to design and build software applications. It breaks down the application into two parts: clients and servers. Clients are the user-facing parts of the application, and they are responsible for displaying data and interacting with users. Servers are the back-end parts of the application, and they are responsible for storing data, processing requests, and generating output.
Let’s breakdown those grammar with this illustration 👇🏽
Imagine a library. The books are stored in the back of the library, and the librarians are at the front of the library. When you want a book, you go to the front of the library and ask a librarian for the book. The librarian goes to the back of the library and gets the book for you. Then, the librarian brings the book to you at the front of the library.
In this illustration, the library is the server, you are the client, and the books are the data. The server stores the data, the client requests the data, and the server provides the data to the clients.
Hope you understand now!
1.2. Client-Server Architecture
Client-server architecture is a way of building software applications that uses the client-server model. In a client-server application, there are two types of computers: clients and servers. Clients are the computers that users interact with, and servers are the computers that store data and process requests.
Again let’s breakdown those grammar with this example 👇🏽
Imagine you and your friend playing a game. In the game, you both have different roles. Your friend is the "server" and you are the "client."
The server's job is to provide the game and make sure everything runs smoothly. It stores all the information, like the rules of the game and what's happening in the game world.
Your job as the client is to interact with the game. You play the game on your device and send messages to the server asking it to do things, like moving your character or getting information about other players.
So, in client-server architecture, the server is like a boss who knows everything about the game, and the client is like a player who asks the boss for help and information.
Hope it makes sense now.
💡 The main difference between the two terms is that the client-server model is a conceptual model, while the client-server architecture is a specific implementation of that model.
2. HTTP Request
HTTP requests are the standard protocol for communication between a client and a server on the web. When a client wants to retrieve information from a server or send data to a server, it initiates an HTTP request.
HTTP requests consist of several components 👇🏽
2.1. HTTP Methods
This specifies the type of action the client wants to perform. There are several methods but we are going to be talking about the common ones which are:
- GET: Retrieve data from the server.
- POST: Send data to the server.
- PUT: Update a data that is already on the server.
- DELETE: Remove a data from the server.
2.2 URL (Uniform Resource Locator)
The URL specifies the address of the resource the client wants to interact with. It typically includes the domain name, path, and optional query parameters. Example can be
GET https://twitter.com/ HTTP/1.1
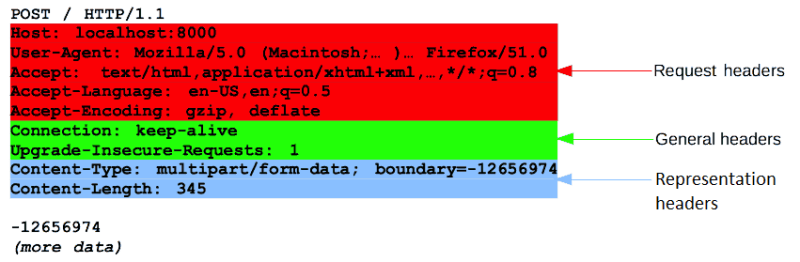
2.3 Request Headers
Headers provide additional information about the request, such as the content type, language, and user-agent. They help servers understand the client's intentions and handle the request accordingly.
2.4 Request Body
In certain HTTP methods like POST and PUT, a request body can be included to send data to the server. This data can be in various formats like JSON, XML, or form data.
3. HTTP Response
HTTP responses are the messages sent by a server to a client in response to an HTTP request. When a client, such as a web browser, sends a request to a server, the server processes the request and generates an HTTP response, which contains the requested information or an appropriate status code indicating the outcome of the request.
It also consists of several components 👇🏽
3.1. Status Codes
HTTP status codes indicate the result of a request. They are three-digit numbers that categorize the response into different classes (e.g.,1xx for informational, 2xx for successful responses, 3xx for redirecting, 4xx for client errors, and 5xx for server errors).
There are a lot of them but here are some of the common ones you’ll see often 👇🏽
- 200 (OK): The request was successful, and the server is sending the requested data.
- 404 (Not Found): The requested resource could not be found on the server.
- 500 (Internal Server Error): An unexpected error occurred on the server while processing the request.
- 302 Found (or other 3xx codes): The server is redirecting the client to a different URL.
As I said earlier, These are some of the common ones. So I would advise you to memorize and understand each of them.
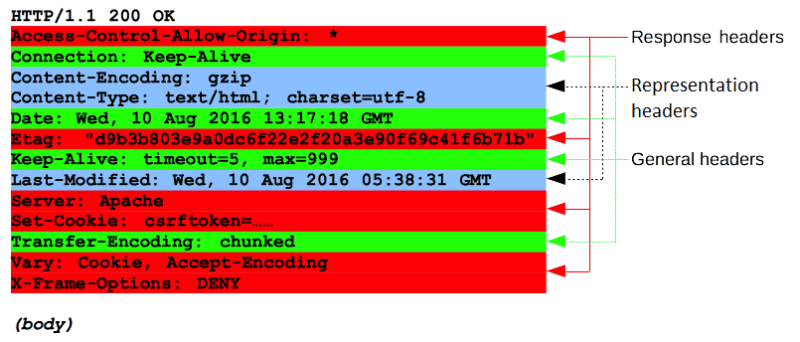
3.2 Response Headers
Similar to request headers, response headers provide additional information about the response or the server sending the response. They can include details such as content type, cache control directives, server information, and more.
3.3 Response Body
The response body carries the requested data or other content sent by the server. The content can be HTML, JSON, XML, images, documents, or any other type supported by HTTP. The presence of a response body depends on the request and the server's response.
Understanding the HTTP request and response cycle can initially be challenging (at least it was for me), as it may seem impractical. However, let's adopt a more practical approach to explore how the request and response cycle work together.👇🏽
HTTP Request and Response cycle
Here's an easier overview of the HTTP request and response cycle. And we going to break it down into steps 👇🏽
💡 Side note, we are also going to reexplain some of the things we’ve already talked about.
The client, typically a web browser, initiates an HTTP request to a server. This request is sent to a specific URL (Uniform Resource Locator) that represents the desired resource.
-
The request consists of:
- Request method: Specifies the type of action the client wants to perform, such as GET, POST, PUT, or DELETE.
- Headers: Additional information about the request, including content type, authentication details, caching instructions, and more.
- Request body (optional): Data sent by the client, typically included in requests like POST or PUT, which may contain form data, JSON, or other payloads (actual data or content carried within a communication protocol or container).
The server receives the HTTP request and processes it based on the provided method, headers, and request body. It determines the appropriate action to take based on the URL and requested resource.
-
The server generates an HTTP response, which consists of:
- Response status code: A three-digit numerical code that indicates the outcome of the request, such as 200 for a successful request or 404 for a resource not found.
- Headers: Additional information about the response, including content type, cache control, server details, and more.
- Response body: The requested data or content sent by the server. This can be HTML, JSON, images, documents, or any other supported format.
The server sends the HTTP response back to the client.
The client receives the response and interprets the status code and headers. It processes the response body accordingly, which may involve rendering the received HTML, parsing JSON data, displaying images, or performing other actions based on the content.
The client can repeat the process by sending additional HTTP requests as needed, such as fetching additional resources, submitting forms, or navigating to other pages.
Here are some images I found on MDN that will enhance your understanding further. 👇🏽
HTTP Request
HTTP Response
👨🏽💻 Code Example
Before concluding, I believe it would be beneficial to explore a simple example that demonstrates the HTTP request and response in action. For this purpose, we will utilize Express which is a web framework for Node.js, to create our API, and Postman which is a versatile API testing tool to test the API we'll be developing.
Before we start the example, make sure you have Express.js installed. You can install it by opening your terminal in vs code and run this command npm install express.
Here's an example of creating a very simple API using Express.js 👇🏽
```
const express = require('express');
const app = express();

// Define a GET route at '/'
app.get('/', (req, res) => {
  res.json({ message: 'Hey there!' });
});

// Start the server and listen on port 3000
app.listen(3000, () => {
  console.log('Server is running at http://localhost:3000');
});
```
In this example, we first import the Express module using require('express').
Next, we create an instance of the Express application by calling express() and assigning it to the app variable.
Then, we define a GET route using app.get(). In this case, we have defined a route at '/'. When a GET request is made to this route, the server responds with a JSON object containing a message.
The route callback function takes two parameters: req (request) and res (response). In this example, we use res.json() to send a JSON response to the client.
Finally, we start the server by calling app.listen(), specifying the port number (3000 in this case). Once the server is running, it logs a message indicating the server's URL.
To run the server and start listening for incoming requests, you need to execute the JavaScript file using Node.js. Here's how you can run the server 👇🏽
Make sure you have Node.js installed on your computer. You can download and install Node.js from the official Node.js website https://nodejs.org
Create a JavaScript file, for example,
server.js, and paste the code for your Express.js server into it.Open a terminal or command prompt and navigate to the directory where you saved the
server.jsfile.Run the following command to start the server
node server.js
If everything is set up correctly, you should see a message in the terminal saying "Server is running at http://localhost:3000" or similar. This indicates that the server has started successfully and is listening on port 3000.
You can now send HTTP requests to the server, for example, by using Postman or a web browser, to interact with your API endpoints.
To test this API using Postman:
Here is a link to download it if you do not have it installed https://www.postman.com/
Ensure that the server is running by executing the script.
Open Postman and create a new request.
Set the request method to GET and enter the URL:
http://localhost:3000/.Send the request by clicking the "Send" button.
Postman will display the response received from the server, which should be a JSON object with the message "Hello, there!".
Here is how your output will look like if you follow the steps correctly 👇🏽
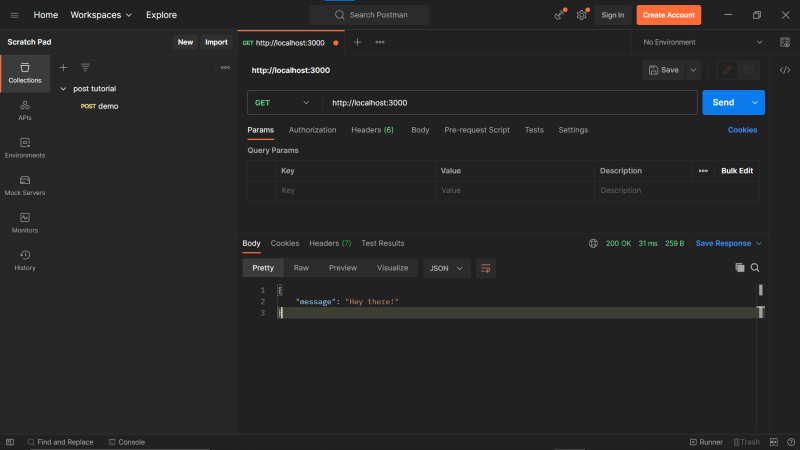
If you refer to the diagrams depicting the HTTP request and response cycle, you'll notice that the majority of elements such as headers and status codes are present in this output. Feel free to experiment with them to gain a better understanding of the process.
💡 I know that this example is quite basic; however, it serves the purpose of providing you with a glimpse of how HTTP works. In the upcoming article, we will delve into more advanced examples to further enhance your understanding.
Conclusion
That’s all guys, Congrats on reaching the end of this article 🎉 🎉. I really hope you learned something. I know that most of the things we talked about look intimidating but I promise you that It is not. Just take things slow and always remember that the only way to get good at something is constant practice. I hope you have an amazing weekend. See you next week 😃

Top comments (2)
Nice article 👍 looking forward to more advanced 😁
Thanks Vlad.