
The video tutorial to this post
You must have seen Tom Scott's YouTube video where he uses the YouTube API to automatically update the title of the video. I had written a tutorial for the same in a previous article (Check it out here)
After doing the YouTube project, I was thinking if I could do the same with my Twitter account. I tried reading through the Twitter API docs and it turned out doing this was actually pretty easy! I was able to completely write and deploy the code in an hour.
In this post, I'll walk you through how I did it and how you can easily get started with the Twitter API to automate processes like updating your profile, posting tweets etc.
Creating an app with Deta
- Create an empty folder for your project
- From the folder, run
deta new --node twitter-updateto create a new Deta Micro. - Once the app is created, you will get some details including the endpoint web address. We will use this to create an app from the Twitter Developer Console.
Setting up the Twitter App

- Log in to your Twitter Developer account and navigate to your dashboard.
- Create a new app and give it a suitable name. Use the endpoint that you got when creating the Micro as the website url for your app
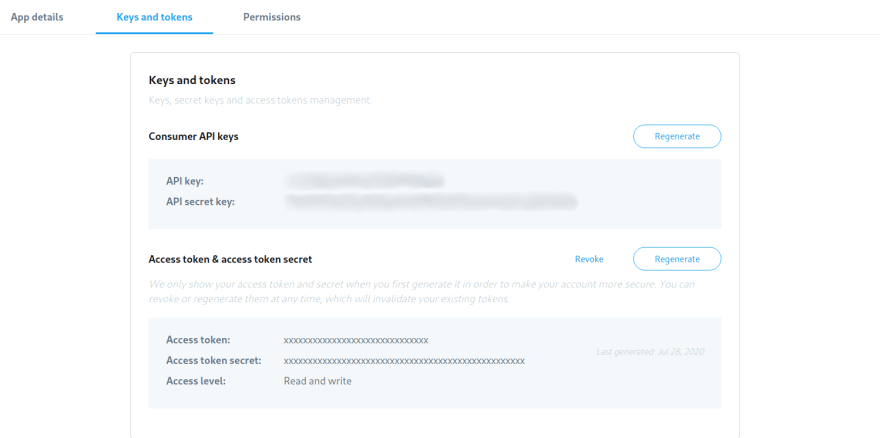
- Go to the keys and tokens tab to find your API Key and API Secret Key.
- Under the API keys, click the option to generate your access token and secret. Copy and store these keys somewhere safe as you will only get to see it once.
Before writing the code
Now that we have the necessary keys, lets get to writing the code that actually does the work. But we need to import the API keys and access tokens inside our code inorder to use it.
- Create a
.envfile inside your project and copy the credentials you got from the Twitter App Dashboard into it, as shown
consumer_key=blah
consumer_secret=blahblah
access_token_key=blahblahblah
access_token_secret=blahblahblahblah
- Now that you have a .env file, you can access these from inside your code (You might have to install the
dotenvpackage and setrequire('dotenv').config()inside your js file. I assume you've done this already.)
Writing the code
- We are going to use the Twitter for Node.js package for making requests to the API.
- Install the package with
npm install twitter - Import the twitter package and create a client object
const twitter = require('twitter')

const client = new twitter({
    consumer_key: process.env.consumer_key,
    consumer_secret: process.env.consumer_secret,
    access_token_key: process.env.access_token_key ,
    access_token_secret: process.env.access_token_secret
})
- Now you can call the get and post functions of the client object to use the Twitter APIs however you want.
You can refer to the docs to choose an api and study about its parameters and such.
In our example, we need to read the profile details from our account - the name, the number of followers and so on and use it to update a part in the profile, the name.
Let's see how to read the profile first. We can use account/verify_credentials to fetch the details from our Twitter account.
client.get('account/verify_credentials',(err,res)=>{
  if(!err){
    const followerCount = res.followers_count
    console.log(followerCount)
  }
})
Here we retrieve only the followers_count from the response, but you can try printing the entire response object to see what all information we are fetching.
Now we need to update the profile details. For this we can use account/update_profile.
client.post('account/update_profile',{name: 'New Name'}, (err,res)=>{
  if(err) throw error
  console.log('Updated')
})
This piece of code above will update the name parameter in your profile to whatever value you give it. You can even create a params object with all the stuff you want to change and pass it to the function.
const params = {name : 'New Name'}

client.post('account/update_profile', params, (err,res)=>{
  if(err) throw error
  console.log('Name has been updated')
})
Now that you have the two pieces of the puzzle, you can use the updation inside the function where you fetch the data.
client.get('account/verify_credentials',(err,res)=>{
  if(!err){
    const cnt = res.followers_count

    const params = {name : 'Sree has ${cnt} followers!'}

    client.post('account/update_profile',params,(err,res)=>{
      if(err) throw error
      console.log('Name has been updated')
    })
  }
})
Now if you run npm start and start the server locally, your Twitter profile name will be updated. But we need this to happen in the background, in real time. This is where Deta Cron comes in.
A cron is a piece of code that has been scheduled to run at a certain interval, and it keeps running again and again. With Deta you can easily deploy a cron with just a few lines of code and a few commands.
For setting a cron with Deta, you can import App from Deta as
const { app } = require('deta')
And set the function to run as the cron inside app.lib.cron like this
app.lib.cron(event => {
    // The code here will be executed repeatedly
});
So you can bundle up all the above code we used to call the API into a function and call the function from inside here.
- Now from your project directory, run
deta update -e .envto update your environment variables. - Run
deta deployto deploy your code to production. - Run
deta cron set '1 minute'to set the code to run every minute.

Latest comments (0)