
What is Hatch?
Hatch is a creative web page builder that brings the fun back to making web sites and apps. We've just integrated AI and Javascript scripting for maximum wow so here's a little tutorial on how to do it.
Adding Interactivity
If you're AI-curious or not ready to try coding your own interactivity use AI Interactions and let the Hatch AI write the code for you! If you're comfortable with JavaScript you can take control and add interactivity to your creations via the Hatch API with our JS Interactions. We'll get into both here.
AI Interactions
Follow along! Click this link (desktop, laptop, tablet) to open the Interactions 101 project in the Hatch editor.
What we're going to do is make the "Next Joke" button display a new joke every time it is clicked. We'll have the AI write the code for us. Not because we're lazy, but because we're smart and still in control of AIs.
Start adding an interaction to the page by opening the Interactions panel. Click on the interactions tab of the right panel:

Or select an element and click its interaction bolt:

Either way, the Interactions panel will open:

To have the AI write the code press the new AI action button:

We "prompt" the AI to write code by giving it a description of what we want to happen. In this case type in the prompt "when clicked fetch a joke and display it in @joke".

You can reference any element on the page by typing "@" and the name of the element. Hatch shows a list of elements to choose from. It's important to choose from the list (click it or press tab or enter when selected) so Hatch AI knows exactly what you're talking about. Hatch will automatically update the code if you rename the element.
Press the arrow button to have the AI write the code.
Amazing! What a time to be alive.
You can take a look at the code the AI wrote and even modify it by clicking the code button below the prompt.
Go ahead and press the Preview button and click the "Next Joke" button.
Haha, that was a good one. Press it again. OK, enough, let's move on.
AI code generation is still in its infancy and often won't be able to write the code you want. But it's getting better every day. If you have a suggestion for how to improve the AI, questions about how best to prompt the AI, or want to share your results head on over to our helpful forum. We'd love to see you there!
Now let's move on to writing some JavaScript ourselves.
JavaScript Interactions
Select the "Interactions 101" heading on the page. Click its interaction bolt to bring up the interactions panel. This time click the "+" next to "{} javascript" to add a new interaction.
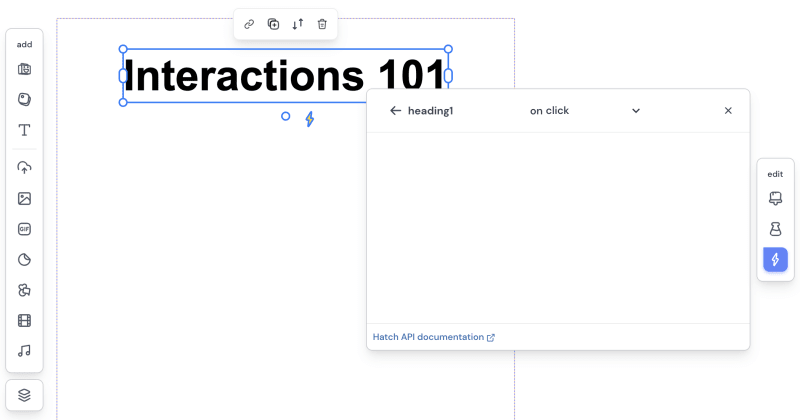
Let's move the heading element named "heading1" every time it is clicked.
In the empty JavaScript "on click" interaction add the code:
@heading1.y += 100
When "@" is typed the editor will helpfully show a list of elements and other completions to choose from.
Press the Preview button and try clicking on the heading.
Animation
Let’s make our example a bit more interesting with some animation! Replace the previous line of code with:
animate(@heading1, { y: @heading1.y + 100 }, { easing: 'ease', duration: 0.5 })
Preview and try it out.
The animate function can animate any element property, and several at once.
The Interaction Bolt
The interaction bolt glows when its element has an interaction. It is also the fastest way to create an interaction. Drag from the bolt on one element to any other element and Hatch will create an interaction that invokes the primary action or sets the primary property of the target element.
Try it out. In the Interactions 101 project, drag from the interaction bolt on the Play button to the frog sound.
Create another interaction to the adjacent video. Preview and press "Play".
Properties
There are properties that all elements share, like x, y, rotation, opacity, and visible. There are also properties that are unique to each element. For example, the Video element has a currentTime property that can be set to jump to a specific time in the video.
Canvas is pretty sweet. It has a context property that returns a CanvasRenderingContext2D object that can be used to draw on the canvas.
Effects are available as properties on elements. For example, if an element has a Shadow Effect applied to it the shadow color can be changed via element.Shadow.color.
The "code names" for element properties are often a little different than what you see in the Hatch editor. For example, Text elements have a property labeled "size" in the editor, but the code name is fontSize. That's what we get for trying to make things easy for humans AND for computers. As compensation there are a number of properties available via the Hatch API that go beyond what is available in the editor.
All element properties can be found in the API documentation.
Events (sometimes known as "triggers")
You can choose what event triggers an interaction. There is a drop-down menu at the top of the code editor that lists all the events the selected element supports.
The default is on "click". Other popular events are "mount" (when an element is added to the page), "pointermove" (when the mouse or finger moves over an element), and "keydown" (when a key is pressed).
Many elements have unique events. Inputs and Sliders have "change" events. The Project fires "scroll" events as the page is scrolled. When physics is enabled elements can respond to "begincontact" and "endcontact" events to handle collisions.
All events can be found in the API documentation.
Methods (sometimes known as "actions")
Every element provides a set of methods that can be invoked to make it do one useful thing or another. Audio and Video elements have play, pause, and stop methods.
All elements have an on method that can be used, by itself or other elements, to listen to the events it receives. This is the same as adding an interaction to the element, but be done dynamically.
Want to make a copy or 1000 copies of an element? Use the clone method. But don't forget to add the copy to the Page, or another Container, with its appendChild method. That's what it takes to make it visible.
All element methods can be found, you guessed it, right there in the API documentation.
Debugging
Sooner or later you or the AI is giong to write some code that doesn't do what is expected. Yay bugs. Hatch doesn't yet provide any debugging tools but you can take advantage of the ones built into your browser. Every browser is different but they all have some way to open "Developer Tools" AKA "devtools" that have two incredibly useful tabs: "Console", to which you can log information as your code executes, and "Sources", which lets you step through code line by line and examine variables and a zillion other things.
Using the Devtools Console
Each browser has their own menus and shortcuts for opening developer tools and a common one is to right-click anywhere on your page and select "Insepct". Try it! Select the "Console" tab. It might display anything initially because web pages are always doing crazy stuff. You can find the button to clear the console if you want.
Output information from your interactions to the console using the standard console methods (console.log, console.warn, console.error, etc.) or use the Hatch log function which is a shortcut for console.log. For example:
// I wonder what the value of @heading1's y property is?
log(@heading1.y)
log(`fancy formatting: x=${@heading1.x} y=${@heading1.y}`)
Using the Devtools Sources
Add a debugger statement anywhere in your code to stop execution at that point. Execution only stops when devtools is open. For example:
// Let's step through this code.
debugger
@heading1.text = "Hatch is fun"
@heading1.y = Math.random() * this.page.height - @heading1.height
@heading1.x = Math.random() * this.page.width - @heading1.width
Where to go from here
Thanks for playing along! Take a look around the Interactions 101 project. It has more examples of micro-interactions you can try and inspect their code.
You'll find a fun remixable example of what can be done wth Hatch interactions at https://hatch.one/try-hatch-programming.
Questions? Made something cool? Come to the Hatch forum for help or to share.
And of course there are all kinds of starter projects at https://hatch.one. Make yourself a fun web site or app!
-- Team Hatch


Top comments (2)
This is cool!
Thanks!