
Implementing search functionality on a full-stack application is hard. But doing it on a static site might seem impossible. After all, you don't have
a database to query, right?
Fortunately, the Astro web framework has an API, where you can fetch the markdown or MDX files you need. After fetching all the data, we'll able to search
for a specific query provided by our users.
Here is a demo of what we're going to build.
Let's build an Astro search component by using React and fuse.js.
Note:
The source code for this project is available on this GitHub
repository.
Creating an Astro Blog Project
Let's kick things off by creating an Astro project. I built an in-depth guide on how to start an Astro project
if you have any questions about this process.
I'll be using the recommended starting template by Astro.
npm create astro@latest
✔ Where would you like to create your new project? … Astro-search-component
✔ How would you like to setup your new project? › a few best practices (recommended)
...
I added the MDX Astro integration, to be able to use both .md and .mdx file extensions, but if you only use plain markdown files this is not necessary. Run the following
at the root of your project.
npx astro add mdx
If you said yes to every option, the CLI tool modified automatically modified your
Astro config file.
Modify the src/pages/index.astro file to look like the following.
This page should be available under localhost:3000.
---
import Layout from '../layouts/Layout.astro';
const allPosts = await Astro.glob('../posts/*.{md,mdx}');
const posts = allPosts.filter((post) => !post.frontmatter.draft && post.frontmatter.slug);
---

<Layout title="MyBlog">
    <h1>Welcome to my Blog</h1>
</Layout>
The Layout component is provided by the starter template of Astro. If you don't have it, create one under the src/layouts/Layout.astro filename, or just wrap the content inside
a normal HTML structure.
For now, don't worry about the styles. We'll be applying Tailwind CSS
later in the tutorial.
After this, create an Astro page to display blog posts dynamically.
Create a file named src/pages/[slug].astro. The squared brackets mean that to display the page we must pass a parameter called slug to the URL. In this case,
the page URL of any posts would be localhost:3000/[slug]/
---
import Layout from '../layouts/Layout.astro';

export async function getStaticPaths() {
    const allPosts = await Astro.glob('../posts/*{md,mdx}');
    const posts = allPosts.filter((post) => !post.frontmatter.draft && post.frontmatter.slug);

    return posts.map((post) => ({
        params: {
            slug: post.frontmatter.slug,
        },
        props: { post },
    }));
}

const { post } = Astro.props;
---

<Layout title={post.frontmatter.title}>
    <h2>{post.frontmatter.title}</h2>
    <p>{post.frontmatter.description}</p>
    <post.Content />
</Layout>
Note how we use the getStaticPaths() function to dynamically create the paths of our posts.
The parameter is a slug field that we must manually specify. You can automate it by applying a slugify
function to the posts' filenames, but this is outside the scope of the tutorial.
Now, let's create some posts with different titles and descriptions inside the src/posts/ directory (you have to create this folder).
The source code of the project up to this point, including the dummy posts are available on this GitHub branch.
Create the Astro Search Component
First, we're going to create an Astro file src/components/SearchBar.astro that fetches all the posts and sends them as a prop to the React search component, which we'll later create in the same components folder.
It's like creating a client, that uses an API, and then creating the API itself.
---
import Search from './Search';
const allPosts = await Astro.glob('../posts/*.{md,mdx}');
const posts = allPosts.filter((post) => !post.frontmatter.draft && post.frontmatter.slug);
---

<Search client:load searchList={posts} />
We filter the posts so they are not drafts, and they have a defined slug. Then we pass this post list to
the React component we're going to create next.
As you can see, it's a pretty simple client, which means all the logic relies on the React component.
Building a React Search component
Before doing any code, let's add the dependencies to our project.
First, add the React integration from @astrojs/react,
and the fuzzy search library fuse.js, which we'll use to search through the markdown files.
You can read more about fuzzy search or more formally approximate string
matching in this article.
On the root of the project run:
npx astro add react
npm i --save fuse.js
Now, create a .jsx file named Search.jsx inside the components folder, which will contain a React function component.
At the top of this file, import Fuse, the fuse.js API, and the useState() hook, which allows us
to track the state (an object that contains data about a component) of our search input.
import Fuse from 'fuse.js';
import { useState } from 'react';
Set the options for the Fuse object with a dictionary.
// Configs fuse.js
// https://fusejs.io/api/options.html
const options = {
    keys: ['frontmatter.title', 'frontmatter.description', 'frontmatter.slug'],
    includeMatches: true,
    minMatchCharLength: 2,
    threshold: 0.5,
};
Now let's create our Search function component. It'll take a search list as a prop.
function Search({ searchList }) {
    // Following code
}
export default Search;
Inside this function, use the useState() hook, with an
empty initial value, to track
the state of a variable query (the input of the user).
const [query, setQuery] = useState('');
Create a Fuse object, with the initial search list, and the
options we defined above.
const fuse = new Fuse(searchList, options);
Now, define the posts we're going to display in the search bar, by using the
search() method of the Fuse object.
// Set a limit to the posts: 5
const posts = fuse
    .search(query)
    .map((result) => result.item)
    .slice(0, 5);
This search method returns a list of the results according to the query. Each result,
has an item object, containing the data of the item found, and refIndex. Because we
only want to get the data from the item, we transform the result object to get only the item.
The slice() function returns only the first 5 results — the most precise results.
You can change it according to your needs.
Now, create a handler function handleOnSearch to change the value of the query according to the
input from the user.
function handleOnSearch({ target = {} }) {
    const { value } = target;
    setQuery(value);
}
We'll pass this function to the input HTML tag.
You can learn more about handling forms in the official React Docs.
Finally, return a label, and an input text field with
the query as value, and handleOnSearch as the handler of the onChange event.
return (
    <>
        <label>Search</label>
        <input type="text" value={query} onChange={handleOnSearch} placeholder="Search posts" />
        {query.length > 1 && (
            <p>
                Found {posts.length} {posts.length === 1 ? 'result' : 'results'} for '{query}'
            </p>
        )}
        <ul>
            {posts &&
                posts.map((post) => (
                    <li>
                        <a href={`/${post.frontmatter.slug}`}>{post.frontmatter.title}</a>
                        {post.frontmatter.description}
                    </li>
                ))}
        </ul>
    </>
);
The src/components/Search.jsx file should look like this.
import Fuse from 'fuse.js';
import { useState } from 'react';

// Configs fuse.js
// https://fusejs.io/api/options.html
const options = {
    keys: ['frontmatter.title', 'frontmatter.description', 'frontmatter.slug'],
    includeMatches: true,
    minMatchCharLength: 2,
    threshold: 0.5,
};

function Search({ searchList }) {
    // User's input
    const [query, setQuery] = useState('');

    const fuse = new Fuse(searchList, options);

    // Set a limit to the posts: 5
    const posts = fuse
        .search(query)
        .map((result) => result.item)
        .slice(0, 5);

    function handleOnSearch({ target = {} }) {
        const { value } = target;
        setQuery(value);
    }

    return (
        <>
            <label>Search</label>
            <input type="text" value={query} onChange={handleOnSearch} placeholder="Search posts" />
            {query.length > 1 && (
                <p>
                    Found {posts.length} {posts.length === 1 ? 'result' : 'results'} for '{query}'
                </p>
            )}
            <ul>
                {posts &&
                    posts.map((post) => (
                        <li>
                            <a href={`/${post.frontmatter.slug}`}>{post.frontmatter.title}</a>
                            {post.frontmatter.description}
                        </li>
                    ))}
            </ul>
        </>
    );
}

export default Search;
Congrats, now you have a fully functional search bar on your site!
Demo
Here is a demo of the component we have up to this point.
The above component gets global styles from my site, thus, the dark mode still applies.
If you want to see what the whole project looks like now,
check out this GitHub branch.
Apply Tailwind CSS styles
Let's finish this project by adding some Tailwind (my favorite CSS framework) styles to the search bar component.
To do this, install the Astro Tailwind integration,
and the typography plugin to modify the styles in markdown rendered pages, like the posts.
npx astro add tailwind
npm i --save @tailwindcss/typography
To the generated tailwind.config.cjs file in the root of your project, add the following, inside the plugins list.
// /tailwind.config.cjs

/** @type {import('tailwindcss').Config} */
module.exports = {
    content: ['./src/**/*.{astro,html,js,jsx,md,mdx,svelte,ts,tsx,vue}'],
    theme: {
        extend: {},
    },
    plugins: [require('@tailwindcss/typography')],
};
Here is the src/pages/index.astro file.
<Layout title="MyBlog">
    <div class="py-10 lg:py-16">
        <h1
            class="text-5xl lg:text-7xl uppercase font-bold bg-clip-text text-transparent bg-gradient-to-tr from-blue-500 to-green-500 text-center"
        >
            Welcome to my Blog
        </h1>
    </div>
    <div class="max-w-3xl mx-auto">
        <SearchBar />
    </div>
</Layout>
Now, to stylize the search bar we must add a className attribute to the tags
inside the return statement.
I'll also use a search icon from Iconify, one of the largest collections of open-source icons.
// src/components/Search.jsx -> Search
return (
    <div>
        <label htmlFor="search" className="mb-2 text-sm font-medium text-gray-900 sr-only dark:text-white">
            Search
        </label>
        <div className="relative">
            <div className="absolute inset-y-0 left-0 flex items-center pl-3 pointer-events-none">
                <svg
                    xmlns="http://www.w3.org/2000/svg"
                    className="icon icon-tabler icon-tabler-search"
                    width={24}
                    height={24}
                    viewBox="0 0 24 24"
                    strokeWidth="2"
                    stroke="currentColor"
                    fill="none"
                    strokeLinecap="round"
                    strokeLinejoin="round"
                >
                    <path stroke="none" d="M0 0h24v24H0z" fill="none"></path>
                    <circle cx={10} cy={10} r={7}></circle>
                    <line x1={21} y1={21} x2={15} y2={15}></line>
                </svg>
            </div>
            <input
                type="text"
                id="search"
                value={query}
                onChange={handleOnSearch}
                className="block w-full p-4 pl-10 text-sm
                                text-gray-900
                               border border-gray-300
                               rounded-lg bg-gray-50

                               focus:outline-none
                               focus:ring-blue-500
                               focus:border-blue-500"
                placeholder="Search for anything..."
            />
        </div>

        {query.length > 1 && (
            <div className="my-4">
                Found {posts.length} {posts.length === 1 ? 'result' : 'results'} for '{query}'
            </div>
        )}

        <ul className="list-none">
            {posts &&
                posts.map((post) => (
                    <li className="py-2">
                        <a
                            className="text-lg text-blue-700 hover:text-blue-900 hover:underline underline-offset-2"
                            href={`/${post.frontmatter.slug}`}
                        >
                            {post.frontmatter.title}
                        </a>
                        <p className="text-sm text-gray-800">{post.frontmatter.description}</p>
                    </li>
                ))}
        </ul>
    </div>
);
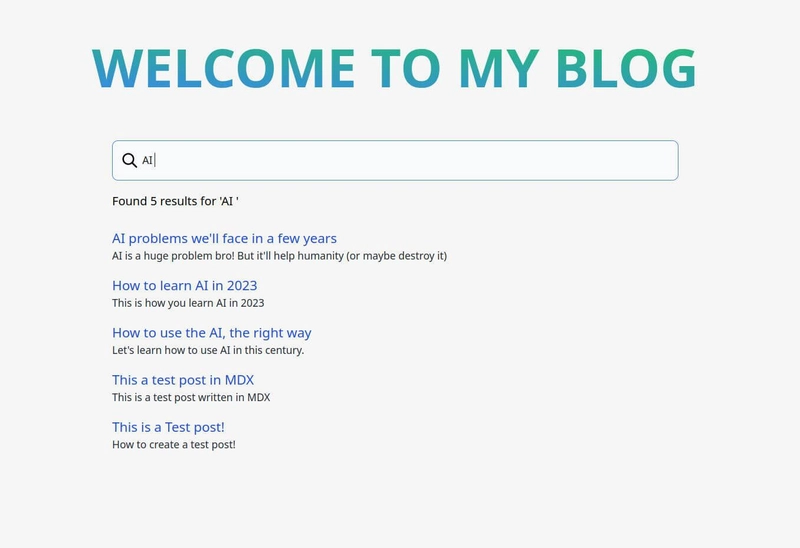
This is how the index page should look like.
Finally, modify the src/pages/[slug].astro file, to make the articles look prettier.
<Layout title={post.frontmatter.title}>
    <div class="pb-12 mx-auto max-w-3xl prose prose-md prose-headings:font-bold prose-a:text-blue-600">
        <h2 class="text-center text-5xl pt-12 pb-3">{post.frontmatter.title}</h2>
        <p class="text-center text-lg text-gray-600 pb-4">{post.frontmatter.description}</p>
        <post.Content />
    </div>
</Layout>
The prose class allows us to add Tailwind styles to HTML content we don't control — like HTML rendered from markdown files.
Now, when you visit an article, you'll have the following page.

Summary
In this tutorial, you learned how to create an Astro Search
component with React, and fuse.js.
You used the Astro API to fetch all the published posts, passed them
as a search list to a function React component, and created a fuse.js
object to search posts the users type in the input field.
Finally, you installed the Tailwind integration, which allowed you to stylize your site without writing custom CSS.
If you have any feedback on this tutorial, please let me know!

Top comments (1)
Any doubts? Let me know!