
A Primer
The name "serverless function", as most people who've done any reading on the subject know, is a misnomer. A server is still involved in the whole process, it's just that, as has been the trend in web development for quite some time, the developer controls ever less of it.
While that sounds bad, much of the deployment and operations of a production-ready application present a tedious and unending to-do list for developers who just want to put cool products in front of cool people (anyone who uses your products is cool, first rule of business 😁). The history of cloud-hosted and managed-hosted software shows that giving up control over these things generally lowers the barrier to entry for many developers. "Serverless" functions, or more accurately "Functions as a Service", are just the next logical evolution of that trend; one that many prominent minds in our field are very excited about.
The primary benefit is that when running these functions as a service, the "pay what you use" promise of cloud hosting is actually extended, because you don't build any overhead into your project. You're not running a virtual server, which uses resources when it idles, for which you are billed per-minute. You're running functions that only use resources when they are triggered, meaning you literally only pay when a user actually uses your code. Neat, right?
While I have personal misgivings about ceding ever more of the means of production (geddit? 😁) to our supposedly benevolent corporate overlords, I felt that I owed it to myself and my technical development to give serverless functions a shot, particularly because there are so many articles extolling the magnitude of cost-saving virtues of these tools. So I did.
Basic Setup
If you've already created a Serverless function before, you can skip to section 3.
1. Installation
First off, you want to install the Serverless framework. It is totally possible to write serverless functions without the framework, but as far as I have read, Serverless makes the whole process much easier. You can install it with
npm install -g serverless
Note that regardless of what language you are writing your function in, Serverless is a node module and must be installed with npm .
2. Setting Up An Admin Service Account
Next, you have to set up a service to which your code can be attached. The set up process should be similar for any provider that Serverless supports, which currently include:
In this post, we will only go over how to do it in AWS. If you're using a different service, then I would suggest checking out Serverless' documentation; it is excellent.
To start, go to AWS and navigate to the IAM service.
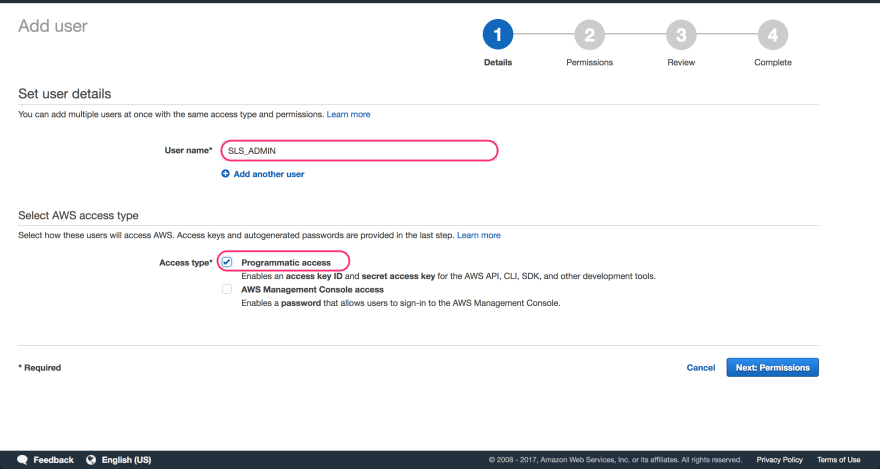
Next, navigate to Users and click Add user. Once there, add a descriptive name to your service account. Since this is an administrative account used by your installation of the Serverless CLI (which I will hereafter refer to as SLS to avoid confusion) to make changes to your AWS account, you can give it a generic name and use a common service account across all the services you write. You're free to use separate accounts as well, and when I first set mine up I gave it a project-specific name because I didn't know what I was doing. Using a project-specific account helps ensure that everything you create stays clean and separated, but it is not absolutely necessary.
Make sure to check the Programmatic Access checkbox, which allows the CLI to automatically apply changes to your account.
On the next page, give your service account the AdministratorAccess permission.
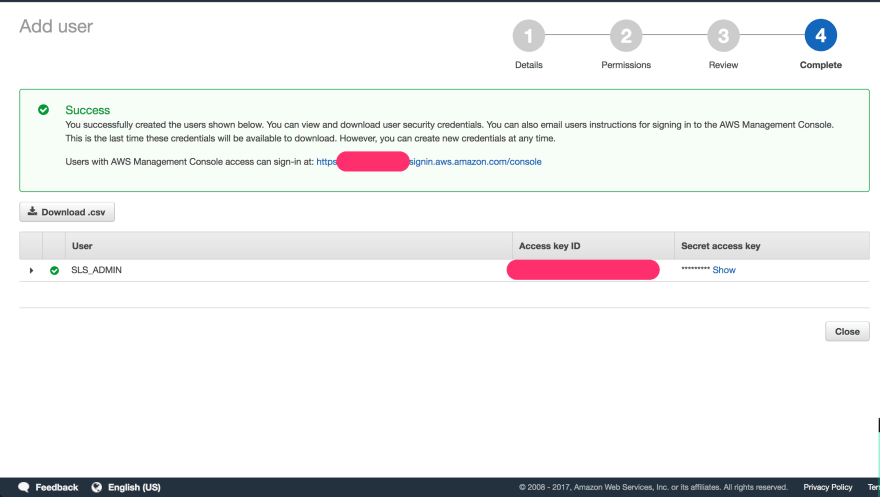
Click Create User when you are ready, and copy out your Access Key ID and Secret Key (or download them as a CSV). If you are this far in, I assume you know that these secrets are important and should be kept safe.
You're almost dooooone! Don't you love unending config when you just want to get something built?

Now all you need to do is run the following to give SLS access to your credentials:
serverless config credentials --provider aws --key <ACCESS KEY ID> --secret <SECRET KEY>
And voila, you are ready to… create your project. Hey, no one ever said this wouldn't be a little tedious. Just be happy that SLS is handling a bunch of this for you.
3. Creating Your Service Project
Now that you're ready to create your project, navigate to the folder where you want your service created and execute the following:
serverless create --template aws-python3 --path <PATH>
You should now have a folder absolutely full of serverless goodness. Inside the folder you should see a file named serverless.yml. This is the primary config file for your new project. If you open it up, you should see something like this (along with a bunch of comments I deleted):
service: my-service

provider:
  name: aws
  runtime: python3.6
package:
  exclude:
    - secrets.yaml

functions:
  hello:
    handler: handler.hello
You should also have a handler.py file which should contain a hello() function. If you look above, you'll see that this is registered in the service (right at the bottom there) with the name hello. This means that you can split various parts of your service into files other than handler.py while still directly registering them to your service. Conveeeenient!
I dislike that thing some writers do in these guides where they purposely have you try something that doesn't work just to prove a point, I find it annoying, so I will just tell you:
While you do already have a function defined called hello that's linked to a function handler, you currently have no way of triggering that function. That's why we need to add an event to the function defined in serverless.yml. Update it as follows:
functions:
  hello:
    handler: handler.hello
    events:
      - http:
          path: hello
          method: get
The events collection contains triggers for your functions, and there are a variety of types. These include cron tasks, Alexa skills, IoT triggers, and more. For now, you are going to use a simple HTTP trigger that will respond when you send a GET request to the /hello endpoint.
From here, you can pretty much treat this like a normal Python project, with one exception I will mention towards the end. To install dependencies just create your env directory like you normally would, or use Pipenv. You may want to install serverless-python-requirements from this repository in your service directory, which will automatically bundle requirements from your requirements.txt or Pipfile and make them available to your function through its PYTHONPATH.
A Note About PipEnv
PipEnv is a relatively new tool used in place of globally installing modules or the previous default solution, virtual environments. It's written and recommended by Kenneth Reitz, author of popular tools like requests and "The Hitchhikers Guide to Python". PipEnv has been a major boon to my development process, however, I have run into some issues with the google-client-api module using PipEnv, and have had to re-work my project around venv instead. If you depend on this module and are writing a serverless function, I would counsel against using PipEnv.
4. Deploy and Test
Finally, you need to deploy your function:
serverless deploy
Grab your endpoint listed in the output, which should resemble:
GET - https://xxxxxxxxxx.execute-api.us-east-1.amazonaws.com/dev/hello
If you ever need information about your service without performing a deployment, just run sls info to log out endpoints, functions, and more.
If you navigate to that URL in your browser, you should receive the response:
Go Serverless!
You can also hit your service by invoking it with the command:
sls invoke -f hello
If, for some reason you do not receive that response, you can run:
sls logs -f <function_name> —tail
to see a continuous log from your server for a given function.
Woot woot, we're done! Right? Mmmm….kind of...

The problem is, deploying to your service takes quite some time, and testing like that can get tedious. Plus, if you have a production service, deploying to test is….inadvisable.
So how can we test our shiny new function?
There are a few different methods, including some fancy libraries, but for now I have found that simply adding the local keyword, as follows, works perfectly fine:
sls invoke local --function <FUNCTION> --log
Instead of hitting your remote function instance, you're hitting one hosted on your own machine, which means you can save files and test them without re-deploying.
Alright, those are the basics, but there is always more to learn
5. Next Steps
The first issue I ran into with my serverless function was a lack of clarity about how to manage secret values. I found this guide incredibly useful and understandable, and I suggest you check it out.
If you're more curious about the philosophy and architecture of serverless solutions, I enjoyed this piece, and I suggest you read up on architectural concerns that differ between FaaS approaches and conventional web backends.
My Use-Case
So, what am I building with all this?
Over the last ten or eleven months I have committed to hitting the gym more frequently, and luckily I have been able to keep that commitment. Of the three days a week I go to the gym, I missed maybe one day maximum between January and late August, and after an amazing trip with some close friends that left me a bit depleted, I missed a couple of weeks in September. The one thing I have kept to flawlessly, is that every time I performed an exercise at the gym, I would use a Google Sheet to record how many repetitions and sets I got in, and sometimes how I felt about them. This may all seem needlessly involved or pointless, but I have noticed that tracking and reviewing these sorts of metrics helps stay me on track and make progress.
Now that I have all of this data, I want to process it (currently 46 spreadsheets) and present it in an interactive graph form on my website. If I have the data, I may as well use it, right?
In service of this goal, I have set up a function that fetches data from my sheets, transforms each sheet into an object, and then serves that to a static frontend that feeds that data into a D3 graph. It's still a work in progress, but I hope to get it published soon.
Serverless functions have definitely made it possible to get my route working much faster than if I had to set up a server.
Limitations
I welcome being corrected on any of the following statements (well, and any of the preceding ones)
Serverless functions seem great, because philosophically they are (what seem like) the final evolution of the cloud hosting ethos. There are, however, drawbacks.
They do not seem like a logical architectural choice if you are self-hosting, because the underlying server is still there, idling, and possibly using more resources in order to coordinate the spin-up and and teardown of every function call. This model only makes sense when it's Amazon or Google picking up the tab. Additionally, if you have long-running processes or background tasks, (excluding crons, which can be set as a trigger for your functions) this architecture may be suboptimal for your application. Persistence layers also present a challenge, because they must be hosted externally, either on a server or using a datastore service like DynamoDB, GCD, etc. Finally, projects which count idle time as a minimal part of their overall cost will probably find smaller gains from this architecture, meaning if your service is hit regularly and with a solid amount of volume, FaaS may be a trend that you should wait to try.
Conclusion
Serverless functions seem like they will provide me with a deep and broad vein of learning for quite some time to come, because they both remove existing concerns caused by the conventional development process, and create new ones for developers who are used to setting up servers. The next time you find yourself prototyping, or creating a sparsely-hit route, I heavily suggest you take a look at serverless first.

Top comments (7)
I just deployed my first function following the tutorial. Smooth as butter.
So nice!
Just today I thought about finally getting started with serverless :D
Give it a shot! If you run into issues let me know, glad to help!
Tried this today!
My first issue was the credentials.
I used AWS Cloud9, which has it's own
.aws/credentials, also many examples only used an ID and a secret, but I got some errors about an invalid token.When I configure everything manually, I get Cloud9 errors. It wants to manage the credentials by itself.
When I disable the c9 management, and reconfigure with serverless, the token goes missing.
In the end I had to add the administration privileges to my c9 user to get it to work and let c9 manage the credentials to have a valid token. Serverless would use the
[default]credentials of c9.I also wanted to add a
[serverless]credential, but c9 stops updating the token if I change the file manually.Thanks for the serverless-python-requirements recommendation!! (I'm the lead dev & maintainer.)
Thanks for leading it's development and maintaining it :D
Great stuff. This was really easy to follow along. Thank you for sharing!