It is incredibly important in today's day and age for any software developer or engineer to be well-versed and comfortable in interacting with Command Line Interface. The purpose of this paper is to demonstrate the utility of CLI in select scenarios where CLI comes through in spades.
- Create/Read/Update/Delete/Move files and folders from the command line
There is a plethora of commands and syntax for said commands to achieve this functionality. We will first explore files and then folders.
Files:
-
To just create a file you can use the "touch" command
touch {file-name}
-
To read the said file you can make use of the "cat" command
touch {file-name}
-
To update a file you can use "touch" with -a or -d flag if you either want to change the access time or the timestamp of said file
touch -d {yyyy/mm/dd} {file-name}
-
For deletion, the "rm" command is quite handy. But there are a few exceptions. In the case of write-protected files, you will be asked to validate the deletion operation. To avoid that prompt you can simply use rm with the -i flag. To add to this, file deletion in Linux using CLI does not allow recovery of said files. Hence you have to be certain that you wish to delete the file.
rm -i {file-name}
-
For moving the "mv" command is your friend. Simply providing the main file and target folder/directory makes the operation simple and straightforward. This command also allows moving multiple folders into a single folder.
mv {file arguments} {target folder}
The "mv " is also useful in renaming files. You only have to supply the final file name instead of the target folder to rename your desired folder.
mv {main-file} {new-file-name}
Folders:
-
For creating folders we make use of the "mkdir" command which stands for make directory. The "mkdir" has a lot of small nuances in its usage such as making multiple directories in 1 command line execution. Those directories could either be independent or connected based on the formatting of the command.
Independent directories:
mkdir {directory-names-space-separated}
Connected directories:
mkdir {parent-directory}/{child-directories}
-
To access any directory you make use of the "cd" which stands for change directory. This command allows for relative path syntax or absolute path syntax in its execution based on your preference and your current working directory. Here are a few scenarios showcasing usage of "cd":
cd cd .. cd ../..- For deletion, we make use of the "rmdir" and "rm" commands once again. But there are a few things that you need to be aware of. Usually, when you use a GUI or a desktop manager to delete files they simply the Trash or recycle bin based on your operating system and can still be recovered. This freedom of recovery is not offered when using CLI for deleting, just as it was shown to be the case with files previously. Also, deleting a directory requires "write permission"" on the directory and its contents. The following examples will help showcase that.
Removing with "rmdir":
If the directory you wish to delete is empty, you can simply use the "rmdir" command as follows:
rmdir {directory-name}
rm -r {directory-name}
rm -rf {directory-name}
If it's not empty, you will get an error stating rmdir failed to remove said directory. In such cases, we employ the use of the "rm" command like in files. By default "rm" without any option doesn't allow the deletion of directories. The command, when coupled with -d option, allows deleting non-empty directories and when used with -r allows all contents.
If a directory is write protected, you will again be prompted like in the case of files, and be asked to validate. To avoid this based on your preference, you can simply use the -f option in conjunction with "rm" to complete the operation and avoid validation.
- Check disk status
To keep tabs on the disk space available on your system, Linux has provided users with the "df" command which stands for disk free, and comes with various options to meet users' requirements for gathering information with regards to their disk space management. We shall look at a few cases with both commands.
## df:
Simply use the command like so
df
You will come across this output:

- Check the status of processes, able to extract process ids
The ps command is of excellent use in getting information regarding all active processes in your system. There are a few options that come with ps which help in sorting processes as per the users' requirements. As a standalone command ps just displays the shell and the process running within the shell as shown:

When used in conjunction with options such -e we get all running processes.

To find the senior-most parent process of any file, we simply couple the ps command with grep to find our parent process like so:

The numbers denoted in those listed outputs are the process IDs that we can use to specifically kill the said process if need be.
- Change file permissions
One of the most crucial things a developer needs while working in a team with multiple people is handling files with different permission levels for reading, writing , and executing depending upon project hierarchy and specifications. To help with this task, CLI has provided two extremely useful commands namely chmod and chown. The first command chmod allows the user to change file permission to either make the file readable, write-able or executable not only for the user but also for groups and other people accessing the file. Consider the following snippet.

Notice the leftmost string in all the files and directories shown. The 10-character string denotes the file type and file permissions. The 2 names following showing fufstmata fufstmata is for ownership details. The formatting for file permission is as follows:
Character 1: file type (directory or file)
Characters 2-4: Permissions for user
Characters 5-7: Permissions for groups
Characters 8-10: Permissions for others
The permissions are denoted by characters r,w,x which means:
r = Read
w = Write
x = Execute
Now how do chmod and chown come into play? Following demonstrations will help understand their purpose.
chmod:
To change the permissions of a file you can do so with the focus on a specific party namely user, group or others with the help of options u, g, or o in conjunction with altering specific permission with relevant characters (r,w,x) either with + or -.

In this instance, we are changing the permissions of the file Goblet.txt with the help of chmod command. We simply use the necessary designation for which we wish to change permission (in this case g for groups and o for others) and supply the necessary additional permissions with the help of the + sign and permission characters (r,w,x). We finally revert back our file permissions to their original state with the help of - sign and removed the additional permissions we had provided. Another alternate way of changing permissions is demonstrated as follows:
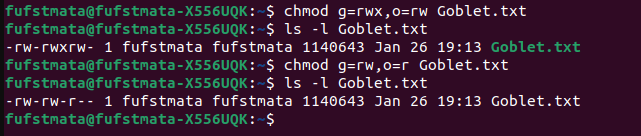
As you can see, instead of using + or - signs and altering permissions by way of adding or subtracting, we simply equate the necessary permissions and alter them. Finally, we revert the permissions to their original state.
Another alternative way of changing permissions is by way of using the bit-wise convention for changing permissions for all parties (u,g,o). Notice that the permissions for all parties are set in the same sequence i.e. it always follows as
r-->w-->x. This arrangement allows developers to go for a short-hand approach based on relative positioning and assigning bit values for respective permissions. The MSB (most significant bit) position assumed by r and LSB (least significant bit) assumed by x allows us to do bit-wise operations of changing permissions as demonstrated:

In this scenario, we are supplying 675 as our bit-wise decimal permission code. The first code 6 associates with the user, the second code 7 associates with groups, and the third code 5 with others. Since our bit-wise convention for r,w,x follows MSB to LSB convention for 3 bit decimal code, the decimal code 675 can be deciphered as:
6 : 110 = rw- for user
7: 111 = rwx for groups
5: 101 = r-x for others
In the end, we revert the permissions to the original state with the code 664.
chown:
To change the ownership of a file, you make use of the chown command. Now, to be able to use chown you need to have sudo privileges, which makes sense since no one should be able to change ownership of a file that easily. Once you have those privileges, simply using the syntax as shown will allow ownership changes.
sudo chown {options} user{:group} {file-list}
- Extract the last x lines from files and the word count for a particular word
For such file-based operations, the tail command is of very good use.
tail -n x {file-name}
By default, the tail command extracts the last 10 lines of a file and prints it out on the terminal. With the help of the -n option, we can extract the last "x" number of lines in the file. During runtime, we will of course supply the numeric value which will replace "x", instead of just supplying the character "x".
To fulfill a word count-based operation for a file, the grep command in conjunction with wc proves to be very effective. The following snippets demonstrate the process:
grep -i {relevant-word} {file-name}
The -i option allows case-insensitive search with grep and the relevant word is the word the user is searching for in the file of interest (file-name).
To find the total word count, we simply pipe the input from grep into the wc command like so:

- Absolute and Relative paths
In Linux terms, an absolute path always begins from the root directory whereas the relative path begins from the current working directory. Consider the snippet shown:

In this example, the user starts from the home directory denoted by the ~ sign before $. Upon using
cd /etc/kernel
the user can switch from the home directory straight to the kernel directory which lies in the root directory. This is due to the absolute path provided with the help of the starting forward slash "/" which denotes root. After entering the kernel directory, the user is still able to swap over to a different directory tmp with the help of absolute path as shown.
The following snippet shows how the relative path works:

In this example, we are starting of with the Books directory present in the DSA section of the Coding directory. If we want to juggle and switch over to the Books directory of "C-Code folder" we make use of the relative path with the help of "../.." which helps in switching between layers of the parent directory and then switching over to our target directory.
- Using the find command
Perhaps one of the most important commands for software developers is the find command. The immense amounts of utility that it offers with all its different options and argument lists make it one of the best commands for use by developers, especially in bash scripts with search operations. The default syntax for using this command is as follows:
find {option-list} {path} {expression-format}
The options-list dictates the control method for finding either links, names, file types, file sizes, date modified etc. The path argument dictates the starting point for the search operations. The expression-format provides the final search pattern to be searched for in conjunction with the option-list and starting path.
- ls with the 5 most commonly used flags*
The ls command is one of the most commonly used commands by developers in keeping track of the file system and gathering relevant information from viewing hidden files in directories, to viewing files in sorted order based on size or time created. We shall look at a few of these cases to understand them better.
ls:
Simply using the command "ls" lists all the files and folders present in your current working directory as shown below:

ls -l:
Using the -l flag with ls gives a more concise and neat formatted output of all files and directories present in our current working directory with relevant information such as date of creation, permissions, ownerships, and file size in bytes.

ls -a:
For seeing all hidden files in our current working directory, we simply make use of the -a option with ls.

ls -h:
For seeing all files in human-readable file size (megabytes(M), gigabytes(G)) we use the -h option with ls.

ls -t:
For sorting the files and directories based on when they were created we make use of the -t option with ls.

- Terminal control codes such as Ctrl + D, Ctrl + C, Ctrl + Z For any software developer when he is busy working on any project, it is often extremely handy to have at your disposal to make you more efficient. Following are a few important terminal shortcut keys and their utility.
-
Ctrl + C:
This shortcut key allows you to break or terminate either a command or process during its runtime. Basically, this kills any process.
-
Ctrl + Z:
This shortcut key allows you to suspend any process during runtime instead of killing it completely as it has done with Ctrl + C. This suspension followed by the retention of shell control to the user allows us to resume the process later if need be.
-
Ctrl + D:
This shortcut allows the user to log out of the current terminal window. Think of it like an "end of file" operation.
-
Ctrl + R:
There might be scenarios wherein you forget what command did you use for a particular operation and browsing the history can be a bit cumbersome. In such situations, the Ctrl + R shortcut is very useful as it allows you to search back the command you wrote by simply providing the string that you can remember. The shortcut will then look for commands matching your string input and provide with you relevant commands from history.
Tab autocompletion
Software developers often have to work in a very fast-paced environment and get a lot of work done while juggling with so many different tools and managing immense directories. It can be tough to work with at times, especially with so many different CLI tools at their disposal. It comes to a point where at times, the names of directories become too long or there are different versions of an application on his pc that he has to work on. The CLI allows one small yet powerful feature to aid developers in juggling through different commands, files, and directories which is the tab completion feature. Tab completion allows a developer to simply provide the initial characters of any command or directory or an executable file that they wish to access and with the help of the Tab key on the keyboard the terminal will either provide the list of commands matching the initial string or the directory that they wish to access or the executable file that they wish to run.
- Using the arrow keys to navigate the history
The command line history of a developer is safe to say extremely long. Navigating through all of that can be quite cumbersome. You could use the arrow keys but that would be an absolute time if you were to browse through hordes of command lines executed over time. The pgup and pgdn and end keys can be of good use in such situations. You can also couple the history command with tail or head to view your last x or first x command lines executed like so:

CONCLUSION:
I hope that by the end of reading this paper, you got some idea about how useful of a tool CLI is for developers in making them even better at saving time.


Top comments (0)