
This article covers a basic overview and an in-depth explanation of the mechanics of JS code generators and source maps. Building our own from scratch, hence why it is quite long.
Source Maps are something of a mystery to most people. They are found in most web-based compilation scenarios; from type system to web bundlers. But often the details of how they are actually built is not 100% transparent as their usage alone can be complex enough. Today we will start with a brief overview of what they are and how to use them. Then move onto walking through the lower-level mechanics; by building our own compiler which will generate some code and produce its own Source Map for browser consumption.
A full video walkthrough for this post is here. Part of my “under-the-hood of” video series.
The plan for today:
Part A: Intro to source maps and compilers
- What is a source map and why are they useful?
- Using source maps with popular tools
- What is AST?
- Steps in transforming JavaScript
- How compilers build source maps
Part B: Building our own compiler
- Building a JavaScript code generator
- What is Base64 VLQ?
- Adding source map support
- Testing our source map
Lets get started 💪
Part A: Intro to source maps and compilers
1. What is a source map and why are they useful?
First let us look at some reason why people write JavaScript which needs transpilation into native JavaScript:
- Using a type system,
- Using the latest ES 8–9–10 features,
- Code optimising (e.g minification)
- Bundle optimising (e.g. vendor vs app bundles)
The modern compiler architecture looks like this:

The problem is that in the process of turning your modules into assets, the code itself becomes un-readable for humans as its emphasis is put on the computer (usually a browser or server) to read.
Some example code which has been put through a compiler is below. It becomes near impossible to reason about and even harder to debug if there is an issue.

This is where Source Maps come in !!
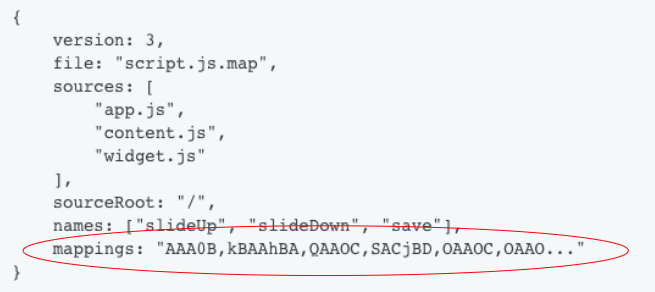
A basic definition for a Source Map would be:
“A source map provides a way of mapping code within a compressed file back to it’s original position in a source file”
So fairly straight forward in its purpose. Modern browsers will parse the source map automatically and make it appear as though you’re running un-minified or uncombined files.
An example below shows debugging TypeScript in the browser, something which is only possible due to Source Maps.

With this you could now put a breakpoint in your code and inside the browser inspect the call stack, variables and any runtime state, all via the pre-compiled TypeScript code.
2. Using source maps with popular tools
Connecting the browser to the source map
There are 2 ways to notify the Browser there is a source map available.
- At the footer of a JavaScript file add
//# sourceMappingURL=/path/to/file.js.map
- In the “Header” of a JavaScript file add
X-SourceMap: /path/to/file.js.map
Couple of points to note
- Chrome will only download a source map if DevTools is open (as they can be huge in size)
- Source maps will not appear as a network request (inside the network tab)
- Once you have your source map you can add breakpoints inside the “source” code (found under sources tab).
Source map spec
Current source maps must follow the latest version of the source map spec. That is version 3 and can be found in full here, it is written by mostly Mozilla and Google engineers. Version 3 comes with improvements to its overall size that will speed up its downloading and parsing.
The below shows an example source map, an important point is the “mappings”, these are Base64 VLQ strings which contain the actual mappings from source to generated code. More on this later as we will be producing our own.

Usage in popular tools:
Node.js
Via the flag — enable-source-maps
Source maps cached and used for stack traces when an exception occurs.
Babel
By default Babel will add a source map location to the bottom of every generated bundle e.g.
//# sourceMappingURL=file.map.js
But via the flag — source-maps — inline you can tell Babel to use an inline source map, which looks like below (i.e. base64 encode string of contents).
//# sourceMappingURL=data:application/json;charset=utf-8;base64,....
Webpack
Via the config property devtool: ‘source-map’
It is worth noting that because tools like Webpack often carry out multiple transformations using many processors at once (e.g. Babel and TypeScript) it can still produce a single source map. Each processor will produce its own source map but there are libraries available which can concatenate JavaScript files while consolidating corresponding source map files. An example is called mapcat.
3. What is AST?
Before we go much further we need to take a quick look at one of the important mechanisms inside any JavaScript compiler, AST.
AST stands for “Abstract Syntax Tree”, it is basically a tree of “Nodes” representing a Program of code. A “Node” is the smallest possible unit and is basically a POJO (i.e. plain old js object) with “type” and “location” properties. All Nodes have these 2 properties, but based on the “type” they can have various other properties as well.
In AST form code is very easy to manipulate, so operations like adding, removing or even replacing.
An example is the below code:

Would become the following AST:

There are websites such as https://astexplorer.net which are great at letting you write JavaScript code and immediately see its AST.
Tree traversal
The most important part of processing the AST is understanding that there are different approaches and each has pros and cons.
An example of a popular type (and the type we will use today) is called “Depth-first search” and it works by starting at the root and exploring as far left as possible along each branch before backtracking. So it would process a tree in the below order:

So if we had a block of code such as
2 + 3 * 1
It would produce the following tree:

4. Steps in transforming JavaScript
There are 3 steps in transforming JavaScript:
1) Parse source code into AST
- Lexical analysis -> Turn string of code into a stream (i.e. an array) of tokens.
- Syntactic analysis -> Turn stream of tokens into its AST representation
2) Transform nodes on AST
- Manipulate AST nodes (any library plugins would operate here e.g. Babel)
3) Generate source code
- Turn AST into string of JavaScript source code
TODAY we are going to focus on the jobs of a generator !!
Libraries differ between doing just step 1 to doing all 3 steps.
Examples of libraries which do all 3:
Examples of libraries which do just 1:
5. How compilers build source maps
There are 3 parts to producing a source map, all of which a compiler has to do:
1) Transform code and note the new generated source location
2) Check for a difference in location between the original and generated code
3) Using these mapping build a source map
This is an over-simplification and we will get more into the nuts and bolts of it in Part B below.
Part B: Building our own compiler
1. Building a JavaScript code generator
We will be starting with the below architecture. With the aim to produce a transformed file (index.es5.js) and source map (index.es5.js.map) after compilation.

Our src/index.es6.js will look like this (a simple “add” function):
function add(number) {
    return number + 1;
}
globalThis.add = add;
So now we have our pre-compiled source code. We want to start looking at the compiler.
THE PROCESS
There are a couple of steps our compiler must perform:
1. Parse the code to AST
As this article is not focusing on parsing, we will use a basic 3rd party tool for this (esprima or escodegen)
2. Add a shallow clone of each node onto the AST
This idea was borrowed from recast. The idea is that each Node will hold itself as well as a clone of itself (i.e. the original). The clone is used to check if the Node has changed. More about this later.
3. Transformation
We will manually be doing this. We could have used a library such as ast-types or @babel/types as they have useful APIs.
4. Generate source code
Turn our AST into JavaScript.
5. Add source map support
4 and 5 are done at the same time as above. This will involve traversing the tree and detecting where the AST node has changed with its “original” property. For those instances store a mapping between the “original” and the “generated” code.
6. Write to build/
Finally write our generated source code and its source map to the appropriate file.
THE CODE
Let us look at these steps again, but this time in more detail.
1. Parse the code to AST
Using a basic 3rd party tool (I went for a simple one called ast), we grab our file contents and pass them into the libraries parser.
import fs from "fs";
import path from "path";
import ast from "abstract-syntax-tree";

const file = "./src/index.es6.js";
const fullPath = path.resolve(file);
const fileContents = fs.readFileSync(fullPath, "utf8");
const sourceAst = ast.parse(fileContents, { loc: true });
2. Add a shallow clone of each node onto the AST
First we define a function called “visit” with the job of traversing the tree and executing our callback function on every single Node.
export function visit(ast, callback) {
  callback(ast);

  const keys = Object.keys(ast);
  for (let i = 0; i < keys.length; i++) {
    const keyName = keys[i];
    const child = ast[keyName];
    if (keyName === "loc") return;
    if (Array.isArray(child)) {
      for (let j = 0; j < child.length; j++) {
        visit(child[j], callback);
      }
    } else if (isNode(child)) {
      visit(child, callback);
    }
  }
}
function isNode(node) {
  return typeof node === "object" && node.type;
}
Here we are doing a “depth-first search” as mentioned above. For a given Node it will:
- Execute the callback
- Check for the location property, if so return early
- Check for any properties which are arrays, if so call itself with each child
- Check For any properties which are AST Nodes, if so call itself with the node.
Next we move onto producing our clones.
export const cloneOriginalOnAst = ast => {
  visit(ast, node => {
    const clone = Object.assign({}, node);
    node.original = clone;
  });
};
Our cloneOriginalAst function produces a clone of the Node and appends that onto the original.
For our cloning we use Object.assign so it is a shallow clone and copies the top-level properties. The nested props are still connected by pass-by-reference i.e. changing them will change the clone. We could have also used the spread operator here as that does the same thing. We will do our comparison using the top-level which is enough to compare 2 AST nodes and determine if the node has changed or not.
Overall our code here will return the same tree except with “original” property on every single Node.
3. Transformation
Next we will do our node manipulation. We will keep it simple so are going to just swap 2 nodes from our program. So we will start with:
number + 1
And will end with:
1 + number
Simple in theory right !
Our code to do the swap is below:
// Swap: "number + 1"
// - clone left node
const leftClone = Object.assign(
  {},
  sourceAst.body[0].body.body[0].argument.left
);
// - replace left node with right node
sourceAst.body[0].body.body[0].argument.left =
  sourceAst.body[0].body.body[0].argument.right;
// - replace right node with left clone
sourceAst.body[0].body.body[0].argument.right = leftClone;
// Now: "1 + number". Note: loc is wrong
We have not used a clean API to do this (which many libraries provide) as we have manually swapped the 2 nodes.
An example of using a library with a helpful API could look something like below, provided by the documentation on ast-types.

This way is certainly safer, easier to follow and faster to develop with. So in general I would recommend using it for any complex AST manipulation, most big name compilers do.
4. Generate source code
Code generators are typically housed in a single file and are several thousand lines long. For example escodegen’s compiler is 2,619 lines (see here). That is on the smaller side compared to others (crazy right!)
I have used much of the same code for our compiler (as most generators need very similar logic to process AST into JavaScript) EXCEPT only what is absolutely necessary for us to process the code from our “index.es6.js” file.
Below I have defined the 3 types of code we have inside our compiler.
a) Node processors and character utilities
These are general utility functions used to process AST nodes (depending on the type e.g. a function declaration will have an identifier) and build source code. It also includes some common character constants (e.g. a “space”). They are called from our code “type statements” in the next section.
I would not worry too much about the details here unless you plan on writing a compiler. This was largely borrowed from the generator in escodegen here.
// Common characters
const space = " ";
const indent = space + space;
const newline = "\n";
const semicolon = ";"; // USUALLY flags on this

// Utility functions
function parenthesize(text, current, should) {
  if (current < should) {
    return ["(", text, ")"];
  }
  return text;
}
const generateAssignment = (left, right, operator, precedence) => {
  const expression = [
    generateExpression(left),
    space + operator + space,
    generateExpression(right)
  ];
  return parenthesize(expression, 1, precedence).flat(); // FLATTEN
};
const generateIdentifier = id => {
  return id.name;
};
const generateFunctionParams = node => {
  const result = [];
  result.push("(");
  result.push(node.params[0].name); // USUALLY lots of logic to grab param name
  result.push(")");
  return result;
};
const generateStatement = node => {
  const result = Statements[node.type](node);
  return result;
};
const generateFunctionBody = node => {
  const result = generateFunctionParams(node);
  return result.concat(generateStatement(node.body)); // if block generateStatement
};
const generateExpression = node => {
  const result = Statements[node.type](node);
  return result;
};
b) Type statements
This is an object holding functions which are tied to an AST node type. Each contains the logic necessary to process that AST node type and produce source code. For example for a function declaration it contains all possible variations of arguments, identifiers, logic and return types. There is a level of recursion that is common here i.e. for a type statement to trigger another type statement which might trigger another etc.
Here we ONLY have the necessary statement functions to process our “index.es6.js” file, so it is fairly limited. You can see how much code is required just to process our AST tree of 3–4 lines of code (in addition to that of the above section).
Again this has borrowed from escodegen here so please feel free to ignore the details, unless you plan to write your own compiler.
const Statements = {
  FunctionDeclaration: function(node) {
    let id;
    if (node.id) {
      id = generateIdentifier(node.id);
    } else {
      id = "";
    }
    const body = generateFunctionBody(node);
    return ["function", space, id].concat(body); // JOIN
  },
  BlockStatement: function(node) {
    let result = ["{", newline];
    // USUALLY withIndent OR for loop on body OR addIndent
    result = result.concat(generateStatement(node.body[0])).flat();
    result.push("}");
    result.push("\n");
    return result;
  },
  ReturnStatement: function(node) {
    // USUALLY check for argument else return
    return [
      indent,
      "return",
      space,
      generateExpression(node.argument),
      semicolon,
      newline
    ];
  },
  BinaryExpression: function(node) {
    const left = generateExpression(node.left);
    const right = generateExpression(node.right);
    return [left, space, node.operator, space, right];
  },
  Literal: function(node) {
    if (node.value === null) {
      return "null";
    }
    if (typeof node.value === "boolean") {
      return node.value ? "true" : "false";
    }
    return node.value;
  },
  Identifier: function(node) {
    return generateIdentifier(node);
  },
  ExpressionStatement: function(node) {
    const result = generateExpression(node.expression); // was []
    result.push(";");
    return result;
  },
  AssignmentExpression: function(node, precedence) {
    return generateAssignment(node.left, node.right, node.operator, precedence);
  },
  MemberExpression: function(node, precedence) {
    const result = [generateExpression(node.object)];
    result.push(".");
    result.push(generateIdentifier(node.property));
    return parenthesize(result, 19, precedence);
  }
};
c) Process code statements
Lastly we are going to iterate over the program body (i.e. each line of code) and start running our generator. This will now return an array called “code” which contains every line of our newly generated source code.
  const code = ast.body
    .map(astBody => Statements[astBody.type](astBody))
    .flat();
6. Write to build/
We are going to skip step 5 for now and complete the core elements of our compiler. So for this step we will
- Add a source map location to our generated code (we will build this in the next section)
- Produce a bundle for the generated code (joining our array of code together), and copy the original code so that the browser can see it (this is only 1 approach to this).
// Add sourcemap location
code.push("\n");
code.push("//# sourceMappingURL=/static/index.es5.js.map");

// Write our generated and original
fs.writeFileSync(`./build/index.es5.js`, code.join(""), "utf8");
fs.writeFileSync(`./build/index.es6.js`, fileContents, "utf8");
5. Add source map support
There are 4 requirements when it comes to building a source map:
- Store record of source file
- Store record of generated file
- Store mappings of line/columns
- Display in Source Map file using spec version3
For a quick win we can use the library which almost every JavaScript code generator uses called source-map. It is from Mozilla and handles storing of points 1–3 as well as the processing the mappings into Base64 VLQ (step 4).
Little reminder what a source map looks like with mappings highlighted (from way above):
The mappings are Base64 VLQ, but what is that?
2. What is Base64 VLQ?
A brief overview on Base64 and VLQ first.
Base64
Solves the ASCII problem of handling languages which don’t have the full ASCII character set. Base64 has only a subset of ASCII, which is easier for processing in different languages.
VLQ (variable-length quantity)
Breaks a binary representation of an integer into a group of small blocks of variable bits.
Base64 VLQ
Optimised to make it easy to have mapping between big numbers and corresponding information in source files.
A line of code is represented in a series of “segments”. The number “1” would be: AAAA => 0000
Here is an example of how the numbers correlate to build a “Segment”:

Building a basic mapping in JavaScript would look something like this:
// .. define "item"
const sourceArray = [];
sourceArray.push(item.generated.column);
sourceArray.push("file.es6.js");
sourceArray.push(item.source.line);
sourceArray.push(item.source.column);
const encoded = vlq.encode(sourceArray);
However this does not handle line and segment separation (which can be very tricky) so it is still more efficient to use Mozilla’s library.
3. Adding source map support
Back to our compiler !!
Using Mozillas SourceMapGenerator
To make full use of Mozillas library we will:
- Create a sourceMap instance to hold and build our mappings
- Initialise and store local mappings
So at times when a node has changed we will; build the location then add it to our local mappings and to the SourceMap instance. We keep a local instance so that we can keep a record of the current location start and end as that will be crucial to build out the next location.
// SourceMap instance
const mozillaMap = new SourceMapGenerator({
  file: "index.es5.js"
});

// Local mappings instance
const mappings = [
  {
    target: {
      start: { line: 1, column: 0 },
      end: { line: 1, column: 0 }
    },
    source: {
      start: { line: 1, column: 0 },
      end: { line: 1, column: 0 }
    },
    name: "START"
  }
];
We need a function which will actually handle updating these mapping instances. The below “buildLocation” function handles all the location generation logic. Most libraries have a similar function using offsets for column and line given by caller.
Its job is to work out the new start of line and column numbers as well as end of line and column numbers. It will only add a mapping if a node has changed, limiting what mappings we will store.
const buildLocation = ({
  colOffset = 0, lineOffset = 0, name, source, node
}) => {
  let endColumn, startColumn, startLine;
  const lastGenerated = mappings[mappings.length - 1].target;
  const endLine = lastGenerated.end.line + lineOffset;
  if (lineOffset) {
    endColumn = colOffset;
    startColumn = 0; // If new line reset column
    startLine = lastGenerated.end.line + lineOffset;
  } else {
    endColumn = lastGenerated.end.column + colOffset;
    startColumn = lastGenerated.end.column;
    startLine = lastGenerated.end.line;
  }

  const target = {
    start: {
      line: startLine,
      column: startColumn
    },
    end: {
      line: endLine,
      column: endColumn
    }
  };
  node.loc = target; // Update node with new location

  const clonedNode = Object.assign({}, node);
  delete clonedNode.original; // Only useful for check against original
  const original = node.original;
  if (JSON.stringify(clonedNode) !== JSON.stringify(original)) {
    // Push to real mapping. Just START. END is for me managing state
    mozillaMap.addMapping({
      generated: {
        line: target.start.line,
        column: target.start.column
      },
      source: sourceFile,
      original: source.start,
      name
    });
  }

  return { target };
};
So now we have our “buildLocation”, we have to go about introducing it across the code. A couple of examples are below. For the “generateIdentifier” processor utility and “Literal” AST type statements you can see how we incorporate “buildLocation”.
// Processor utility
const generateIdentifier = id => {
  mappings.push(
    buildLocation({
      name: `_identifier_ name ${id.name}`,
      colOffset: String(id.name).length,
      source: id.original.loc,
      node: id
    })
  );
  return id.name;
};

// AST type statement function (part of "Statements" object)
Literal: function(node) {
  mappings.push(
    buildLocation({
      name: `_literal_ value ${node.value}`,
      colOffset: String(node.value).length,
      source: node.original.loc,
      node
    })
  );

  if (node.value === null) {
    return "null";
  }
  if (typeof node.value === "boolean") {
    return node.value ? "true" : "false";
  }
  return node.value;
};
We need to apply this throughout our code generator (i.e. all node processors and AST type statement functions).
I found this tricky as the node-to-character mapping is not always 1–2–1. For example a function could have brackets either side of its argument which has to be accounted for when it comes to character line positions. So:
(one) =>
Has different character positions to:
one =>
What most libraries do is introduce logic and defensive checks using information on the AST nodes, so all scenarios can all be covered. I would have followed the same practice except I was only adding code for what was absolutely necessary for our “index.es6.js”.
For full usage please see the code for my generator in the repository here. It is missing large pieces but it does the job and is the building blocks for a real code generator.
The final part is writing our source map contents into the source map file. This is surprisingly easy with Mozillas library as they expose a “toString()” method which will handle the Base64 VLQ encoding and build all the mappings into a v3 spec compliant file. NICE !!
// From our Mozilla SourceMap instance
fs.writeFileSync(`./build/index.es5.js.map`, mozillaMap.toString(), "utf8");
Now our reference to “./build/index.es5.js” earlier will have a file that exists.
OUR COMPILER IS NOW DONE !!!! 🤩

Thats it for the compiler, the last part is now getting confirmation that is has worked.
If we compile the code it should produce our build folder with 3 files inside.
npm run compile
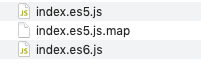
That is the original, the generated and the source map.
4. Testing our source map
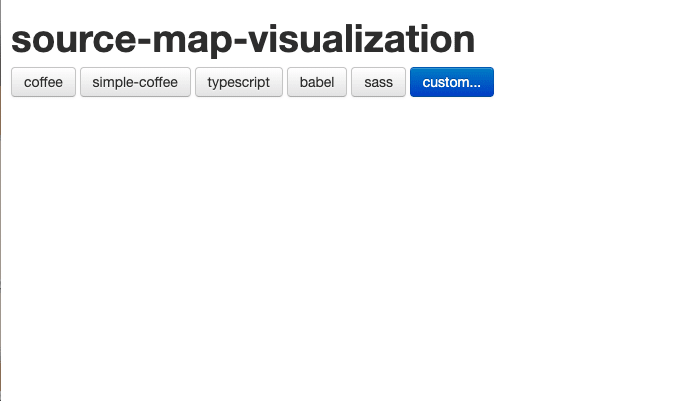
There is a fantastic website at https://sokra.github.io/source-map-visualization/ which lets you visualise source map mappings.
The page starts like this:
By dropping our 3 files into it we can now see this:

Very colourful eh !
It contains the original code, the generated code and the mappings decoded (at the bottom).
A little reminder of our transformation from earlier:
// Swap: "number + 1"
// - clone left node
const leftClone = Object.assign(
  {},
  sourceAst.body[0].body.body[0].argument.left
);
// - replace left node with right node
sourceAst.body[0].body.body[0].argument.left =
  sourceAst.body[0].body.body[0].argument.right;
// - replace right node with left clone
sourceAst.body[0].body.body[0].argument.right = leftClone;
// Now: "1 + number". Note: loc is wrong
We have swapped:
number + 1
Into:
1 + number
Can we confirm the mapping has worked?
If we hover over the character or mapping, it will highlight the mapping and its corresponding locations in the generated and original locations.
This screenshot shows what happens when I hover over the literal number “1” character. It clearly shows there is a mapping.

This screenshot shows what happens when I hover over the variable identifier “number” word. It clearly shows there is a mapping.

SUCCESS !! 💪
What did we miss?
So what are the limitations of building a compiler like this?
- Not all JavaScript statements are covered (only what our file needed)
- Current it only works with 1 file. Web bundlers will follow the app building a dependency graph and applying transformations on those files (see my “under-the-hood of web bundlers” article for more on this).
- Output file vs bundle. Web bundlers will produce bundles with code runnable in specific JavaScript environments, ours was very limited (again see my “under-the-hood of web bundlers” for more).
- Basic transform. Performing additional optimisations would not really be easy to do without a lot of new code.
Thanks so much for reading. This topic was very far reaching and I learnt a huge amount in researching it. I really hope this serves as useful in shining a light on how JavaScript compilers and source maps work together including the mechanisms involved.
The source code for this can be found at craigtaub/our-own-babel-sourcemap.
Thanks, Craig 😃


Top comments (0)