To solidify my programming skills, I decided to create and deploy a compound interest and amortization calculator.
The app can be found here.
The source code can be found here.
App Overview
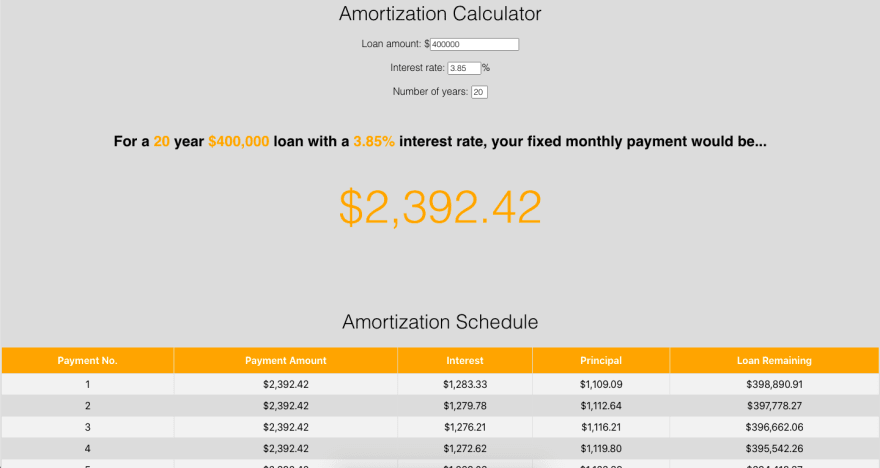
In the Compound Interest Calculator, a user can find the compound interest accrued in an investment by supplying the investment's starting amount, interest rate, number of years, and compounding interval (monthly or yearly). If a user wanted to determine their monthly payment on a loan, they could use the Amortization Calculator. The Amortization Calculator will automatically generate an amortization schedule, which each month shows how much of their monthly payment will go toward principal and interest.
useState
The app, which I call Money Calculators, was made with React. I decided to try the useState react hook to add internal state to my functional components. useState allowed me to code the project without a single React class component. Basically, useState creates two variables: a variable that holds a specific slice of the component's current state and a function that will update that state. You can think of a React component's state like a global variable - accessible in any function inside that component.
Submit Button
The most challenging part of the project was getting rid of the submit button in my forms. This way, the user can change form input values and immediately see the new result. For instance, if a user has filled out all the form boxes for the compound interest calculator, they will see a number on the screen. If they decide to update a form box, they will get a new compound interest calculation right away.
In the compound interest component, to get rid of the submit button yet still show a compound interest calculation to the user, I did the following:
- The compound interest is calculated via a formula that requires four variables. The user provides each of these variables.
- Each variable is saved to the compound interest component's internal state
- A getFinalAmount function is created. This function produces a compound interest based on the component's state. This function will only return a truthy value (not zero) if all the component's forms are filled out.
- In the component's return function, a ternary operator is introduced. If calling getFinalAmount returns a truthy value, a piece of HTML is rendered to the screen that shows the result of the compound interest calculation. If calling getFinalAmount returns a falsy value, a React fragment is rendered. The user will not be able to see this React fragment.
Deploying to Heroku
This was my first time publishing an application of mine to the Internet, so I was pretty nervous putting my app on Heroku because I didn't want to mess anything up. In the end, I succeeded by doing the following:
- Make a Heroku account
- Download the Heroku CLI
- Push your project to GitHub
- I built a React app so I followed the steps in this article.
- The above article says as a final step to write
git push heroku mainin Mac Terminal. I needed to changemaintomasterfor my project to send to Heroku. So I wrotegit push heroku masterinstead.

Top comments (0)