ขั้นตอนการเซ็ตอัพโปรเจ็ค Flutter กับ Firebase

Flutter 2.10.4 | Dart 2.16.2 | DevTools 2.9.2
Create Flutter Project
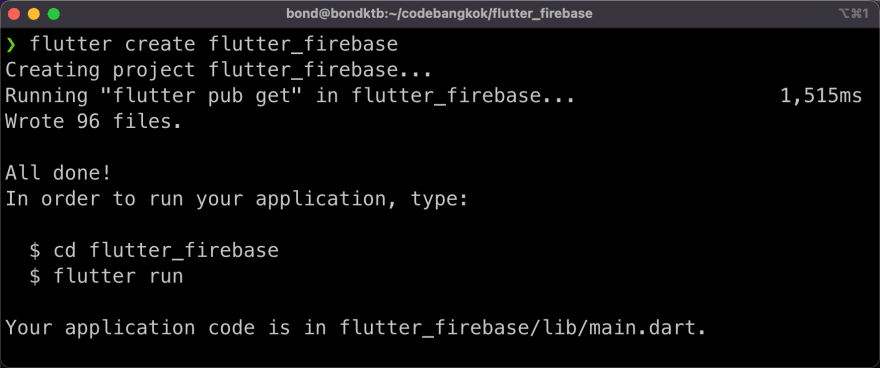
1) สร้างโปรเจ็ค Flutter
flutter create flutter_firebase
Create Firebase Project
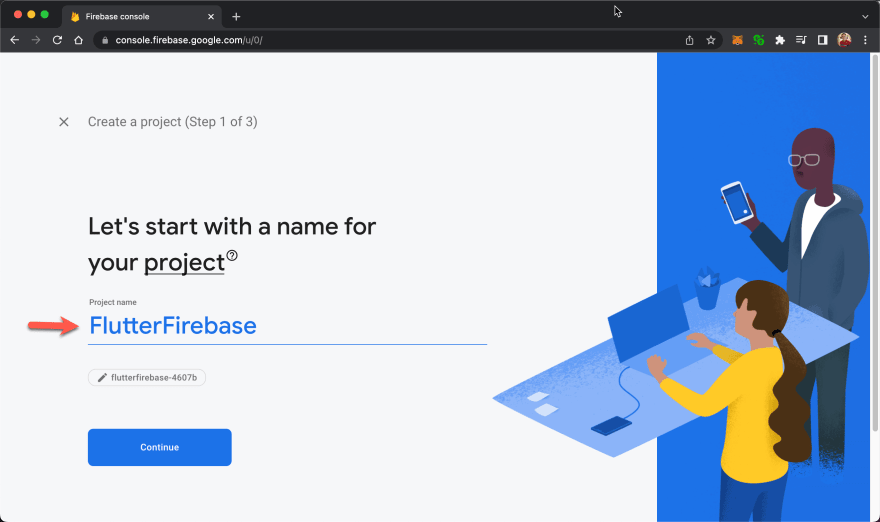
1) เข้าเว็บ https://console.firebase.google.com แล้ว Add Project ใหม่
2) ตั้งชื่อโปรเจ็ค ผมใช้ชื่อว่า FlutterFirebase แล้วกดปุ่ม Continue
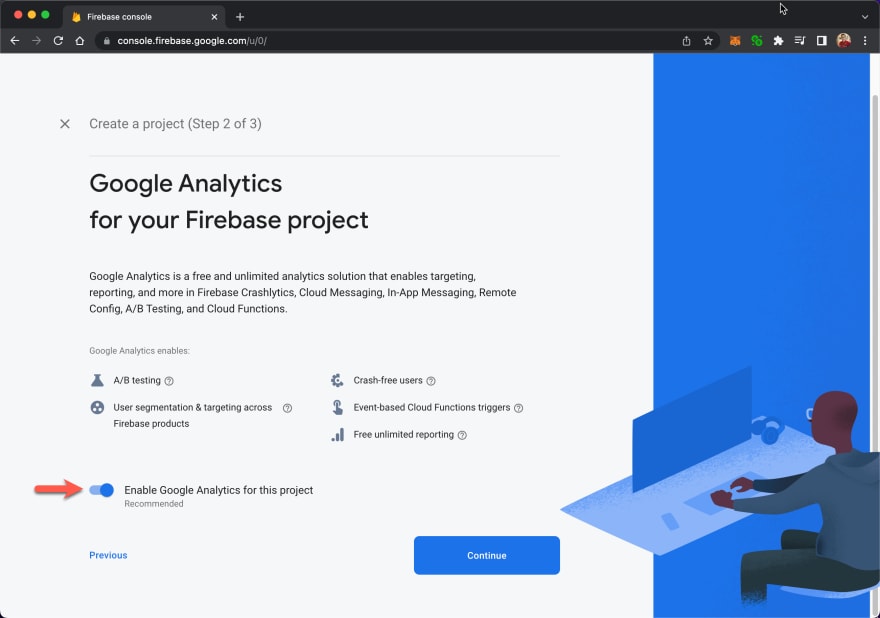
3) เลือก Enable Google Analytics for this project แล้วกดปุ่ม Continue
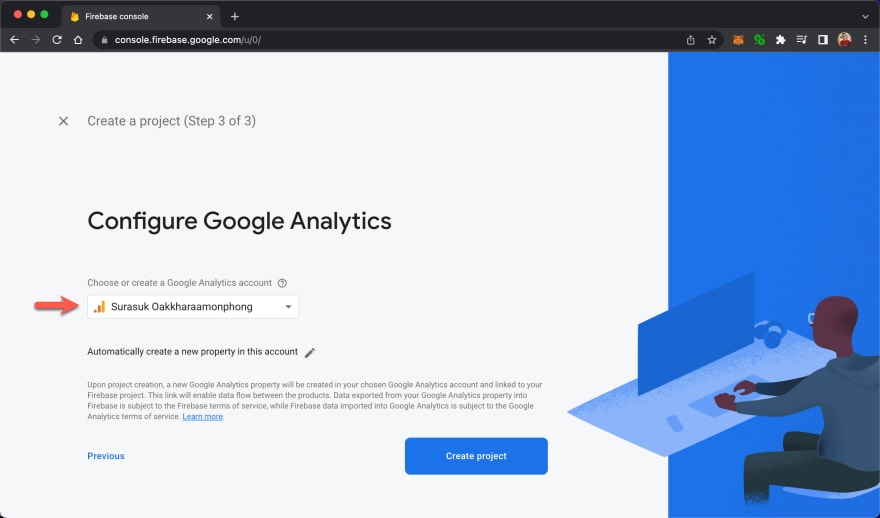
4) เลือกบัญชี Google Analytics account แล้วกดปุ่ม Create project เมื่อสร้างเสร็จแล้วให้กดปุ่ม Continue
Add iOS App
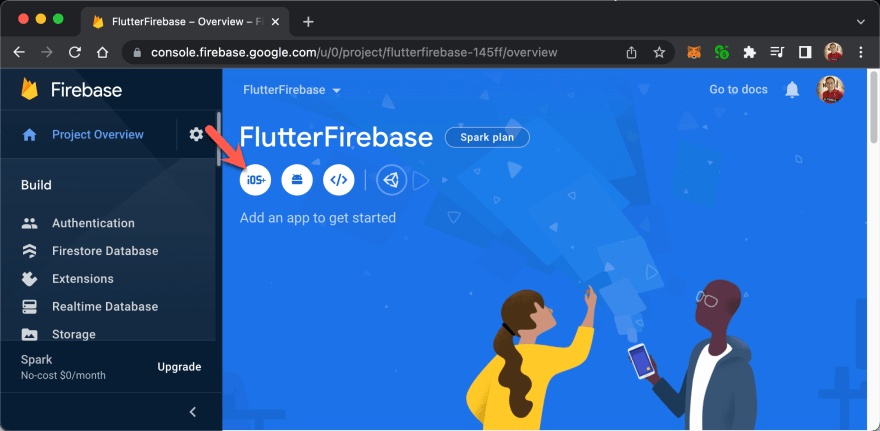
1) คลิ๊กที่ปุ่ม iOS เพื่อ Add app to project
2) เปิด Terminal เข้าไปใน flutter_firebase/ios ไดเร็กทอรี่ แล้วเปิดไฟล์ Runner.xcworkspace ด้วย Xcode
cd flutter_firebase
cd ios
open Runner.xcworkspace
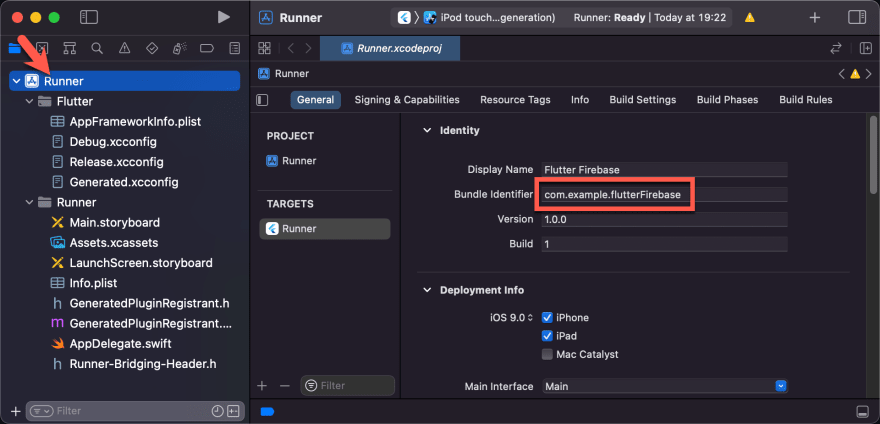
3) ที่ Xcode คลิ๊ก Runner แล้วกีอปปี้ Bundle Identifier
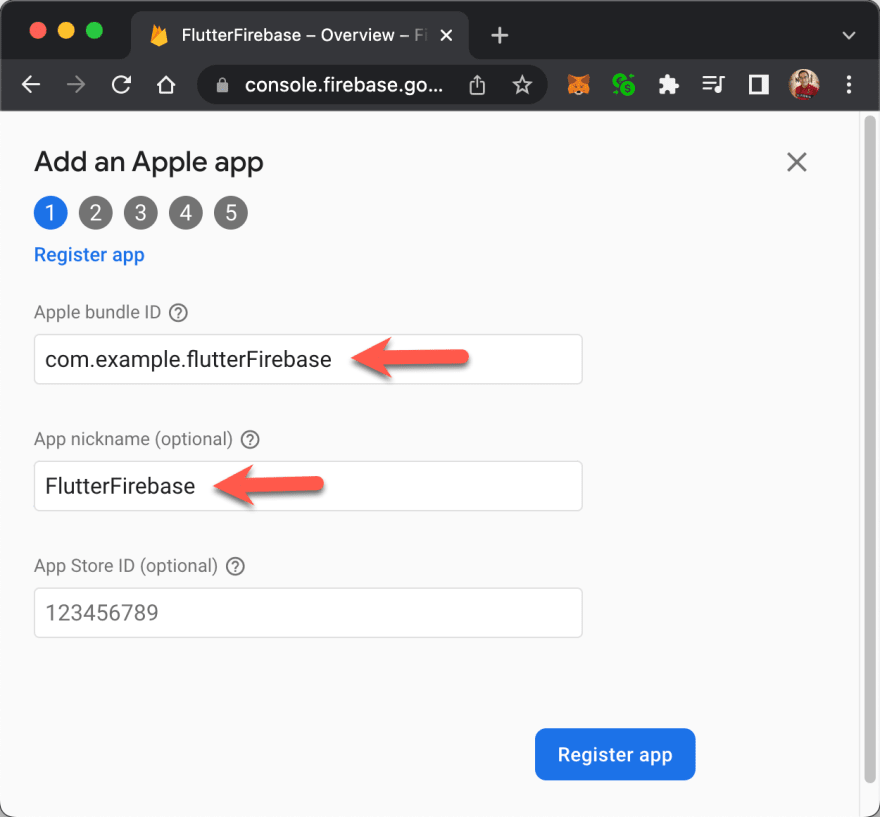
4) กลับไปที่ Firebase นำ Bundle Identifier ไปวางไว้ที่ Apple bundle ID ตั้งชื่อ App nickname แล้วกดปุ่ม Register app
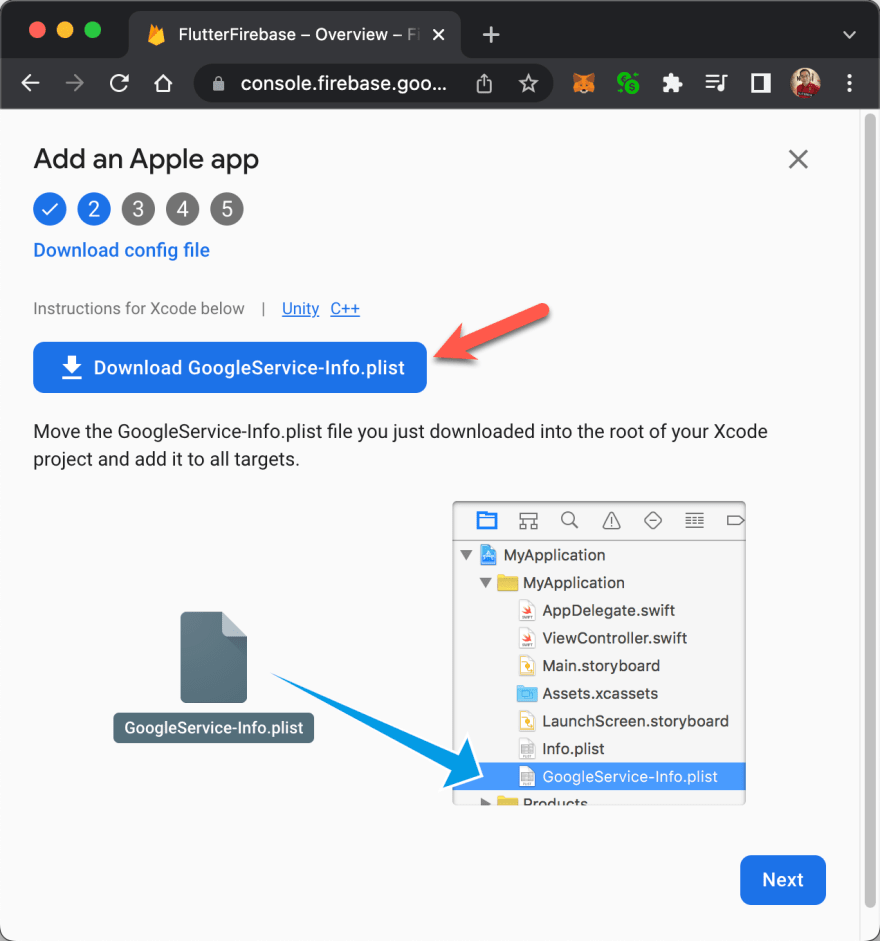
5) กดปุ่ม Download GoogleService-info.plist แล้วกดปุ่ม Next
6) Step 3 และ 4 กดปุ่ม Next ผ่านไปได้เลย ส่วน Step 5 ให้กดปุ่ม Continue to console
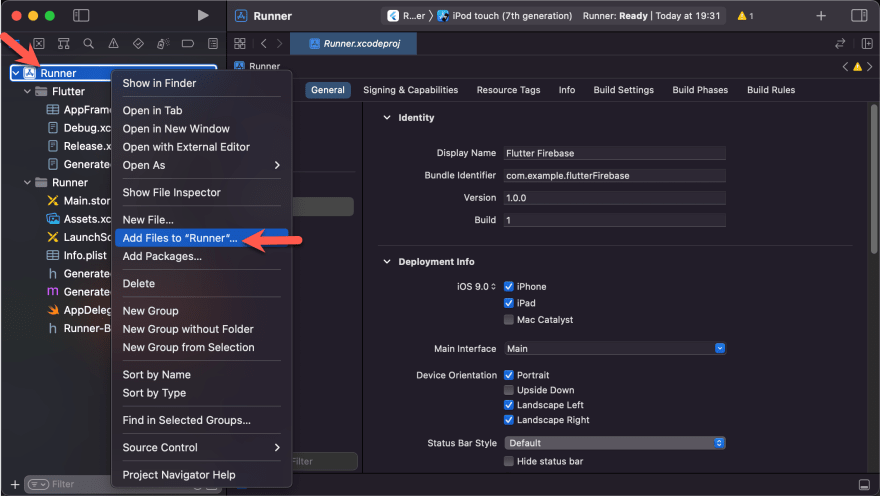
7) กลับไปที่ Xcode คลิ๊กขวาที่ Runner แล้วคลิ๊กที่ Add Files to "Runner"...
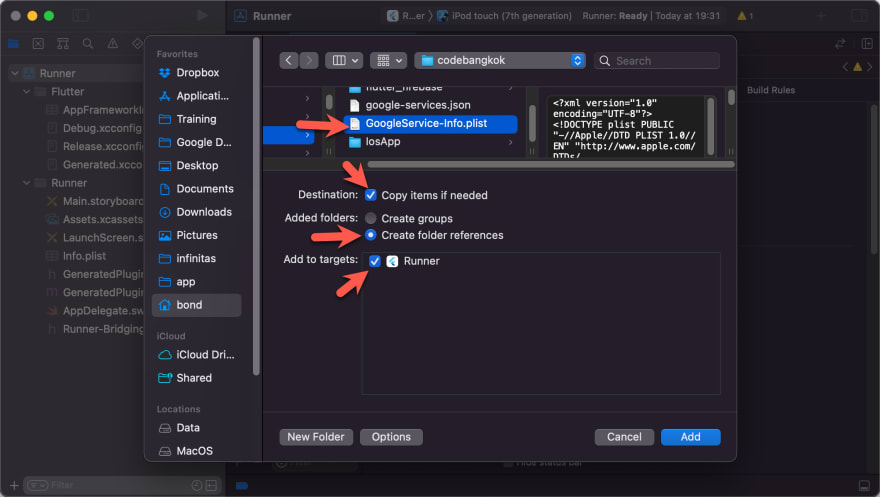
8) เลือกไฟล์ GoogleService-info.plist ที่ดาวน์โหลดมา แล้วกดปุ่ม Add
9) เปิด Terminal เข้าไปใน ios ไดเร็กทอรี่ แล้วรันคำสั่ง pod init จะได้ไฟล์ Podfile
pod init
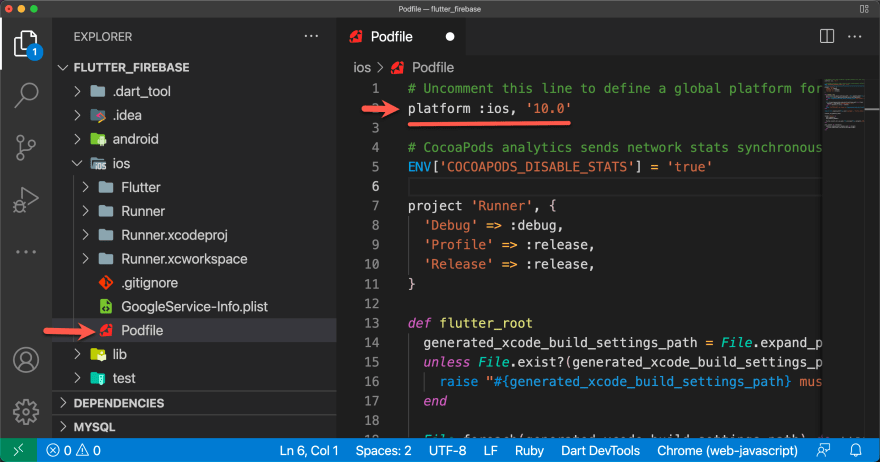
10) เปิดโปรเจ็ค flutter_firebase ด้วย VSCode เปิดไฟล์ ios/Podfile uncomment platform แล้วแก้เป็น 10.0
platform :ios, '10.0'
Add Android App
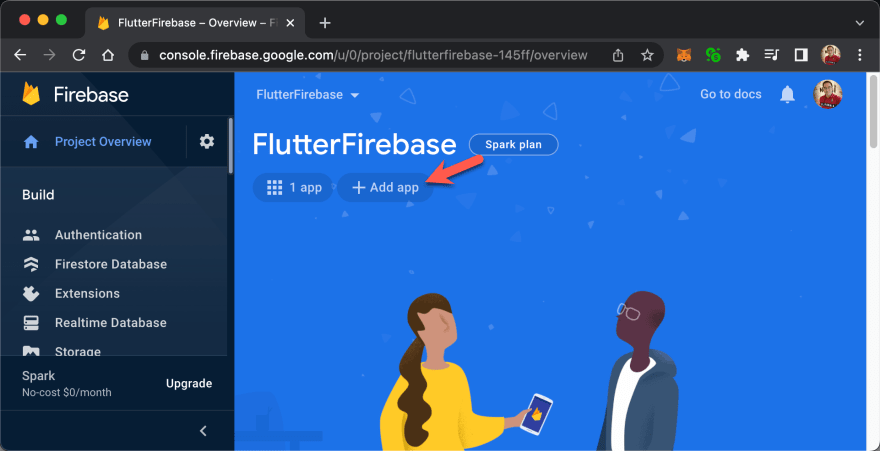
1) กลับไปที่ Firebase กดปุ่ม Add app แล้วเลือก Android icon
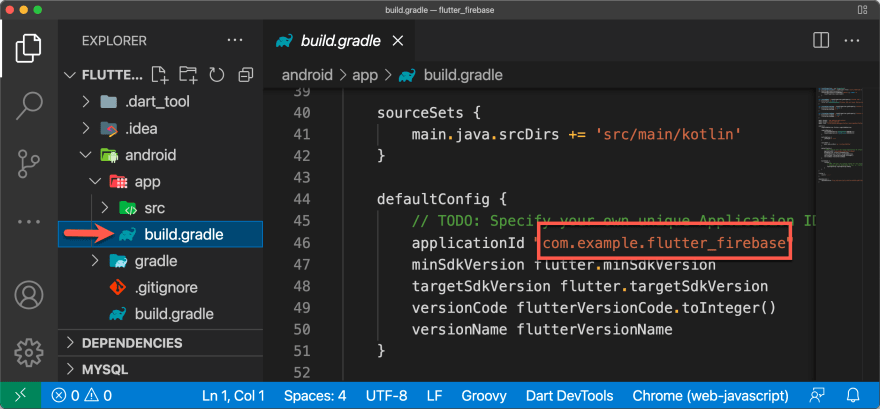
2) กลับไปที่ VSCode เปิดไฟล์ android/app/build.gradle แล้วก๊อปปี้ applicationId
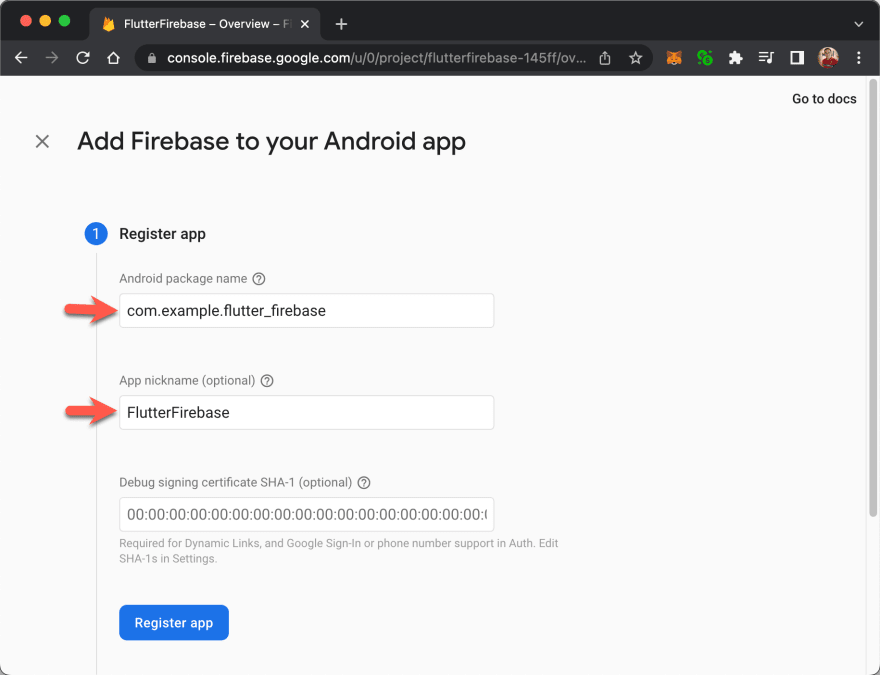
3) กลับไปที่ Firebase นำ applicationId ไปวางไว้ที่ Android package name ตั้งชื่อ App nickname
4) ไปที่ Terminal เข้าไปใน flutter_firebase/android ไดเร็กทอรี่ รันคำสั่ง grablew แล้วก๊อปปี้โค้ด SHA1
./gradlew signingReport
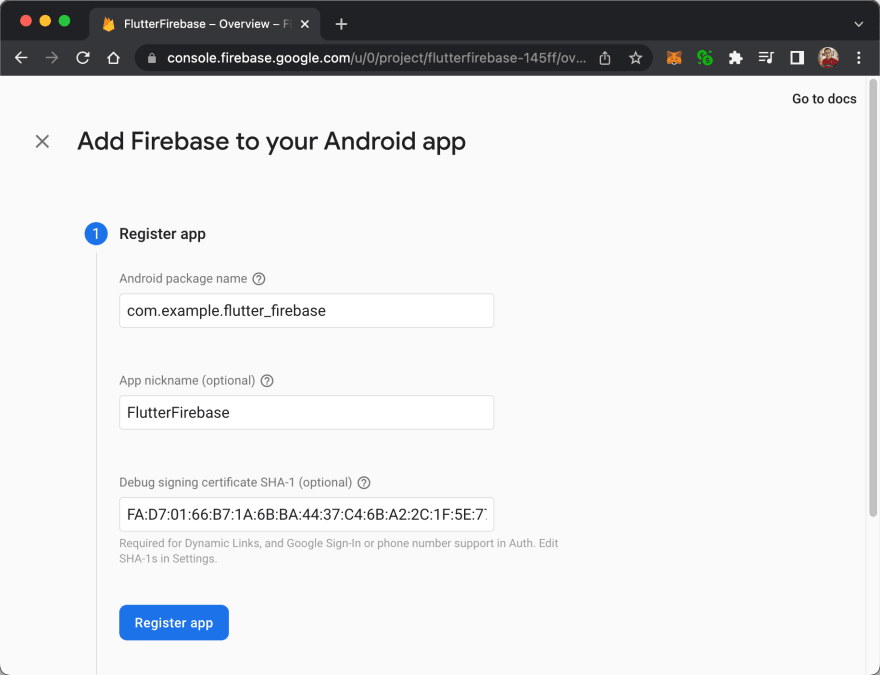
5) กลับไปที่ Firebase นำ SHA1 ไปวางไว้ที่ Debug signing certificate SHA-1 แล้วกดปุ่ม Register app
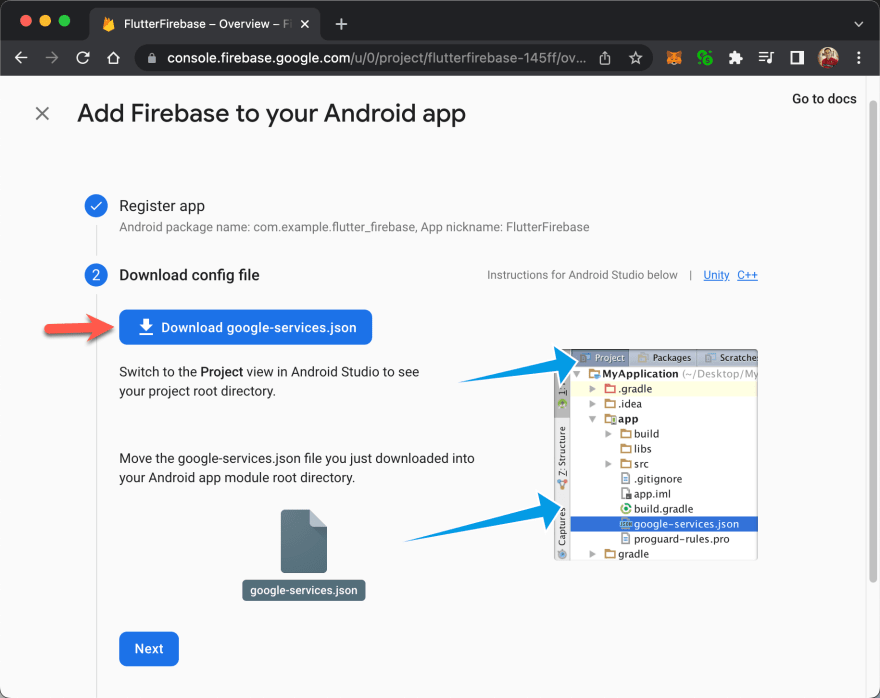
6) กดปุ่ม Download google-services.json แล้วกดปุ่ม Next
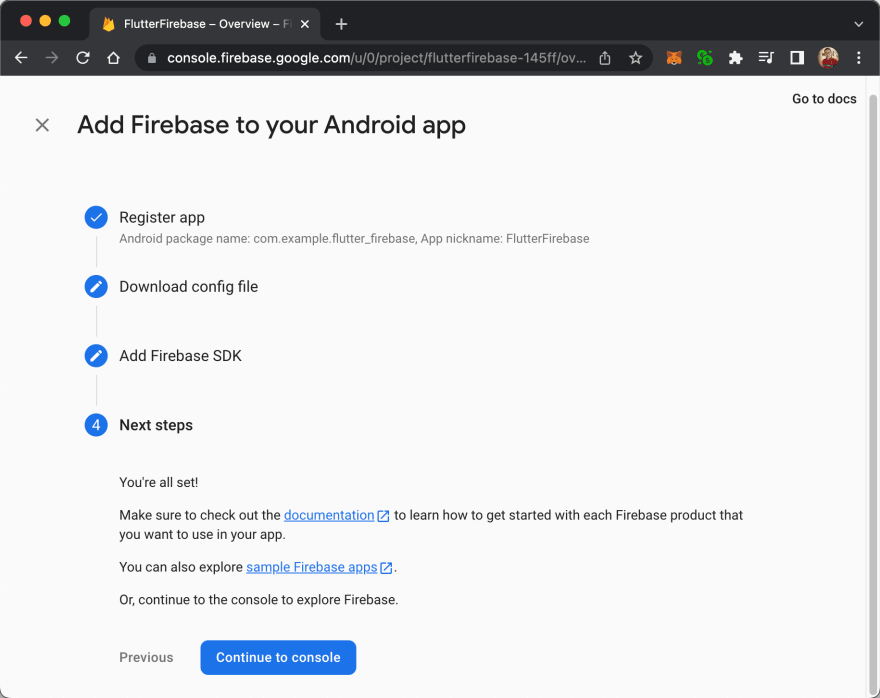
7) Step 3 กดปุ่ม Next ผ่านไปได้เลย ส่วน Step 4 ให้กดปุ่ม Continue to console
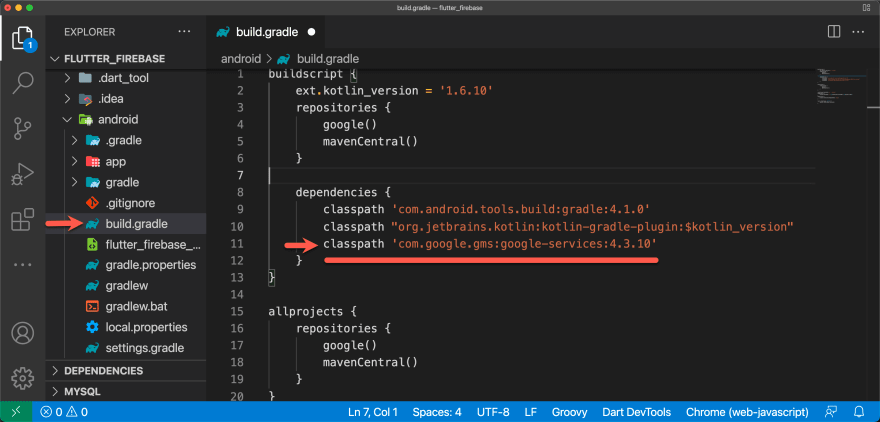
8) กลับไปที่ VSCode เปิดไฟล์ android/build.gradle เพิ่ม classpath เข้าไปที่ dependencies (ตรวจสอบเวอร์ชั่นได้ที่ https://mvnrepository.com/artifact/com.google.gms/google-services?repo=google)
classpath 'com.google.gms:google-services:4.3.10'
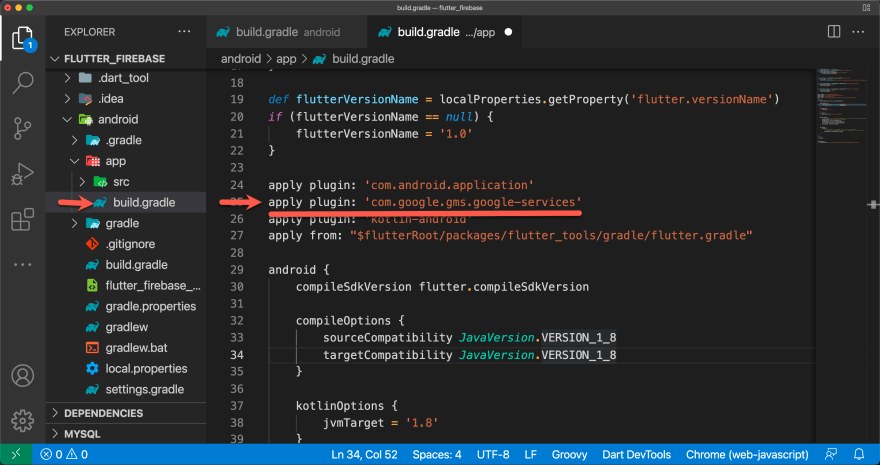
9) เปิดไฟล์ android/app/build.gradle เพิ่ม apply plugin
apply plugin: 'com.google.gms.google-services'
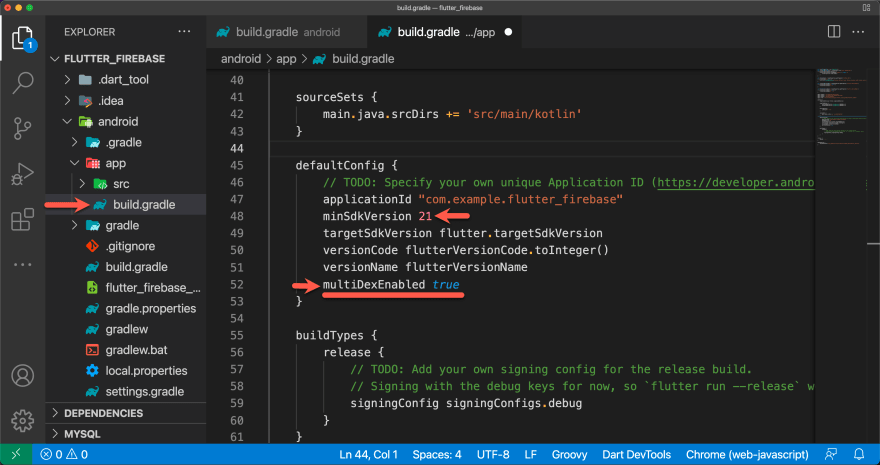
10) แก้ minSdkVersion เป็น 21 และเพิ่ม multiDexEnabled ใน defaultConfig
minSdkVersion 21
multiDexEnabled true
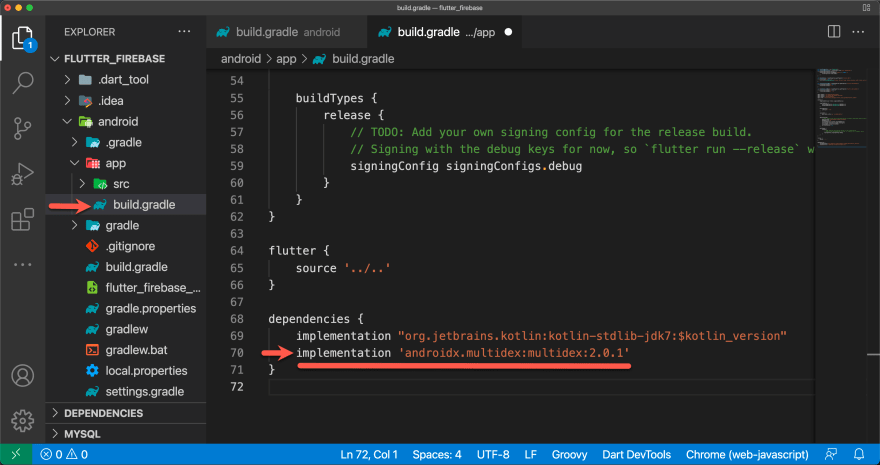
11) เพิ่ม implementation ใน dependencies (ตรวจสอบเวอร์ชั่นได้ที่ https://mvnrepository.com/artifact/androidx.multidex/multidex)
implementation 'androidx.multidex:multidex:2.0.1'
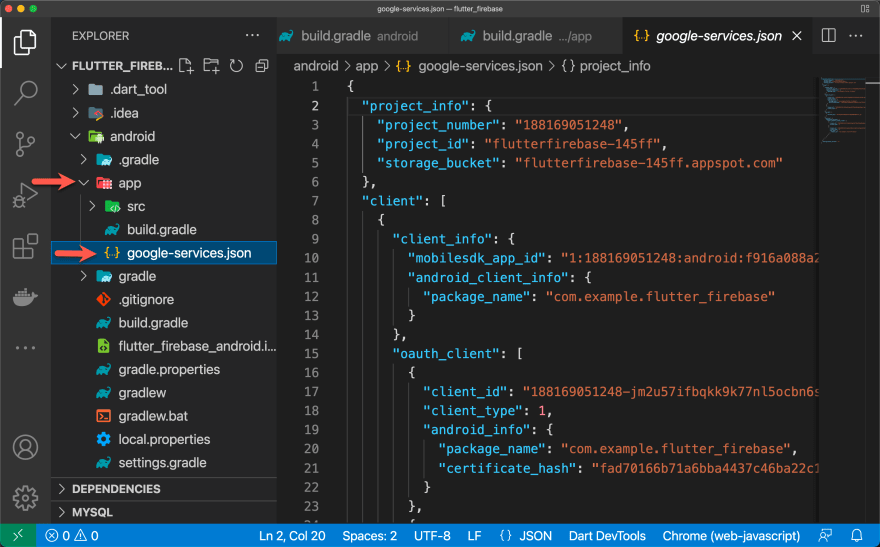
12) ก๊อปปี้ไฟล์ google-services.json ที่ดาวน์โหลดมา ไปไว้ใน android/app
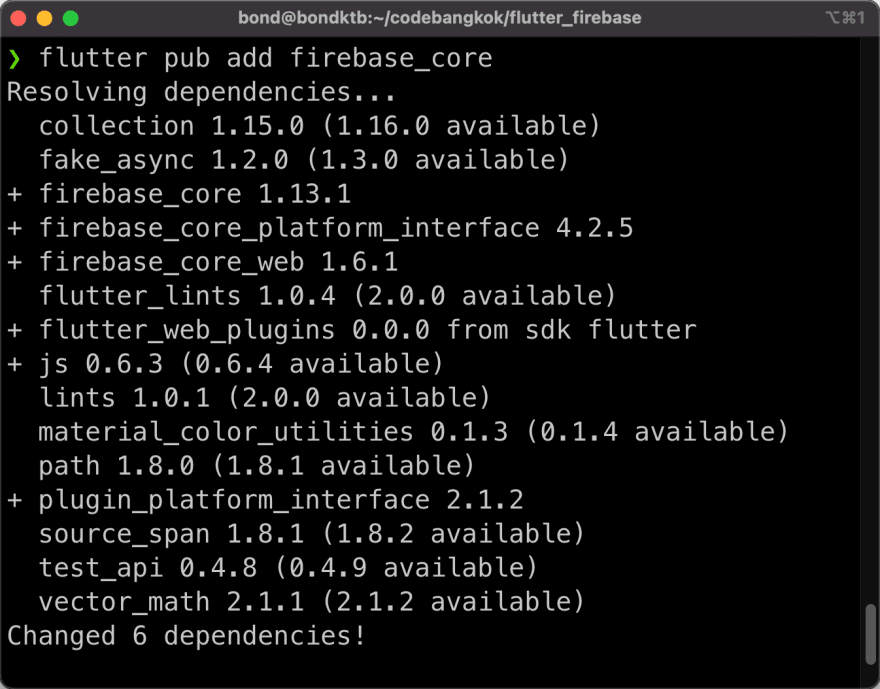
13) เปิด Terminal เข้าไปที่ flutter_firebase ไดเร็กทอรี่ แล้วติดตั้ง firebase_core package (ดูรายละเอียดได้ที่ https://pub.dev/packages/firebase_core)
flutter pub add firebase_core
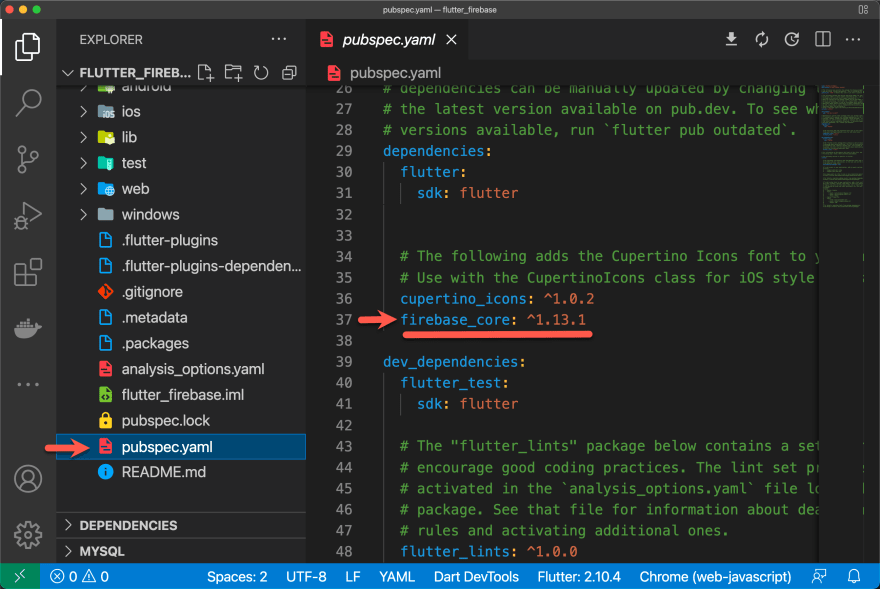
14) ถ้าไปเปิดไฟล์ pubspec.yaml ดูก็จะเห็น firebase_core ที่ dependencies
Initialize Firebase
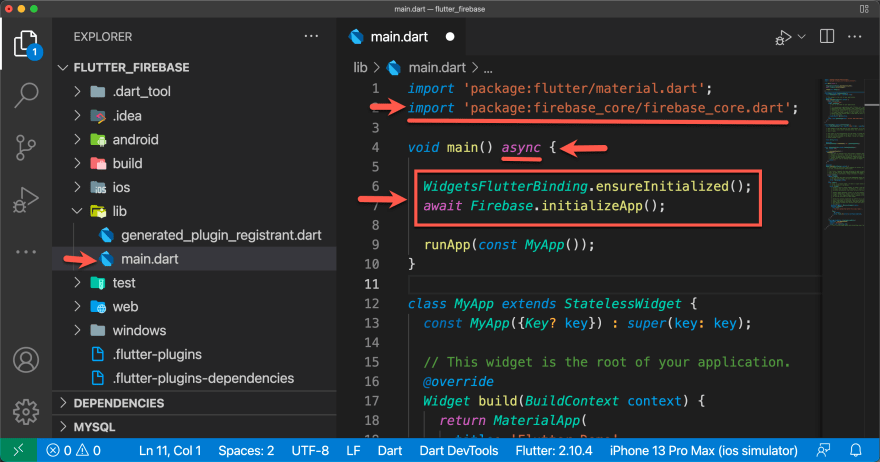
1) เปิดไฟล์ main.dart
- เพิ่ม import firebase_core package
- เพิ่ม async หลัง main()
- เพิ่ม WidgetsFlutterBinding.ensureInitialized()
- เพิ่ม Firebase.initializeApp()
import 'package:firebase_core/firebase_core.dart';

void main() async {
  WidgetsFlutterBinding.ensureInitialized();
  await Firebase.initializeApp();
  runApp(const MyApp());
}
ติดตามผลงานได้ที่
- Page: https://fb.com/CodeBangkok
- Group: https://fb.com/groups/msdevth
- Blog: https://dev.to/codebangkok
- YouTube: https://youtube.com/CodeBangkok









Top comments (0)