
Kubernetes is all about containerization. Is that enough to make rightsizing and cost savings happen?
Running more workloads on the same server instance might seem more cost-effective.
But tracking which projects or teams generate Kubernetes costs is hard. Knowing whether you’re getting any savings from your cluster is also a challenge.
But there’s one tactic that helps: rightsizing. The tighter your Kubernetes scaling mechanisms are configured, the lower the waste and costs of running your application.
Read on to learn how to use Kubernetes autoscaling mechanisms and drive your cloud costs down.
And if autoscaling is no mystery to you, take a look at this handful of tips: 8 best practices to reduce your AWS bill for Kubernetes
What you’ll find inside:
- How autoscaling works in Kubernetes: Horizontal vs. Vertical
- Kubernetes autoscaling methods in detail
- Make sure that HPA and VPA policies don’t clash
- Use instance weighted scores
- Reduce costs with mixed instances
How autoscaling works in Kubernetes: Horizontal vs. Vertical
Horizontal autoscaling
Horizontal autoscaling allows teams to create rules for starting or stopping instances assigned to a resource when they breach the upper or lower thresholds.
Limitations:
- It might require you to architect the application with a scale-out in mind so that the distribution of workloads across multiple servers is possible.
- It might not always keep up with unexpected demand peaks as instances take a few minutes to load.
Vertical autoscaling
Vertical autoscaling is based on rules that affect the amount of CPU or RAM allocated to an existing instance.
Limitations:
- You’ll be limited by upper CPU and memory boundaries for a single instance.
- There are also connectivity ceilings for every underlying physical host due to network-related limitations.
- Some of your resources may be idle at times, and you’ll keep on paying for them.
Kubernetes autoscaling methods in detail
1. Horizontal Pod Autoscaler (HPA)
In many applications, usage may change over time. As the demands of your application vary, you may want to add or remove pod replicas. This is where the Horizontal Pod Autoscaler (HPA) comes in to scale these workloads for you automatically.
What you need to run the Horizontal Pod Autoscaler
HPA is by default part of the standard kube-controller-manager daemon. It manages only the pods created by a replication controller (deployments, replica sets, and stateful sets).
To work as it should, the HPA controller requires a source of metrics. For example, when scaling based on CPU usage, it uses metrics-server.
If you’d like to use custom or external metrics for HPA scaling, you need to deploy a service implementing the custom.metrics.k8s.io or external.metrics.k8s.io API. This provides an interface with a monitoring service or metrics source. Custom metrics include network traffic, memory, or a value that relates to the pod’s application.
And if your workloads use the standard CPU metric, make sure to configure the CPU resource limits for containers in the pod spec.
When to use it?
The Horizontal Pod Autoscaler is a great tool for scaling stateless applications. But you can also use it to support scaling stateful sets.
To achieve cost savings for workloads that see regular changes in demand, use the HPA in combination with cluster autoscaling. This will help you to reduce the number of active nodes when the number of pods decreases.
How does the Horizontal Pod Autoscaler work?
If you configure the HPA controller for your workload, it will monitor that workload’s pods to understand whether the number of pod replicas needs to change.
The HPA takes the mean of a per-pod metric value to determine this. It calculates whether removing or adding replicas would bring the current value closer to the target value.
Example scenario:
Imagine that your deployment has a target CPU utilization of 50%. You currently have five pods running there, and the mean CPU utilization is 75%.
In this scenario, the HPA controller will add 3 replicas so that the pod average is brought closer to the target of 50%.
Tips for using the Horizontal Pod Autoscaler
1. Install metrics-server
To make scaling decisions, the HPA needs access to per-pod resource metrics. They’re retrieved from the metrics.k8s.io API provided by the metrics-server. That’s why you need to launch metrics-server in your Kubernetes cluster as an add-on.
2. Configure resource requests for all pods
Another key source of information for the HPA’s scaling decisions is the observed CPU utilization values of pods.
But how are utilization values calculated? They are a percentage of the resource requests from individual pods.
If you miss resource request values for some containers, the calculations might become entirely inaccurate. You risk suboptimal operation and poor scaling decisions.
That’s why it’s worth configuring resource request values for all the containers of every pod that’s part of the Kubernetes controller scaled by the HPA.
3. Configure the custom/external metrics
Custom or external metrics can also serve as a source for the HPA’s scaling decisions. The HPA supports two types of custom metrics:
- Pod metrics – averaged across all the pods, supporting only target type of AverageValue,
- Object metrics – describing any other object in the same namespace and supporting target types of Value and AverageValue.
When configuring custom metrics, remember to use the correct target type for pod and object metrics.
What about external metrics?
These metrics allow the HPA to autoscale applications based on metrics that are provided by third-party monitoring systems. External metrics support target types of Value and AverageValue.
When deciding between custom and external metrics, it’s best to go with custom because securing an external metrics API is more difficult.
2. Vertical Pod Autoscaler (VPA)
The Vertical Pod Autoscaler (VPA) is a Kubernetes autoscaling method that increases and decreases the CPU and memory resource requests of pod containers to match the allocated cluster resource to the actual usage better.
The VPA replaces only the pods managed by a replication controller. That’s why it requires the Kubernetes metrics-server to work.
It’s a good practice to use the VPA and HPA at the same time if the HPA configuration doesn’t use CPU or memory to identify scaling targets.
When to use the Vertical Pod Autoscaler?
Some workloads might experience temporary high utilization. Increasing their request limits permanently would waste CPU or memory resources, limiting the nodes that can run them.
Spreading a workload across multiple instances of an application might be difficult. This is where the Vertical Pod Autoscaler can help.
How does the Vertical Pod Autoscaler work?
A VPA deployment includes three components:
- Recommender – it monitors resource utilization and computes target values,
- Updater – it checks if pods require a new resource limits update,
- Admission Controller – it uses a mutating admission webhook to overwrite the resource requests of pods when they’re created.
Kubernetes doesn’t allow dynamic changes in the resource limits of a running pod. The VPA can’t update the existing pods with new limits.
Instead, it terminates pods using outdated limits. When the pod’s controller requests a replacement, the VPA controller injects the updated resource request and limits values to the new pod’s specification.
Tips for using the Vertical Pod Autoscaler
1. Use it with the correct Kubernetes version
Version 0.4 and later of the Vertical Pod Autoscaler needs custom resource definition capabilities, so it can’t be used with Kubernetes versions older than 1.11. If you’re using an earlier Kubernetes version, use version 0.3 of the VPA.
2. Run VPA with updateMode: “Off” at first:
To be able to configure VPA effectively and make full use of it, you need to understand the resource usage of the pods that you want to autoscale. Configuring VPA with updateMode: “Off” will provide you with the recommended CPU and memory requests. Once you have the recommendations, you have a great starting point that you can adjust in the future.
3. Understand your workload seasonality
If your workloads get regular spikes of high and low resource usage, VPA might be too aggressive for the job. That’s because it will keep replacing pods over and over again. In such a case, HPA might be a better solution for you. However, using the VPA recommendations component will prove useful too as it gives you valuable insights into resource usage in any case.
3. Cluster Autoscaler
The Cluster Autoscaler changes the number of nodes in a cluster. It can only manage nodes on supported platforms – and each comes with specific requirements or limitations.
The autoscaler controller functions on the infrastructure level, so it requires permissions to add and delete infrastructures. Make sure to manage these necessary credentials securely. One key best practice here is following the principle of least privilege.
When to use the Cluster Autoscaler?
To manage the costs of running Kubernetes clusters on a cloud platform, it’s smart to dynamically scale the number of nodes to match the current cluster utilization. This is especially true for workloads designed to scale and meet the current demand.
How does the Cluster Autoscaler work?
The Cluster Autoscaler basically loops through two tasks. It checks for unschedulable pods and calculates whether it’s possible to consolidate all the currently deployed pods on a smaller number of nodes.
Here’s how it works:
- The Cluster Autoscaler checks clusters for pods that can’t be scheduled on any existing nodes. That might be due to inadequate CPU or memory resources.
- Another reason could be that the pod’s node taint tolerations or affinity rules fail to match an existing node.
- If a cluster contains unschedulable pods, the Autoscaler checks its managed node pools to determine whether adding a node would unblock the pod or not. If that’s the case, the Autoscaler adds a node to the node pool.
- The Cluster Autoscaler also scans nodes in the node pools it manages.
- If it spots a node with pods that could be rescheduled to other nodes available in the cluster, the Autoscaler evicts them and removes the spare node.
- When deciding to move a pod, it factors in pod priority and PodDisruptionBudgets.
Tips for using the Cluster Autoscaler
1. Make sure that you’re using the correct version
Kubernetes evolved rapidly, so following all the new releases and features is difficult. When deploying the Cluster Autoscaler, make sure that you’re using it with the recommended Kubernetes version. You can find a compatibility list here.
2. Double-check cluster nodes for the same capacity
Otherwise, the Cluster Autoscaler isn’t going to work correctly. It assumes that every node in the group has the same CPU and memory capacity. Based on this, it creates template nodes for each node group and makes autoscaling decisions on the basis of a template node.
That’s why you need to verify that the instance group to be autoscaled contains instances or nodes of the same type. And if you’re dealing with mixed instance types, ensure that they have the same resource footprint.
3. Define resource requests for every pod
The Cluster Autoscaler makes scaling decisions on the basis of the scheduling status of pods and individual node utilization.
You must specify resource requests for each and every pod. Otherwise, the autoscaler won’t function correctly.
For example, the cluster autoscaler will scale down any nodes that have a utilization that is lower than the specified threshold.
It calculates utilization as the sum of requested resources divided by capacity. If any pods or containers are present without resource requests, the autoscaler decisions will be affected, leading to suboptimal functioning.
Make sure that all the pods scheduled to run in an autoscaled node or instance group have resource requests specified.
4. Set the PodDisruptionBudget for kube-system pods
Kube-system pods prevent the cluster autoscaler from scaling down the nodes on which they’re running by default. If pods end up on different nodes for some reason, they can prevent the cluster from scaling down.
To avoid this scenario, determine a pod disruption budget for system pods.
A pod disruption budget allows you to avoid disruptions to important pods and make sure that a required number is always running.
When specifying this budget for system pods, factor in the number of replicas of these pods that are provisioned by default. Most system pods run as single instance pods (aside from Kube-dns).
Restarting them could cause disruptions to the cluster, so avoid adding a disruption budget for single instance pods – for example, the metrics-server.
Best practices for Kubernetes autoscaling

1. Make sure that HPA and VPA policies don’t clash
The Vertical Pod Autoscaler automatically adjusts the requests and limits configuration, reducing overhead and achieving cost-savings. The Horizontal Pod Autoscaler (HPA) aims to scale out and more likely up than down.
Double-check that the VPA and HPA policies aren’t interfering with each other. Review your binning and packing density settings when designing clusters for business- or purpose-class tier of service.
2. Use instance weighted scores
Let’s say that one of your workloads often ends up consuming more than it requested.
Does that happen because the resources are needed? Or were they consumed because they were simply available, but not critically required?
Use instance weighted scores when picking the instance sizes and types that are a good fit for autoscaling. Instance weighting comes in handy especially when you adopt a diversified allocation strategy and use spot instances.
3. Reduce costs with mixed instances
A mixed-instance strategy forges a path towards great availability and performance – at a reasonable cost.
You basically choose from various instance types. While some are cheaper and just good enough, they might not be a good match for high-throughput, low-latency workloads.
Depending on your workload, you can often select the cheapest machines and make it all work.
Or you could run it on a smaller number of machines with higher specs. This could potentially bring you great cost savings because each node requires installing Kubernetes on it, which adds a little overhead.
But how do you scale mixed instances?
In a mixed-instance situation, every instance uses a different type of resource. So, when you scale instances in autoscaling groups and use metrics like CPU and network utilization, you might get inconsistent metrics.
The Cluster Autoscaler is a must-have here. It allows mixing instance types in a node group – but your instances need to have the same capacity in terms of CPU and memory.
Check this guide too: How to choose the best VM type for the job and save on your cloud bill
Can you automate Kubernetes autoscaling even more?
You actually can.
Teams usually need a balanced combination of all the three Kubernetes autoscaling methods. This is how they ensure that workloads run in a stable way during their peak load and keep costs to a minimum when facing lower demand.
Here’s how CAST AI solves rightsizing for you.
CAST AI added new nodes automatically for the duration of the increased demands on the workload.
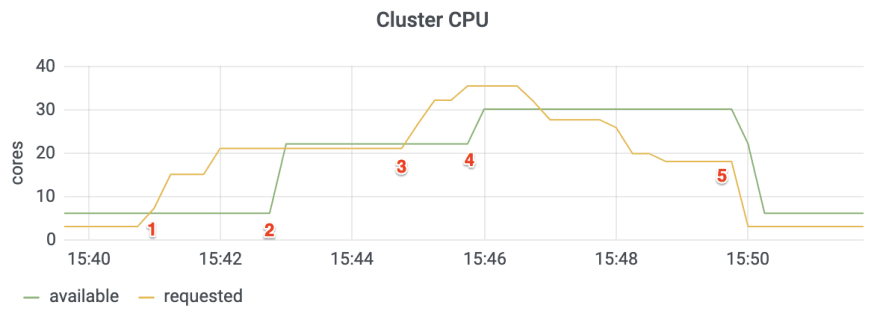
- At 15:41, the application receives a large surge of unexpected traffic. The Horizontal Pod Autoscaler creates pods. Since they have no place to run, we get an instant requirement for 15.5 new CPU cores.
- Within 2 minutes, CAST AI automatically adds a new 16-core node.
- At 15:45, additional traffic starts hitting the application.
- To handle this, CAST AI adds an extra 8-core node within a minute.
- Once the work is completed, CAST AI immediately retires 2 nodes to eliminate resource waste.
To achieve extra cost savings, the AI cost optimization engine selected spot instances for the additional work available at a 70% discount.
Making Kubernetes autoscaling more streamlined is one of our key goals at CAST AI - try now risk-free.
Right now, we’re working on an EKS optimization tool that will be launched in a few weeks.

Top comments (0)