
Introduction
Whenever we are starting a backend project in NodeJS, there's always a question about which frameworks we are going to use, although there is no correct answer to this question, it is always good to use new and famous technologies, they came to solve existing problems and make it easy to develop robust applications.
Let me show you how to build a initial project structure using some of the new frameworks to build NodeJS scalable and efficient applications: NestJS and Prisma.
Starting the backend using NestJS
Nest (NestJS) is a framework for building efficient, scalable Node.js server-side applications. Nest makes use of robust HTTP Server frameworks like Express. Nest provides an out-of-the-box application architecture that allows developers and teams to create highly testable, scalable, loosely coupled, and easily maintainable applications. For more information:(https://docs.nestjs.com/)
Installation
- Run
npm i -=g @nestjs/clito install the NestJS cli. - Run
nest new <project-name>to create the Nest project - A project-name folder will be created with node_modules and some files. A src/ directory will be created and populated with some main files:

We can delete all test files and jest commands inside the package.json file because it won't be our focus on this article.
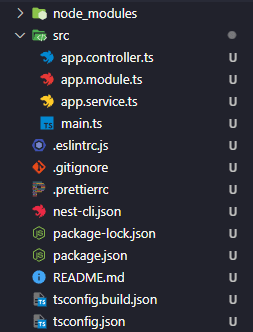
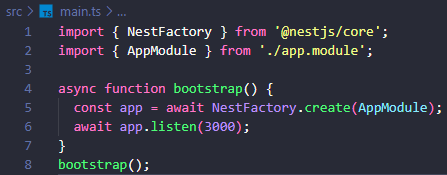
In the structure generated by NestJS contains the file main.ts that Nest Factory starts the main module and listens on some defined port.
A briefly introduction to the Nest files:
- Module: Group controllers and providers.
- Controller: Route that calls a service to do something.
- Services: Functions with the logic and business rules from the backend.
Basically the NestJS works based on decorators:
- Decorators declare routes, services, controllers and anything else.
- Decorators connect classes with common backend functionalities.
hint: It's possible to access the nest commands by: nest -h
First Steps
Run
npm run start:devto start the project and watch your files, automatically recompiling and reloading the server if something changes.Something cool about nest is that it's possible to generate classes by the command: nest generate FILE_TIPE FILE_NAME as we gonna do right now:
1.nest generate module database
2.nest generate module http
Basically, each command will generate a module. The first module will handle the database, it will contain the Prisma service and the another one is to handle the HTTP requests, it will contain our controllers.
Before anything is important to add a .env file to our API to use secret variables. Run npm i @nestjs/config to be possible to use .env.
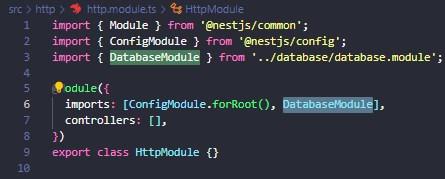
- Import the ConfigModule in the http.module.ts file:
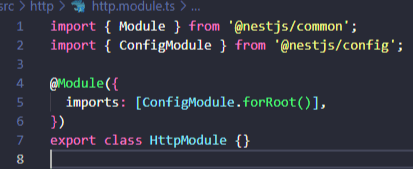
- This way it's possible to access the .env file from the proccess.env inside the Http Module
Configuring the Application Database, using Prisma
Prisma is a Typescript ORM developed mainly to SQL databases.
Some features of Prisma:
- It helps to write queries by warning errors and auto-completing when writing queries on the backend (Using Typescript).
- It creates migrations automatically from changes made by the developer. For more info:
Adding Prisma to the backend project
- Install prisma:
npm i prisma -D - Then run:
npx prisma init - In the Prisma folder we got the configuration file, we need to set the DATABASE_URL.
- Inside the .env file add the DATABASE_URL variable. To start and get our DATABASE_URL I'll provide to you a docker-compose.yml file and you just need to run
docker-compose up -dto start the postgreSQL database.
![]()
Setting up Prisma Service
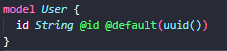
- First of all we'll add a new User Table inside prsima/schema.prisma:
- Run
npx prisma migrate devto check the changes on the schema.prisma file and generate our first migration. You should give a name for it, for instance: create_users_table. (Migrations will be available in the prisma/migrations/* folder). - After create our first migration with prisma install the package:
npm i @prisma/client. Ref: Prisma Client - Inside the Nest project we'll generate a new prisma service:
nest generate service prisma. This service will be located on src/database/prisma/prisma/service.ts and it will be responsible to initiate Prisma.
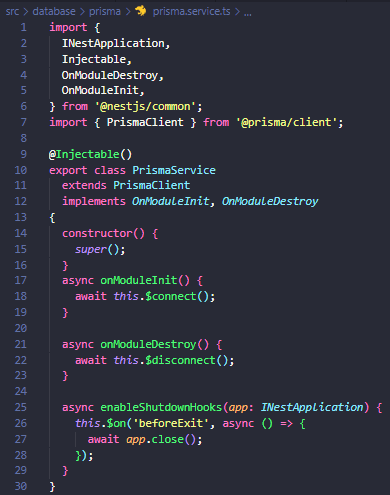
(This configuration can be found on Prisma documentation)
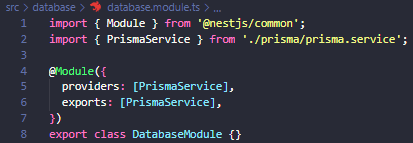
- Now to use PrismaService we should export it inside DatabaseModule (Which contains PrismaService)
- Furthermore, we should import DatabaseModule in our HttpModule in order to get access to PrismaService.
-
Finished! Prisma is configured, and you can run the project by
npm run start:dev. You can also using another terminal you can runnpx prisma studio. (Prisma studio is a friendly interface that allows us to create/access/filter/delete database data)
Testing Prisma by creating our first route
Now that we have the PrismaService is possible to create DB queries. So we gonna create a route to get all users.
- We start it by creating a new Controller. (Controllers are responsible to handle requests and return a response to the client, just like a standard Express NodeJS application)
- We can delete app.controller.ts and app.service.ts files that were generated by Nest, and generate a new user controller by the command:
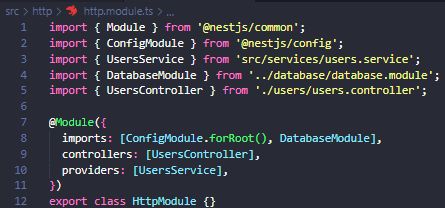
nest g controller users. This command will generate a users folder with a user.controller.ts file. This controller will be part of http.module.ts (as we going to receive HTTP requests from it). - The new project structure:

Controller
- To define a route on a controller we use the
@Controller('users')decorator, we specify a path prefix optional as 'users'. - The routes also will be defined with decorators (Everything on NestJS uses decorators). As we going to get data we will use the
@Get()decorator, without defining any route path. - The new user.controller.ts file:

- Now you can make a GET request to /users and receive a response from the controller. (It's possible to access the request body, query, params, etc. All this through decorators, check the NestJS documentation: https://docs.nestjs.com/controllers)
Service
- After creating our first controller, it's time to create our first service. On Prisma, services are also providers. The main idea of a provider is that it can be injected as a dependency; this means that objects can create multiple relationships with each other, and the function of "linking" object instances can be largely delegated to the Nest runtime system.
- Our controller should handle HTTP requests and delegate complex tasks to providers. Our provider will be a service called UsersService.
- First run
nest g service users - Move the users.service.ts file to a new folder src/service, and import this as a provider on http.module.ts to be possible to call it from the UsersController:
- This service will be responsible for manipulating data from the Database using PrismaService and it's also a Provider.
- The best part of NestJS it is that is simple to use services by dependency injection. See how I import and use PrismaService:
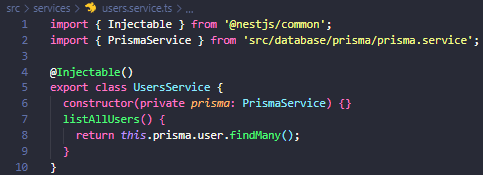
- Through Typescript, Prisma helps us to do database operations in a much easier way.
- Now to test you can run prism studio and add some data to your database using Prisma Studio:
npx prism studio. And everything should be working just fine!
Conclusion
- That's an initial structure for a NestJS backend project using Prisma, you can clone my repo and start your own project from there.
- Thank you for reading this article! Check out the Github repo link: https://github.com/caiofelipe97/nestjs-prisma.
- You can also reach me on LinkedIn: https://www.linkedin.com/in/caio-melo-281705119/

Top comments (1)
dev.to/umasankarswain/how-to-updat...