How to make a mock server, APIClient SDK, and live API documentation with ease in Kubernetes using open-source tools

I’m enthusiastic about the open-source world. There so many great, free, open-source tools such as Linux, Kubernetes, Docker, NodeJS, and Golang. And this ecosystem continues to grow, bringing new technology and solutions for the better of the world (the software engineering world).
Today, I’m exploring a few open-source projects that might be useful to developers. If you ever read my piece about the practice of API driven development that we use in Kurio, you will find terms like Open API 3, mock server, and SDK generator. But, in that article, I don’t explain things such as utilizing Open API 3, creating a mock server, or generating the SDKs.
In this piece, I’ll cover how to create a mock server, generate an API SDK with free tools (a.k.a open-source projects) and host it in a Kubernetes(K8s) cluster. For this case, I will use my own personal Kubernetes cluster.
All the steps below will use the K8s cluster and I’ll be working under the assumption that you already have a live and production-ready of K8s cluster (or at least staging-ready).
For my exploration, I’ve already prepared an example of Open API 3 specification and I will use this specification for this article. The specification can be found in my Github repo.
So to summarize, there are three things I will do here using the Open API Specification:
- Create live API documentation from Open API 3 specs
- Create a Lightweight and blazing fast mock server from Open API 3
- Generate the HTTP SDK clients from Open API 3 specs
Creating Live API Documentation
Tools to be prepared:
- Swagger UI
- A complete/ready to use installation of Open API
- A live and production-ready K8s cluster (or at least staging-ready)
The easiest one is to create live API documentation. With live API documentation, hopefully, every developer will be able to read it and understand our API, how it works, requests, and responses. There are numerous tools we can use, but in this article, I will use the default tool provided by Swagger, Swagger UI .
They already provide a public docker-image that we can use. So if you have a K8s cluster, just add a deployment for it into our K8s cluster. Easy-peasy.
Step One: Create a Docker image of Swagger UI
We need to create a Docker image that will be used and deployed to our K8s cluster. Don’t forget to use Swagger UI as the base docker-image.
Here is an example of my Dockerfile:
FROM swaggerapi/swagger-ui:v3.23.1

ADD **tweetor.yaml** /usr/share/nginx/html/tweetor.yaml
# Add another spec here
- tweetor.yaml is my Open API specification. Just add it to the base image folder. The complete file can be found here.
- Since the base image swaggerapi/swagger-ui:v3.23.1 uses the NGinx, I need to add my Spec into the NGinx folder, which is in/usr/share/nginx/html/.
And then, we can build and push it to a private container registry (I use GCR for my personal docker registry):
$ docker build -t asia.gcr.io/kube-xmas/tweetor-docs:latest .
//docker build process will happen here...

$ docker push asia.gcr.io/kube-xmas/tweetor-docs:latest
//docker push process will happen here...
Step Two: Create a Kubernetes deployment configuration for Swagger UI
Next, create the K8s deployment component.
Execute and run the deployment on Kubernetes:
$ kubectl apply -f swagger\_ui\_deployment.yaml

$ kubectl get pods --namespace=tweetor-docs
NAME READY STATUS RESTARTS AGE
tweetor-docs-786d889d67-65h45 1/1 Running 0 14m
So, in the deployment above, I only used three components, Namespace,Deployment and Service (Node Port). The last step is to add the Ingress component to the service, so every engineer will able to see the documentation.
$ kubectl apply -f ingress\_swagger\_docs.yaml
And now the docs will be available and accessible by any engineer.
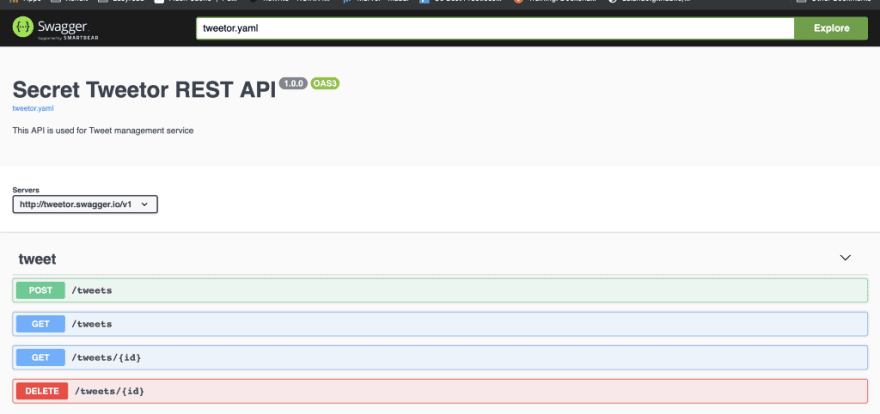
*Note: If you encountered a Petstore swagger when visiting your API-Docs, enter the swagger yaml name that you created in the docker file. In my case, I use tweetor.yaml, as you can see in the search-bar/explore. All your docs can be hosted in one docker-container. If you have time, try to change the default swagger file in the index page.
That’s all, it’s simple.
Creating a Lightweight and Blazing Fast Mock Server
Tools to be prepared:
- API Sprout
- A complete/ready to use installation of Open API
- A live and production-ready K8s cluster (or at least staging-ready)
Another trick, that may be useful for software development is creating a mock-server. A mock server is a dummy server that represents a real server but usually doesn’t have any specific logic. They can accept any request but the response usually static.
Why do we need mock-servers? You can find more details in my past article here, but I’ll cover it briefly here.
The simplest example I can think of is, imagine that we’re working between two teams, one on the backend and the other on the frontend. Both teams are starting on the same sprint. Normally, the frontend team will need the API to be ready first, so they can work, but when working on the same sprint, it will be blocked, because the backend still not implemented the API. This is when mock servers are useful.
So how can we create a mock server with ease?
Step One: Creating the Dockerfile
I already have a live Kubernetes cluster and a ready-to-use copy of Open API 3 specs.
There is a good tool/library here. This is a simple mock server generator based on the Open API 3 specification. The code is really simple and written in Golang. If only I had the idea first, it could of been me who created this tool. But, it’s okay, instead of re-inventing the wheel, I’ll just use it for my own.
What I need to do is create a Docker image from it and add my Open API specification into the docker image.
This is my Dockerfile:
FROM danielgtaylor/apisprout

ADD tweetor.yaml /data/tweetor.yaml
Create the Docker image and push it to the Docker registry:
$ docker build -t asia.gcr.io/kube-xmas/tweetor-mock:latest .
//docker build process will happen here...

$ docker push asia.gcr.io/kube-xmas/tweetor-mock:latest
//docker push process will happen here...
That’s it, all we have left is to add a deployment file to Kubernetes.
Step Two: Creating the Kubernetes deployment for a mock server
Next, add the K8's deployment. Here is my deployment configuration:
$ kubectl apply -f mock\_tweetor\_deployment.yaml
After you add the ingress to DNS management you can now access the mock-server:
$ curl mock.tweetor.xyz/tweets
[
  {
    "createdTime": "2018-12-24T09:21:41.827Z",
    "id": "abc-f45def-5sdaf-5636f",
    "text": "Merry Christmast Everyone!!!"
  },
  {
    "createdTime": "2018-12-23T09:21:41.827Z",
    "id": "abc-f45def-5sdaf-5636f",
    "text": "I believe santa will give me a great present"
  },
  {
    "createdTime": "2018-12-22T09:21:41.827Z",
    "id": "abc-f45def-5sdaf-5636f",
    "text": "Hello my secret santa. Thank you!!!"
  }
]
And now, our frontend team will able to develop the frontend using the mock API.
Generating the HTTP SDK Clients
Tools to be prepared:
- Open API Generator
- CI/CD for advanced usage, in this article, I won’t use CI/CD.
The last things we have to cover is how to utilize Open API Specs to help us to generate an HTTP Client SDK. SDK stands for software development kit and means a group of libraries or other things that can assist us in integrating or using some services or tools.
In the microservice world, there are so many services operating and handling different tasks. Every service has its endpoint that may differ from others, but within its differences, they still have the same pattern (I’m talking about RESTfull Microservices). They use HTTP verbs (GET, POST, PUT, DELETE) and status codes (200,201,202,400,401,403,404,500,etc).
Each service may depend on more than just one service and when connecting each service to another, usually, programmers build their function to do an HTTP request.

For an example from the picture above:
Let’s say that Service A and Service B is connected to Service C. Now imagine a programmer built the connector (REST HTTP Client) manually from Service A. That programmer also built the connector from Service B. And imagine there are also numerous services that will be connected to Service C and all the connector was built manually.
In the example above, we see a redundant job. What if the connector was separate and imported into our project as a library? And what if, instead of building the connector manually, we can generate it automatically?
That’s how Open API will be used here. Previously, in Swagger 2, the previous version of Open API 3, this was common to generate an HTTP Client SDK. But, in Open API 3, it’s still new.
Luckily, there is a great tool has been built by the communities here. It’s open-source, free, and very easy to use. Especially because they already support CLI and Docker Images.
Generate SDK With Docker
I prefer to use with Docker because it can be used in CI/CD, especially if the CI/CD supports containerization like Buddy. Also with Docker, we don’t need to install Java SDK, because if we want to install using CLI, we need to install Java SDK. Since I don’t want to add any extra jobs, I just use the Docker method.
- Change ./ tweetor.yaml with your Open API Specification.
- -g: specify the programming language of the generated SDK. The supported programming-language can be seen here. In the example above, I want to generate an HTTP Client SDK for Golang.
- -o : specify the target folder of the generated SDK.
Here is a sneak peek of the generated HTTP Client SDK. This an example folder structure after the client is generated in Go.
.
├── README.md
├── api
│ └── openapi.yaml
├── api\_tweet.go
├── client.go
├── configuration.go
├── docs
│ ├── Tweet.md
│ └── TweetApi.md
├── git\_push.sh
├── go.mod
├── go.sum
├── model\_tweet.go
└── response.go
I can’t tell you exactly how the code generated, but you can try it on your own, and see the generated SDK. It’s really helpful and helps us develop projects faster if when working on many microservices.
But in the future, there may be an issue from this generated SDK:
- Maintaining the version of the target API. Because it’s a generated HTTP Client SDK, it may be hard to handle versioning. So the optimal solution is after we generate the SDK, we must push to a Git repository and add a git tag to each generated SDK (actually, the shell script already prepared in the generated folder, so it’s solved :D).
What’s Next?
There are so many tools that might be useful to us which are related to Open API or Swagger. You can find every tool listed here: https://openapi.tools.
The next step is automating the process with (your chosen) CI/CD, so when an engineer updates the Open API specification, it will automatically update all the API documentations, mock server, and the generated SDK.
I’ve done the automated process of all the process I wrote above, but I’m still looking for the right time to write it out.🤧🤕

Top comments (0)