Application Programming Interface, or API, development is a critical aspect of modern software engineering, enabling diverse software systems to interact and share data seamlessly. The API serves as a contract between different software applications, outlining how they can communicate with one another.
Two of the most popular architectural styles for building Web APIs are Representational State Transfer (REST) and GraphQL. REST APIs use standard HTTP methods like GET, POST, PUT and DELETE to perform operations on data; GraphQL is a query language that allows clients to define the structure of responses for their queries and mutations, providing a more flexible approach to data interaction.
This article aims to delve into the intricacies of GraphQL, how it differs from REST API, and how you can implement it in NestJS.
The Differences Between GraphQL vs REST API
REST (Representational State Transfer), introduced by Roy Fielding in 2000, is an architectural style for networked applications. It uses a stateless, client-server communication protocol, typically HTTP, where the server provides resources and the client accesses and modifies them. REST APIs, a shift from the complex SOAP protocol, enable standardized communication between systems on the internet.
On the other hand, GraphQL, developed by Facebook in 2012 and released publicly in 2015, is a query language for APIs designed to address data loading inefficiencies in mobile networks. Unlike REST, GraphQL allows clients to specify exactly what data they need, avoiding over-fetching and under-fetching. This feature has led to its adoption by many large companies and its maintenance by the GraphQL Foundation.
Key Differences
- Endpoints vs. Single Endpoint : In REST you have multiple endpoints, each serving a different purpose. In GraphQL, you have a single endpoint that can handle multiple operations based on the query or mutation sent in the request.
- Over-fetching and under-fetching : In REST, you might end up over-fetching or under-fetching data because the server defines what data is returned for each endpoint. In GraphQL, on the other hand, you specify exactly what data you want in your query, which can help to avoid over-fetching and under-fetching.
- Versioning : In REST, changes to the API often lead to new versions. In GraphQL, you can avoid versioning by deprecating API fields and adding new ones.
- Error Handling : In REST, you can use HTTP codes to indicate the status of a request. In GraphQL, you always get a 200 OK status, and errors are handled in the response body.
- Data Relationships : In REST, linking related resources can be complex. In GraphQL, you can easily fetch related data in a single request using nested queries.
- API Discoverability : In REST, you need to refer to the documentation or the API source code to know what data can be fetched. In GraphQL, you can use tools like GraphiQL or Apollo to explore the API schema and know what data is available for fetching.
Understanding the Differences
To really grasp the differences between these two models, it’s best to use an example.
Let’s imagine we have two models for retrieving data from devices, one called Device and another called City. Here we have some example data:
Device
 {
    "id": "1",
    "imei": "1234567890",
    "address": "123 Main St",
    "name": "Device 1",
    "city_id": 1,
    "type": 1,
    "battery": 80,
    "lat": 40.7128,
    "lon": 74.0060,
    "hardware": "hardware_v1",
    "firmware": "firmware_v1",
    "comments": "This is a test device",
    "uptime": 100,
}
City
{
    "id": "1",
    "name": "New York",
    "country": "USA"
}
Query using REST API
In a REST API, you might have an endpoint to get device details:
GET /devices/:id
This might return:
{
  "id": "1",
  "imei": "1234567890",
  "address": "123 Main St",
  "name": "Device 1",
  "city_id": 1,
  "type": 1,
  "battery": 80,
  "lat": 40.7128,
  "lon": 74.0060,
  "hardware": "hardware_v1",
  "firmware": "firmware_v1",
  "comments": "This is a test device"
}
If you only needed the name , battery_main , and battery_lock of the device, you would be over-fetching data because the endpoint returns much more information than you need.
If you also needed to know the details of the city where the device is located, you would have to make another request to the City endpoint with the city_id :
GET /cities/:id
This is an example of under-fetching, because the initial request did not provide all the data you needed.
Query using GraphQL
In a GraphQL API, you could make a single request to get the exact data you need:
query {
  device(id: "1") {
    name
    battery
    city {
      name
      country
    }
  }
}
This might return:
{
  "data": {
    "device": {
      "name": "Device 1",
      "battery": 80,
      "city": {
        "name": "New York",
        "country": "USA"
      }
    }
  }
}
In this case, with a single GraphQL query, you’re getting exactly the data you need: the device’s name, main battery level, lock battery level and city details. No over-fetching, no under-fetching.
Implementing a GraphQL API using NestJS
NestJS, a progressive Node.js framework, is an excellent choice for building efficient, scalable, and maintainable applications. It’s built with TypeScript, offering the best of both JavaScript and TypeScript features.
One of the advanced usages NestJS supports is creating GraphQL APIs. This guide will walk you through the steps to implement a GraphQL API using NestJS and Apollo.
Setting Up NestJS
Start by installing NestJS. You can use the Nest CLI, which not only sets up a new project but also helps generate application components. You can install it globally using npm:
npm i -g @nestjs/cli
Create a new project:
nest new my-graphql-project
Navigate into your new project:
cd my-graphql-project
Installing GraphQL and Apollo
For the implementation of our GraphQL API, we have decided to use Apollo Server. This is a popular and widely-used open-source solution that is community-driven and well-maintained.
By choosing Apollo Server to implement our GraphQL API, we can benefit from its many features and capabilities, including its flexibility, scalability, and ease of use. Additionally, the Apollo community provides a wealth of resources and support, which can help us to quickly and effectively implement our API. With all of these factors in mind, we can be confident that Apollo Server is the ideal choice for our needs.
Let’s start by installing all the necessary dependencies:
npm i @nestjs/graphql @nestjs/apollo @apollo/server graphql
Now we need to import Apollo into the App module, which you can configure by choosing certain key options.
In our case, we are going to use autoSchemaFile: truebecause we are using a code-first approach to define our API (we use decorators and TypeScript classes to generate the corresponding GraphQL schema). We also disable the default GraphQL playground to use Apollo Server, which offers more funcionality and has a more user-friendly UI.
import { Module } from '@nestjs/common';
import { AppController } from './app.controller';
import { AppService } from './app.service';
import { GraphQLModule } from '@nestjs/graphql';
import { ApolloDriver, ApolloDriverConfig } from '@nestjs/apollo';
import { ApolloServerPluginLandingPageLocalDefault } from '@apollo/server/plugin/landingPage/default';

@Module({
  imports: [
    GraphQLModule.forRoot<ApolloDriverConfig>({
      driver: ApolloDriver,
            autoSchemaFile: true,
            playground: false,
      plugins: [ApolloServerPluginLandingPageLocalDefault()],
    }),
  ],
  controllers: [AppController],
  providers: [AppService],
})
export class AppModule { }
Creating a GraphQL Module
In NestJS, modules provide a great way to organize your code. You can create a GraphQL module with the following code:
nest generate module devices
This command creates a new module and registers it in app.module.ts.
Defining a GraphQL Schema
In GraphQL, the schema is the centerpiece of your API. It defines the shape of your data and the operations available. In NestJS, you define your schema using TypeScript classes and decorators.
You can create a device schema in a device/entities/device.entity.ts file with the following code:
import { ObjectType, Field, Int } from '@nestjs/graphql';

@ObjectType()
export class Device {
    @Field(() => String, { description: 'Device ID' })
    id: string;

    @Field(() => String, { nullable: true })
    imei: string;

    @Field(() => String, { nullable: true })
    address: string;

    @Field(() => String, { nullable: true })
    name: string;

    @Field(type => Int, { nullable: true })
    city_id: number;

    @Field(() => Number, { nullable: true })
    type: number;

    @Field(() => Number, { nullable: true })
    battery: number;

    @Field(() => Number, { nullable: true })
    lat: number;

    @Field(() => Number, { nullable: true })
    lon: number;

    @Field(() => String, { nullable: true })
    hardware: string;

    @Field(() => String, { nullable: true })
    firmware: string;

    @Field(() => String, { nullable: true })
    comments: string;
}
Creating a Resolver and a Service
Resolvers are the equivalent of controllers in REST. They handle the incoming queries and mutations and do the required operations. To create a devices resolver in devices/devices.resolver.ts, use the following code.
nest generate resolver devices
In the devices.resolver.ts file, define a query to get a device:
import { Query, Resolver } from '@nestjs/graphql';
import { Device } from './entities/device.entity';
import { DevicesService } from './devices.service';

@Resolver()
export class DevicesResolver {
  constructor(private readonly devicesService: DevicesService) { }

    @Query(() => [Device], { name: 'devices' })
    findAll() {
        return this.devicesService.findAll();
    }
}
As you can see, the resolver ends by calling a function of DevicesService, as we use Services to abstract the data manipulation layer. Let’s write this file now.
nest generate service devices
In the devices.service.ts file, you can define the function to get the devices from your data repository. In our example we return a hardcoded device, but the most common use case will use TypeORM to query a database.
import { Injectable } from '@nestjs/common';

@Injectable()
export class DevicesService {
    findAll() {
        return new Array({
            id: '1',
            imei: '123456789012345',
            address: '123 Main St',
            name: 'My Device',
            city_id: 1,
            type: 1,
            battery: 100,
            lat: 0,
            lon: 0,
            hardware: '1.0',
            firmware: '1.0',
            comments: 'This is a comment'
        });
    }
}
Testing Your API
Write the following to start your server:
npm run start
Navigate to http://localhost:3000/graphql in your browser. You’ll see the Apollo GraphQL explorer and playground, where you can list all your queries and mutations and test your API. As you can see, there’s only a single GraphQL endpoint, not multiple endpoints as in a RestAPI.
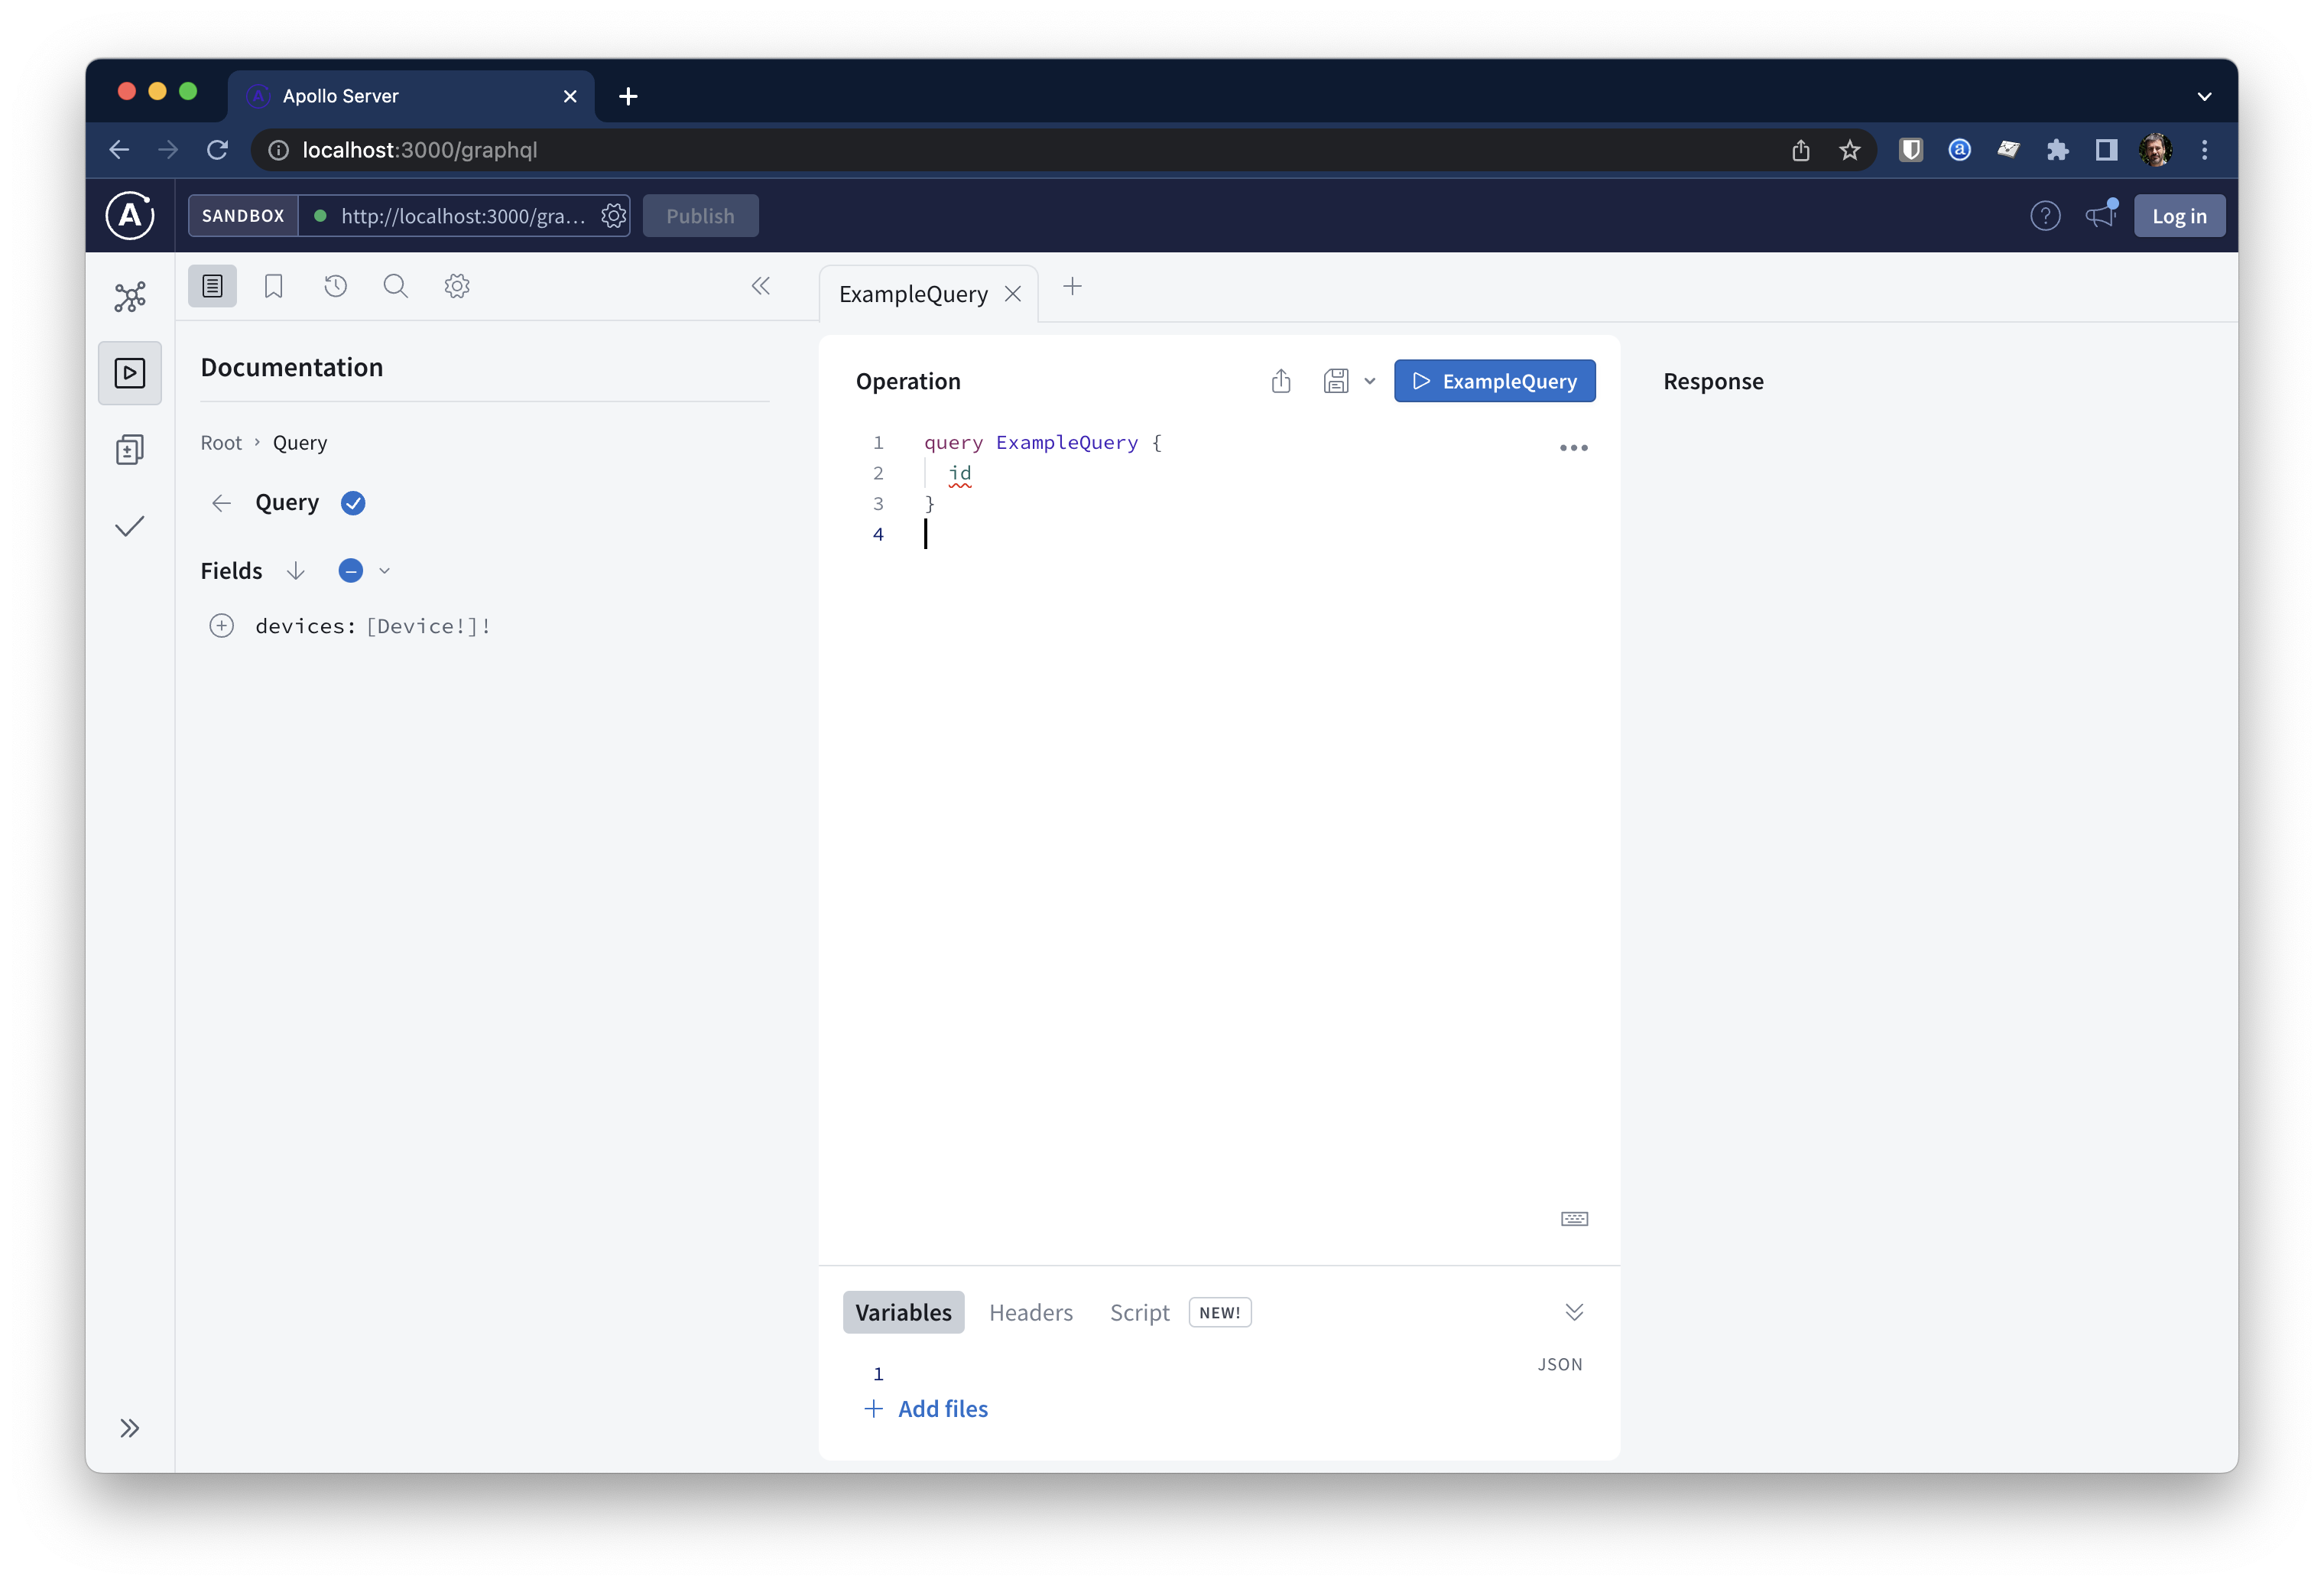
On the left-hand side you will see all the queries defined in your API. The middle section shows the current query you want to try, and the right-hand section shows the response from the server. You can play around as the UI is very intuitive.
Here you have a query that fetches the id, name and address of the devices, and shows how the server responds with the data.
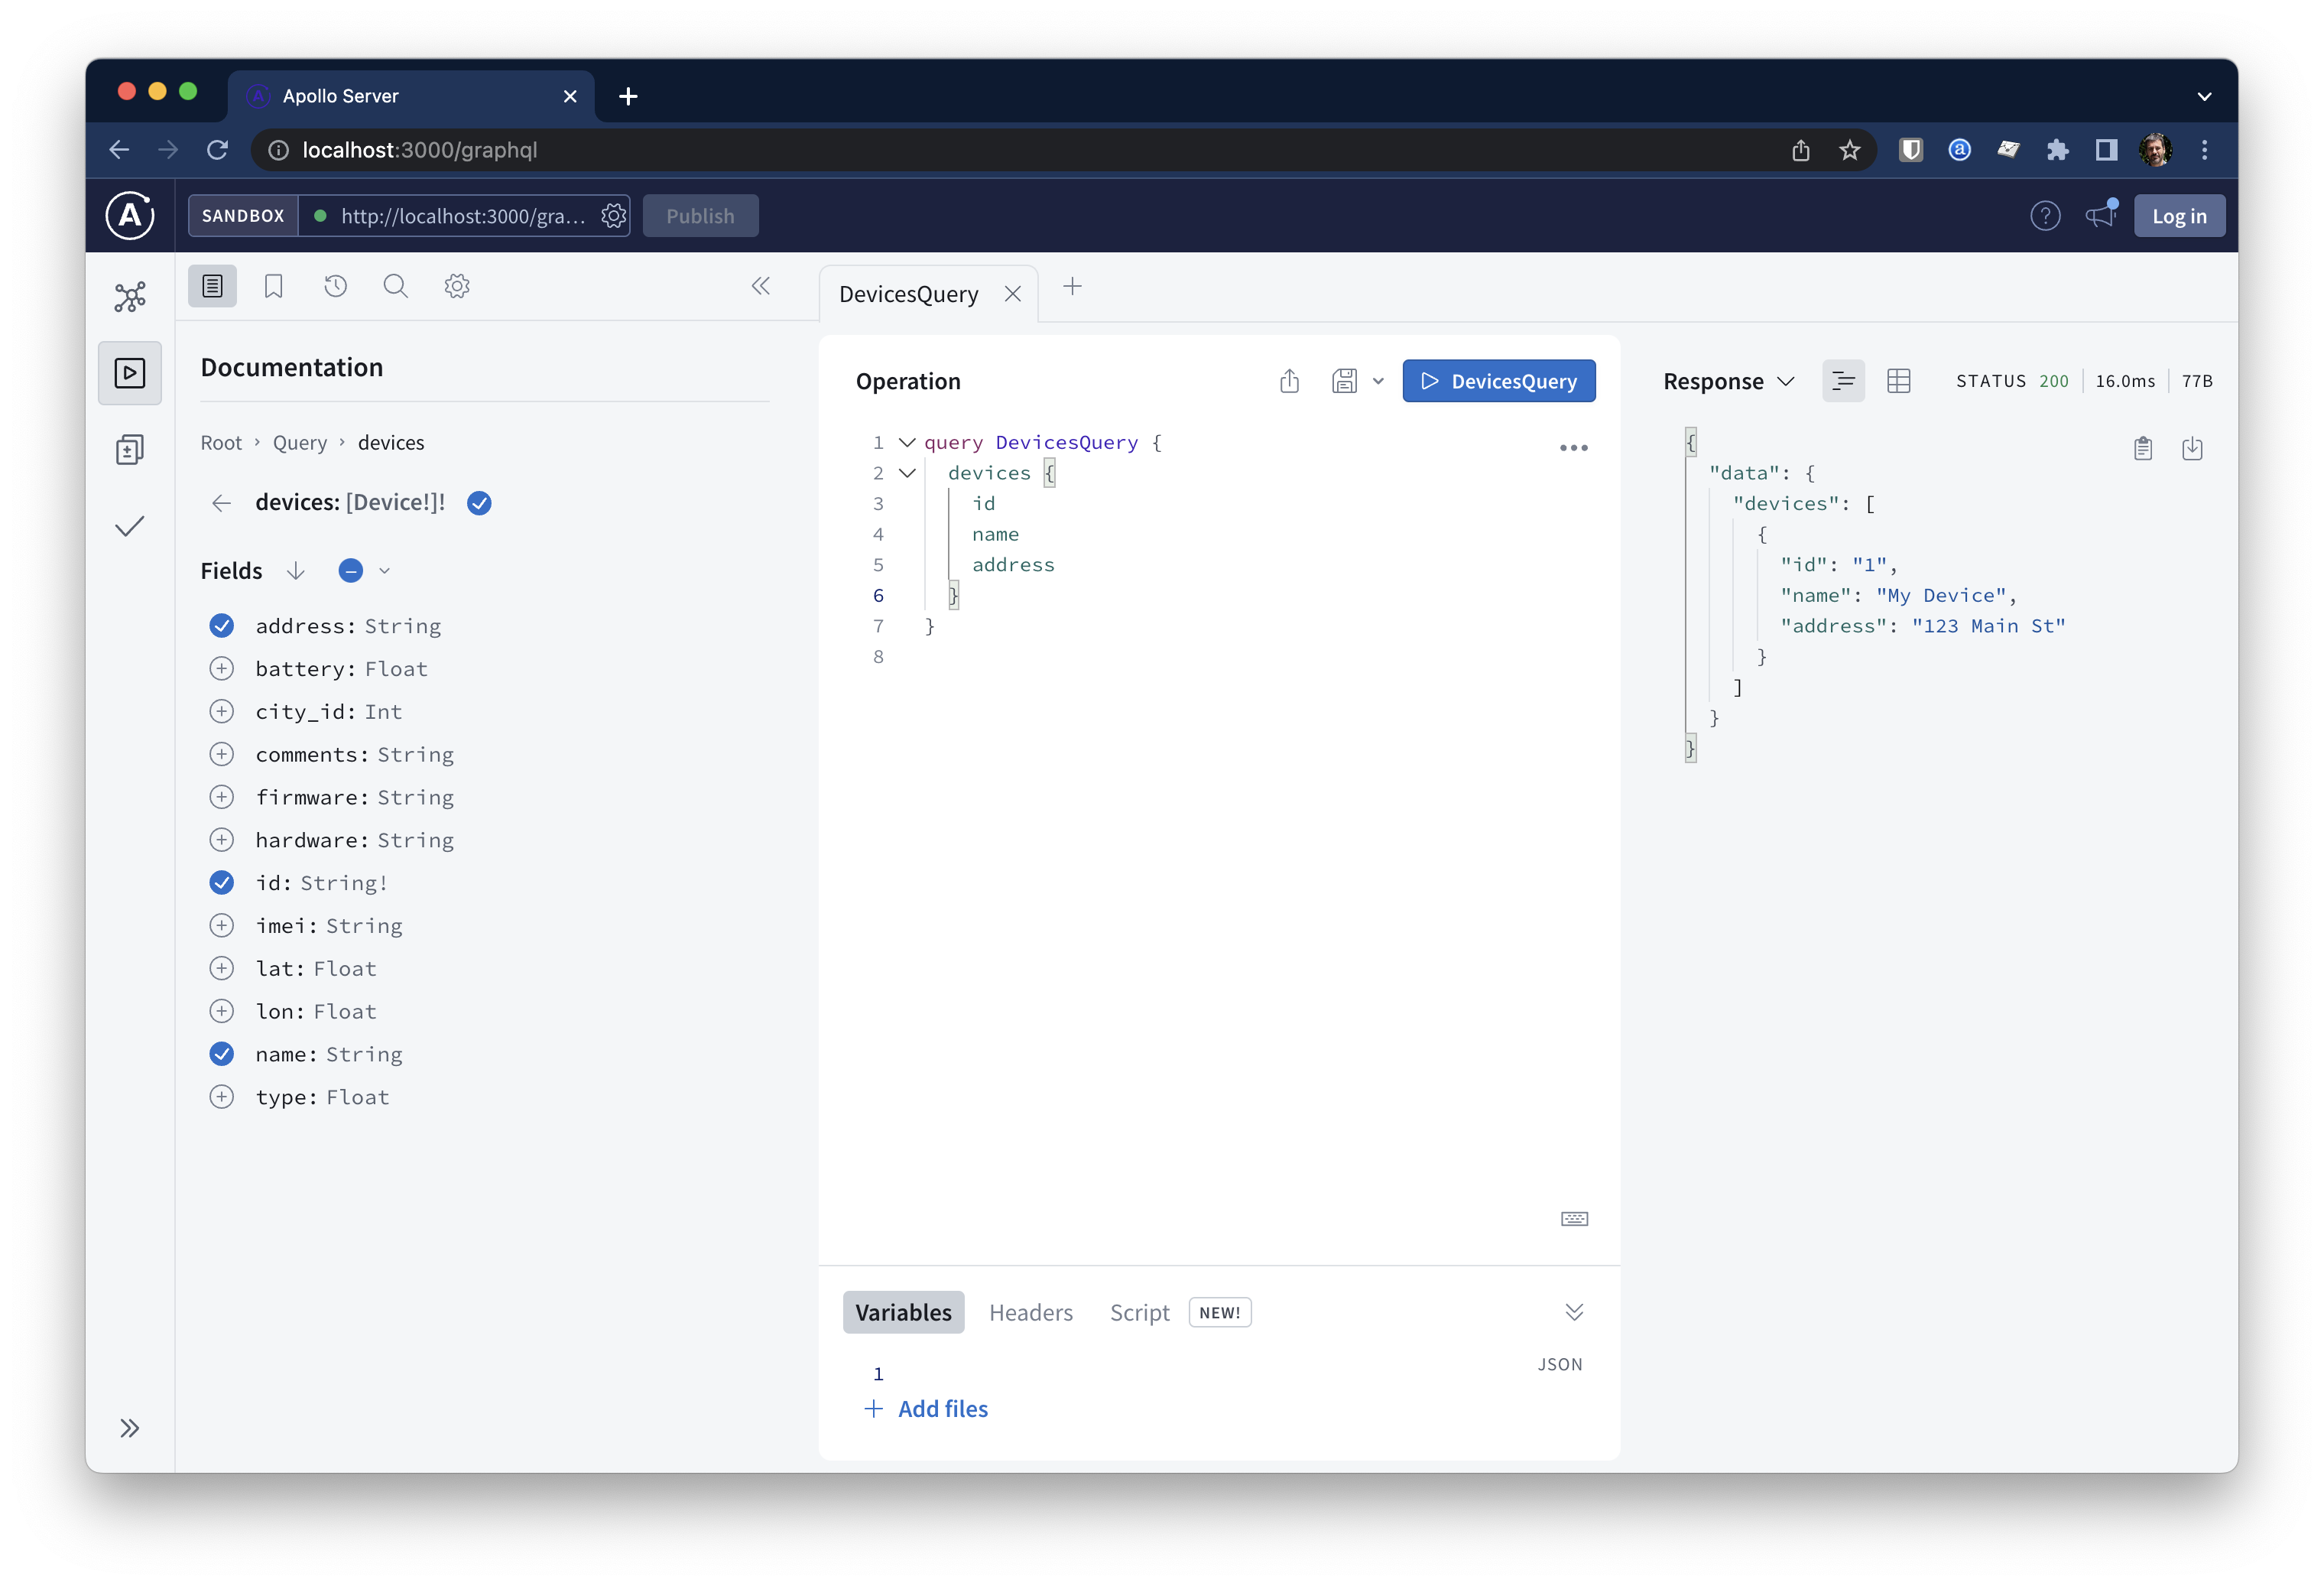
Here you can clearly see the flexibility of GraphQL versus Rest API. You can define which fields you can query instead of getting a fixed number of fields on a Rest API; you can even add relationships to the query.
GraphQL Mutations
The next step after defining a GraphQL schema and testing out our first query is to implement mutations, functions that allow you to create, update, or delete data on the server.
In the case of our devices API, we might have mutations that allow us to create, update, or delete devices. Let’s create an example mutation, which involves creating a new device with a specific set of properties.
First we create and Input the entity to define which data is required to create a device (we create a simple mutation that allows us to create a device with only the imei field and optionally a name). So let’s create the file devices/dto/create-device.input.ts:
import { InputType, Int, Field } from '@nestjs/graphql';

@InputType()
export class CreateDeviceInput {
    @Field(() => String, { description: 'Device IMEI', nullable: false })
  imei: String

    @Field(() => String, { description: 'Device Name', nullable: true })
  name: String!
}
Now we add a mutation operation in our devices.resolver.ts:
import { Query, Resolver } from '@nestjs/graphql';
import { Device } from './entities/device.entity';
import { DevicesService } from './devices.service';

@Resolver()
export class DevicesResolver {
  constructor(private readonly devicesService: DevicesService) { }

    @Query(() => [Device], { name: 'devices' })
    findAll() {
        return this.devicesService.findAll();
    }

    @Mutation(() => Device)
    createDevice(@Args('createDeviceInput') createDeviceInput: CreateDeviceInput) {
        return this.devicesService.create(createDeviceInput);
    }
}
And finally, you can modify the devices.service.ts file to add the new function, and add the new database to your current underlying data storage service. However this function is out of the scope of this article, as we are focusing on understanding how GraphQL works.
Conclusion
The implementation of a GraphQL API using NestJS offers a robust, efficient solution for modern API development. With its modular structure and use of TypeScript, NestJS provides a solid foundation for building scalable applications.
Using a GraphQL API can help eliminate common issues associated with REST APIs, such as over-fetching and under-fetching, and remove the need for versioning. The single endpoint in GraphQL simplifies the client-server interaction, and the capability to fetch related data in a single request makes it a powerful tool for dealing with complex data relationships.
The combination of NestJS and GraphQL provides developers with a powerful toolkit for building efficient, scalable, and maintainable APIs. Whether you’re building a small application or a large-scale system, this combination can help you meet your development goals effectively and efficiently.
In subsequent articles, we will learn how to query GraphQL on different frontend development platforms. So stay tuned.

Top comments (0)