With the launch of .NET Core 3.0 and Visual Studio 16.3.0, support for creating web apps using the Blazor template is now natively enabled. This makes it easy for you to run your C# libraries directly in the browser.
Unfortunately, client-side Blazor support did not make this release. Much like server-side Blazor with SignalR, client-side Blazor, or Blazor WebAssembly, allows you to develop ASP.NET Core web apps in C#, without having to rely on JavaScript.
Enabling WebAssembly in Visual Studio
To begin developing client-side Blazor projects in Visual Studio, you will need to install the WebAssembly template from the command line. A new Blazor WebAssembly preview launched in conjunction with the .NET Core 3.0 release. To install the latest preview, execute the following command via the Package Manager Console in Visual Studio. The command can also be run from a cmd or PowerShell terminal window.
dotnet new -i Microsoft.AspNetCore.Blazor.Templates::3.0.0-preview9.19465.2
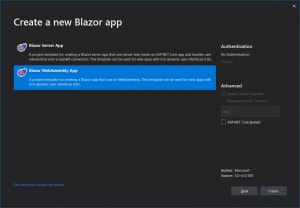
With the WebAssembly template installed, you can now create a client-side Blazor project. Start by creating a new Blazor App project.
After choosing a name for your project, you will have the option to select a server-side or WebAssembly (client-side) Blazor project. Select Blazor WebAssembly App to create your first client-side Blazor project.
Write to JavaScript Console.Log
Now that you have successfully templated a project for a client-side ASP.NET Core web app that uses Blazor and WebAssembly, let’s learn how to write to the browser’s JavaScript console using only C#.
In the Solution Explorer, right-click your project and select Add > New Item…. Add a new Razor Component item. Name the component WriteConsole.razor.
The Razor syntax is a combination of HTML and C# that can be used to create beautiful and functional web apps. Begin by providing a heading, some instructional information, and a button for your new Blazor app.
<h1>Write to Console</h1>

<p>Click the button to print to the JavaScript console using C#</p>

<button class="btn btn-primary">Click me</button>
In Razor, the @ symbol indicates that C# code will follow instead of HTML. A C# event handler, then, can be assigned to a button’s onclick event or a form’s onsubmit event by prepending @ to the attribute’s name, or example @onclick or @onsubmit. The following code will show you how to assign a C# method named WriteToConsole() to the onclick event of the button you just created.
<button class="btn btn-primary" @onclick="WriteToConsole">Click me</button>
With Razor, it is simple to define C# methods to use within your page by including them inside a @code block at the bottom of the Razor Component file.
<h1>Write to Console</h1>

<p>Click the button to print to the JavaScript console using C#</p>

<button class="btn btn-primary" @onclick="WriteToConsole">Click me</button>

@code {

    void WriteToConsole()
    {
        Console.WriteLine("Writing to javascript console using C#");
    }
}
When developing client-side web apps with JavaScript, it is helpful to be able to print to the browser’s developer tools console when debugging. With Blazor WebAssembly, you can now do this using the same C# classes you are used to because the Console.WriteLine() method will now write to the JavaScript console!
To test your WriteConsole.razor Razor Component, add it as an element to the project’s Index.razor component.
@page "/"

<WriteConsole />
The Bottom Line
In this tutorial, you learned how to enable client-side Blazor development using .NET Core and Visual Studio. Blazor WebAssembly enables you to write web applications without having to learn or use JavaScript. You learned about Blazor event handling, and you wrote your first Blazor WebAssembly program which demonstrated the ability to write to the browser’s console using Console.WriteLine() in the same way that console.log() works for JavaScript.


Top comments (0)