From machine learning idea to implemented solution with MLflow, AWS Sagemaker, and Booklet.ai
Introduction
Selling something can be hard work. A business might have many potential customers leads but most of those customers won’t turn into actual, paying customers in the end. A sales team has to sort through a long list of potential customers and figure out how to spend their time. That’s where lead scoring comes in. This is a system that analyzes attributes about each new lead in relation to the chances of that lead actually becoming a customer, and uses that analysis to score and rank all of the potential customers. With that new ranking, the sales team can then prioritize their time, and only spend time on the leads that are highly likely to become paying customers.
Cool, that sounds great! How do I do it?
Well, I’m glad you asked! In this post, we will walk through the full end-to-end implementation of a custom built lead-scoring model. This includes pulling the data, building the model, deploying that model, and finally pushing those results directly to where they matter most — the tools that a sales team uses.

If you want to test out this model without going through the full process, we have a fully-functioning lead scoring model on Booklet.ai . We’ve posted all code, in the form of a Jupyter Notebook on GitHub.
Prerequisites
This will be a technical tutorial that requires a bit of coding and data science understanding to get through. To get the most out of this, you should have at least a bit of exposure to:
- Python (we will stay within Jupyter notebooks the whole time)
- Machine Learning (we will use a Random Forest model)
- The command line (yes, it can be scary, but we just use a few simple commands)
- AWS (we can hold your hand through this one!)
Also, you should have a few things installed to make sure you can move quickly through the tutorial:
An AWS username with access through awscli (we will cover this below!)
Python 3 of some kind with a few packages:
- Pandas
pip install pandas - MLflow
pip install mlflow - SKlearn
pip install scikit-learn - Docker (pretty quick and easy to install here)
Before we get started…
We’re going to touch on a lot of tools and ideas in a short amount of time. Before we dive right in, it’s important to take a step back to understand what’s happening here. There are a few tools that we will be using:
- Jupyter Notebook: A go-to for data scientists. Allows you to run python scripts in the form of a notebook and get results in-line.
- MLflow: An open source model management system.
- Sagemaker: A full-stack machine learning platform from AWS.
- Booklet.ai: A model testing and integration system.
- Intercom: A customer messaging platform that is commonly used by customer service and sales teams to manage customer relationships.
Here is a diagram that outlines how these different tools are used:
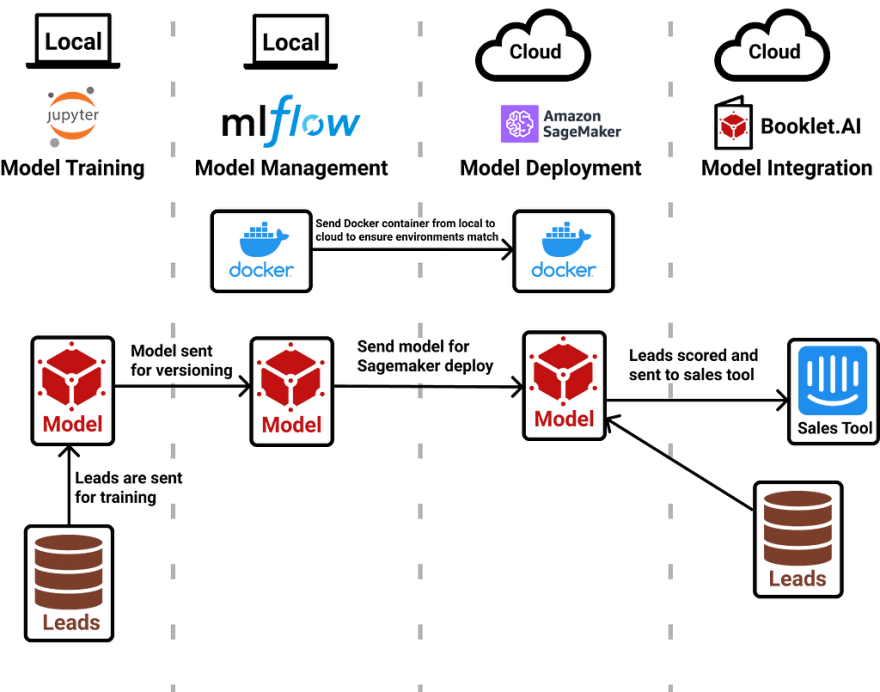
At the highest level, we will use a Jupyter notebook to pull leads data and train a model. Next, we will send that model to MLflow to keep track of the model version. Then, we will send both a docker container and the model into AWS Sagemaker to deploy the model. Finally, we will use Booklet to put that model to use and start piping lead scores into Intercom.
Now that we got that out of the way, let’s get started!
Training the Model
About the Data
First, we need to access data about our leads. This data should have two types of information:
(A) The response variable: Whether or not the lead converted into a paying customer
(B) The features: Details about each lead that will help us the response variable
For this exercise, we are going to use an example leads dataset from Kaggle. This dataset provides a large list of simulated leads for a company called X Education, which sells online courses. We have a variety of features for each lead as well as whether or not that lead converted into a paying customer. Thanks Ashish for providing this dataset and for the awesome analysis on Kaggle.
Importing and Cleaning the Data
To import this data, simply read the leads_cleaned dataset into Pandas. If you are reading this data from a database instead, replace this with pd.read_sql_query instead.
Next, we want to pick out a few columns that matter to us. To do that, we will create lists of columns that fit into different categories: numeric, categorical, and the response variable. This will make the processing and cleaning processing easier.
From here, we can create our train/test datasets that will be used for training:
Now that we have a test dataset, let’s go ahead and create a scaler for our numeric variables. It is important to only run this on the training dataset so that we don’t “leak” any information about the test set.
Now, we need to make some adjustments to the model to prepare for modeling. We’ve created a function to perform a few things:
- Select the columns that we’ve defined as important
- Use the fitted scaler to center and scale the numeric columns
- Turn categorical variables into one-hot encoded variables
- Ensure that all columns from the training dataset are also in the outputted, processed dataset (This is important so that all levels of dummy variables are created, even if the dataset we import doesn’t have each individual level.)
Here’s how it looks when we put it all together and run both the training and test dataset through our preprocessing function:

Training the model
This bring us to the exciting part! Let’s use our newly cleaned and split datasets to train a random forest model that predicts the chances of someone converting into a paying customer of X Education. First, let’s define a few standard hyperparameters and initialize the SKLearn model:
From here, we can quickly calculate a few accuracy metrics in our test set to see how the model did.
We have an accuracy of 82% and an AUC score of 80% in our held-out test set! Not too shabby. There is definitely room to improve, but for the sake of this tutorial, let’s move forward with this model.
MLflow: Managing the Model
What is MLflow?
Before we go setting this up, let’s have a quick chat about MLflow. Officially, MLflow is “An open source platform for the machine learning lifecycle.” Databricks developed this open source project to help machine learning builders more easily manage and deploy machine learning models. Let’s break that down:
Managing models: While building an ML model, you will likely go through multiple iterations and test a variety of model types. It’s important to keep track of metadata about those tests as well as the model objects themselves. What if you discover an awesome model on your 2nd of 100 tries and want to go back to use that? MLflow has you covered!
Deploying models: In order to make a model accessible, you need to deploy the model. This means hosting your model as an API endpoint, so that it is easy to reference and score against your model in a standard way. There is a super long list of tools that deploy models for you. MLflow isn’t actually one of those tools. Instead, MLflow allows easy deployment of your managed model to a variety of different tools. It could be on your local machine, Microsoft Azure, or AWS Sagemaker. We will use Sagemaker in this tutorial.
Setting up MLflow
The MLflow tracking server is a nice UI and API that wraps around the important features. We will need to set this up before we can use MLflow to start managing and deploying models.
Make sure you have the MLflow package installed (check out the Pre-reqs if not!). From there, run the following command in your terminal:
mlflow ui
After this, you should see the shiny new UI running at http://localhost:5000/
If you run into issues getting this setup, check out the MLflow tracking server docs here. Also, if you’d prefer not to setup the tracking server on your own machine, Databricks offers a free hosted version as well.
Once you have the tracking server running, let’s point Python to our tracking server and setup an experiment. An experiment is a collection of models inside of the MLflow tracking server.
Packaging our model with processing
If you are working with a model that has no preprocessing associated with your data, logging the model is fairly simple. In our case, we actually need to setup this preprocessing logic alongside the model itself. This will allow leads to be sent to our model as-is and and the model will handle the data prep. A quick visual to show this:

To do this, we will utilize MLflow’s pyfunc model-type (more info here) which allows us to wrap up both a model and the preprocessing logic into one nice Python class. We will need to send two different inputs to this class: objects (i.e. list of columns that are numeric or the random forest model itself) and logic (i.e. preprocessing function that we created). Both of these entities will be used inside the class.
Now, let’s setup the class. First, check out the code and then we will talk through the different pieces:
The class leadsModel by based on MLflow’s pyfunc class. This will allow us to push this model into MLflow and eventually Sagemaker.
Next we setup all of the objects that we need within the __init__. This contains both the objects and the logic function.
Finally, we setup the predict function:
- First, we take in the model_input (which is the dataframe that is sent to the deployed object after deployment) and ensure that all of the column names are lowercase.
- Next, we send this dataframe into the preprocessing function that we had created and used earlier for model training. This time, we keep the response columns blank since we won’t need them for deployment!
- Then, we reference the original training dataset’s column names and fill in any missing columns with 0’s. This is important since we will have levels of on-hot-encoded variables that aren’t calculated when we send datasets to the model after deployment.
- Finally, we send this nice, clean dataset to our Random Forest model for prediction.
Now that we have all of our logic and objects ready to go within one class, we can log this model into MLflow!
Logging the model to MLflow
Before we package everything up and log the model, we need to setup the Anaconda environment that will be used when the model runs on Sagemaker. For more information about Anaconda, here’s a detailed overview.
Now, we start a run within MLflow. Within that run, we log our hyperparameters, accuracy metrics, and finally the model itself!
If you head over to the MLflow UI that we checked out earlier, you’ll see the newly created model along with all of the metrics and parameters that we just defined. Woot woot!

Sagemaker: Deploying the Model
What is Sagemaker?
Sagemaker is a suite of tools that Amazon Web Services (AWS) created to support Machine Learning development and deployment. There’s a ton of tools available within Sagemaker (too many to list here) and we will be using their model deployment tool specifically. There are some great Sagemaker examples in their GitHub repo here.
Setting up Sagemaker
First things first, you need to get permissions worked out. AWS permissions are never simple, but we will try to keep this easy! You’ll need to setup two different settings: a user for yourself and a role for Sagemaker.
The first is a user account so that you can access AWS as you send the model to Sagemaker. To do this, you’ll need to head over to the Identity and Access Management (IAM) console and setup a user account with Administrator permissions. If your security team pushes back, “Sagemaker Full Access” should work too! At the end of the setup flow, you’ll be given an AWS Access Key ID and a AWS Secret Access Key. Make sure to save those! They are not accessible after that first time. Now, head to your terminal and type aws configure. This will prompt you to enter your AWS keys that you just collected. Once you have that setup, you’ll now have AWS access from both the terminal and from Python! Here are more details from AWS.
The second is a role (which is essentially a user account for services within AWS) for Sagemaker. To set this up, head to the roles section of IAM. You’ll want to assign this role to Sagemaker and then pick the policy called “SagemakerFullAccess.” At the end of this process, you’ll get something called an ARN for this role! We’ll need this for deployment so keep this handy. More details from AWS here.
Finally, we need to push an MLflow docker container into AWS. Assuming you have the permissions setup correctly above and docker installed (see prerequisites section for docker setup), you’ll want to run the following command in your terminal:
mlflow sagemaker build-and-push-container
This will push a docker container into AWS, which will be used during deployment.
Deploying to Sagemaker
Now that we have everything setup, it’s time to push our model to Sagemaker!
The deploy function usually takes a 5 to 10 minutes to complete and the status is checked every so often with this function until completion. Once the deployment is complete, you’ll be able to find a running model in the Sagemaker UI!

Booklet: Integrating the Model
Congrats, your model is now deployed! Our next goal is to make this model helpful to the sales team. To do that, we’ll want to use the deployed model to create lead scores for new sales leads and send those results to the tools that the sales team uses. We now need to create a system that regularly pulls in new sales leads, sends each lead’s info to our deployed model, and then send those model results to Intercom, the sales team’s tool.
There are a few custom-built ways to set this up:
- We can setup a custom Python script that regularly collects new Intercom user data in our data warehouse, sends that data to our deployed endpoint using the Sagemaker Python SDK, and then sends the results back to Intercom with their API.
- We can utilize Sagemaker’s Batch Transform functionality (great example here) to score batches of Intercom users. All data starts and ends in S3 for batch transform, so we’ll need to pull data into S3 for scoring, and then push data from S3 to Intercom to serve that up to sales teams
We knew there had to be a more efficient way to push the model results into the tools where they are most useful, so we built Booklet.ai to make these steps easier.
What is Booklet?
Booklet adds a web testing interface and data integrations to each of your Machine Learning endpoints, without requiring code changes. With Booklet, you can quickly try out model test-cases to ensure results are performing as expected, as well as send these results to the tools that matter most. For a lead scoring model, we can send results back to our data warehouse (Redshift in this case) or the sale’s team’s tool (Intercom).
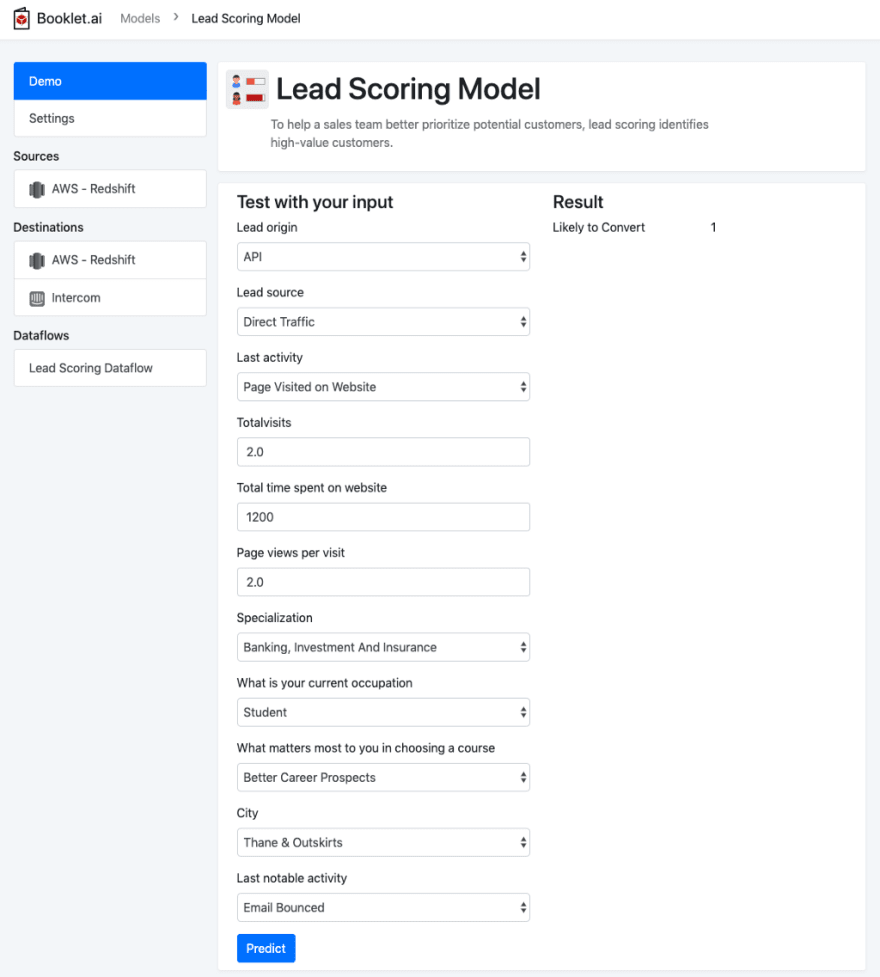
Testing the model
Using Booklet, we quickly setup a demo to test the lead scoring model. This is connected to the endpoint that we created in this tutorial so far. You can try out different inputs and see how the model classifies each theoretical lead. Learn more about how to turn your ML model into a web app here.
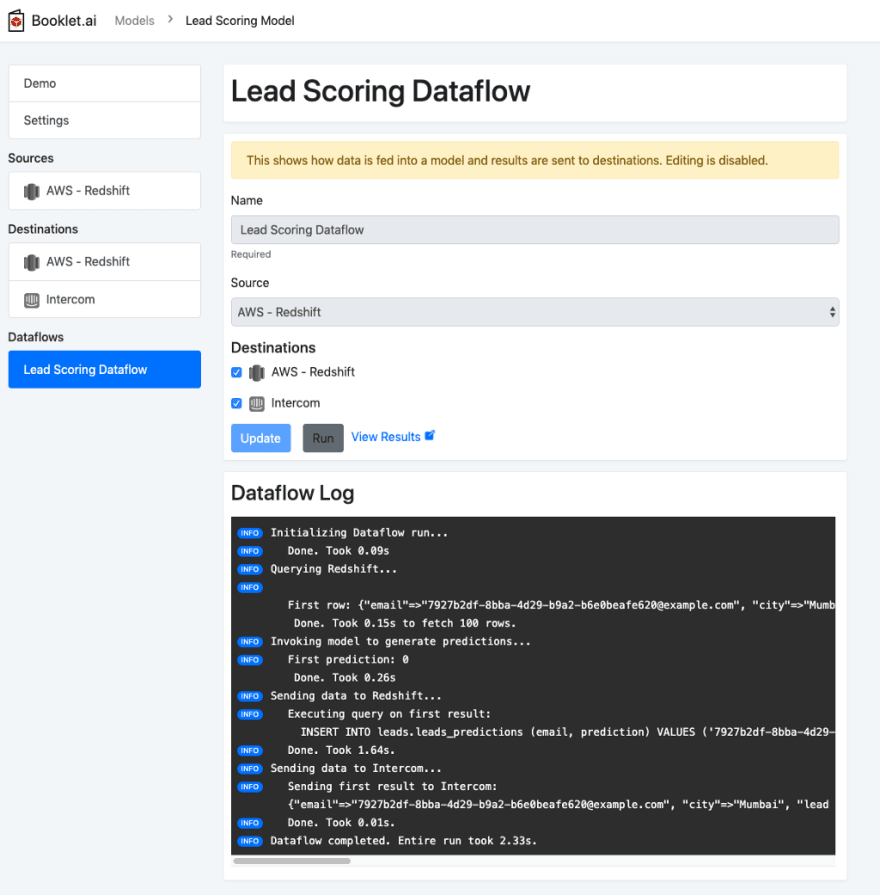
Connecting the model
Once you feel comfortable with the output of the model from testing, you can start sending those results to systems where that output is most useful. We’ve already set up our source in Redshift, which pulls data to feed into the model. We’ve also setup both a Redshift destination and an Intercom destination, where the results will be sent. To kick off an example dataflow, which pulls data from the source, scores that data with the model, and sends results to both destinations, you can try out a dataflow here.
Making your model impactful
Tada! We’ve now made our lead scoring model impactful by sending results directly into Intercom. To get a sense of how this might show up for a sales team member, here you can see each example lead now has a custom attribute listing whether or not they are likely to convert:
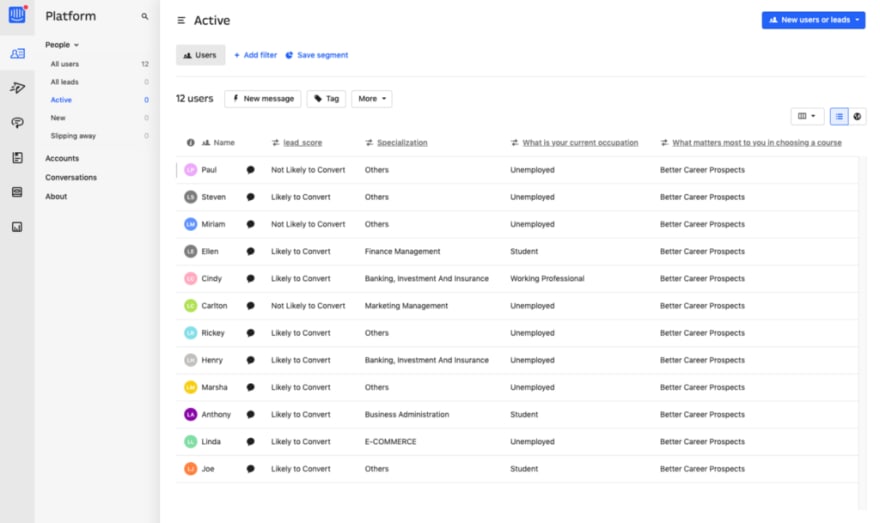
With these labels easily available for each potential lead, a sales team member can start to prioritize their time and pick who they will reach out to first. This will hopefully lead to better efficiency, and more sales for your business! There are many ways to measure the success of these outcomes, but we’ll visit that at another time!
Closing Thoughts
If you’ve made it this far, thank you! You’ve successfully navigated an entire end-to-end machine learning project. From idea inception to business impact, and all of the steps in between. If you have any thoughts, questions, or run into issues as you follow along, please drop in a comment below.
A big thank you to Ashish for the dataset, Bing for a helpful review, and Kyle for an awesome blog to reference on MLflow and Sagemaker.


Top comments (1)
Thx for your post - I would consider to add a
sklearn.pipelineas a "true end to end" solution