
Written by Diogo Spínola✏️
One way to visualize a progressive web app (PWA) is to compare it to web technologies that behave and feel like a mobile app. For example, most mobile apps have splash screens to notify the user that it’s loading, maintain some kind of functionality when offline, and work fast because most of the assets the user needs are already on the phone when they download an app.
In this tutorial, we’ll demonstrate how to build a PWA that has offline functionality and complies with all the Google Lighthouse checks.
Project setup
Before we start, let’s outline some requirements. Please note that these requirements are only for the purpose of this tutorial; you can mix, match, and swap any of them to suit your needs and goals.
For this project, you’ll need:
– Node.js to run the server
– Express to run the HTTP server
– Nodemon to debug the server
– Chrome to check the website and debug your PWA
– OpenSSL to generate a self-signed certificate (more on that later)

Folders
project-folder
  |_certs
  |_public
    |_images
    |_js
Files
project-folder
  |_certs
  |_public
    |_images
    |_js
      |_pwa.js
    |_index.html
  |_package.json
  |_server.js
package.json
Generate package.json with npm init and fill out the questions. Get the packages out of the way and proceed to npm install express nodemon. In package.json, add the script "server-debug": "nodemon --inspect server.js".
server.js
Create a basic HTTP server to generate your index.html once you connect to localhost in the browser.
const express = require('express')
const path = require('path')

const httpPort = 80

const app = express()

app.use(express.static(path.join(__dirname, 'public')))

app.get('/', function(req, res) {
  res.sendFile(path.join(__dirname, 'public/index.html'))
})

app.listen(httpPort, function () {
  console.log(`Listening on port ${httpPort}!`)
})
public/index.html
<html>
  <body>
    <span>This example is for the article of progressive web apps written for LogRocket</span>
    <br>
    <span>You are now</span> <span><b class="page-status">online</b></span>
    <script src="/js/pwa.js"></script>
  </body>
</html>
public/js/pwa.js
document.addEventListener('DOMContentLoaded', init, false);
function init() {
  console.log('empty for now')
}
In the browser, access http://localhost to see the page with just your initial message. Right-click→inspect to see your log on the console.
Building a PWA
Now that you have a basic page set up, how do you get Google to recognize it as a fully functional PWA?
Inspect again and select the audit tab, then Progressive Web App, and run the audit. You should end up with something like this:
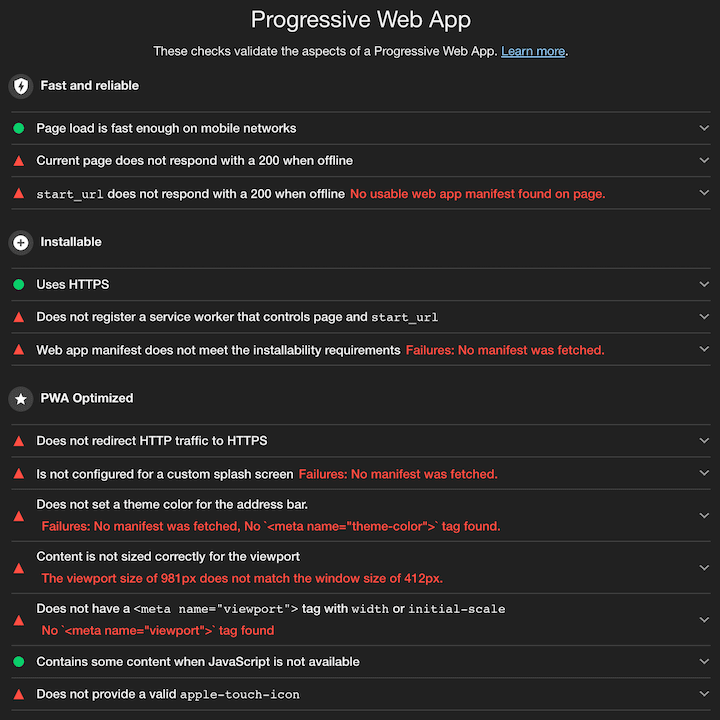
As you can see, most of the results are red. We’ll work on them until each one is green.
Some are already green because:
- It takes less than 10 seconds to load the page
- The page shows some text even when JavaScript is not available
- Since we’re using localhost, the page is checked even if there’s no HTTPS
Adding a manifest
Adding a manifest will address the installability criterion as well as the missing splash screen.
public/js/pwa.webmanifest
{
  "name": "Progressive Web App example",
  "short_name": "pwa-tutorial",
  "description": "Progressive Web App example to be used in conjuction with the article in LogRocket",
  "icons": [
    {
      "src": "/../images/splash-screen.png",
      "sizes": "512x512",
      "type": "image/png"
    }
  ],
  "start_url": "/",
  "display": "fullscreen",
  "theme_color": "#764ABC",
  "background_color": "#764ABC"
}
public/index.html
<html>
  <head>
    <link rel="manifest" href="/js/pwa.webmanifest">
  </head>
  <body>
    <span>This example is for the article of progressive web apps written for LogRocket</span>
    <br>
    <span>You are now</span> <span><b class="page-status">online</b></span>
    <script src="/js/pwa.js"></script>
  </body>
</html>
public/images/splash-screen.png
You’ll also want to add a 512×512 image in the images folder. Call it splash-screen.png.

Now the red checks associated with the manifest and splash screen should be green.
This splash screen comes into play when the user opens the PWA on their phone, presses “Add to home screen,” and opens the PWA using the app that is downloaded on their phone.
Optimizing your PWA
Let’s keep chipping away at the easy checks, such as the theme color, an icon to show when the app is being used on an iOS device, and a viewport to make sure the application is responsive.
public/index.html
<html>
  <head>
    <link rel="manifest" href="/js/pwa.webmanifest">
    <link rel="apple-touch-icon" href="/images/apple-touch.png">
    <meta name="viewport" content="width=device-width, initial-scale=1">
    <meta name="theme-color" content="#764ABC"/>
  </head>
  <body>
    <span>This example is for the article of progressive web apps written for LogRocket</span>
    <br>
    <span>You are now</span> <span><b class="page-status">online</b></span>
    <script src="/js/pwa.js"></script>
  </body>
</html>
public/images/apple-touch.png
Below is the icon that is shown on iOS devices. It should be 192×192.
![]()
After making these changes, run Lighthouse again. You should see more green marks.

There is still a red mark under PWA Optimized: all PWAs must be served with HTTPS. This requirement calls for using technology such as service workers to make sure the page is either localhost or HTTPS.
I usually get rid of that error by adding the SSL on the reverse proxy. That means I always have that criterion marked red locally, but for the purpose of this tutorial — just to get the satisfaction of seeing all green checks — we’ll generate a self-signed certificate and change the server to redirect to HTTPS.
To generate the self-signed certificates, go to the certs folder and run the following on the command line.
openssl req -x509 -out localhost.crt -keyout localhost.key \
  -newkey rsa:2048 -nodes -sha256 \
  -subj '/CN=localhost' -extensions EXT -config <( \
   printf "[dn]\nCN=localhost\n[req]\ndistinguished_name = dn\n[EXT]\nsubjectAltName=DNS:localhost\nkeyUsage=digitalSignature\nextendedKeyUsage=serverAuth")
This should create your missing files. Now you can update your server.
server.js
const express = require('express')
const path = require('path')
const fs = require('fs')
const https = require('https')

const httpPort = 80
const httpsPort = 443
const key = fs.readFileSync('./certs/localhost.key');
const cert = fs.readFileSync('./certs/localhost.crt');

const app = express()
const server = https.createServer({key: key, cert: cert }, app);

app.use((req, res, next) => {
  if (!req.secure) {
    return res.redirect('https://' + req.headers.host + req.url);
  }
  next();
})

app.use(express.static(path.join(__dirname, 'public')))

app.get('/', function(req, res) {
  res.sendFile(path.join(__dirname, 'public/index.html'))
})

app.listen(httpPort, function () {
  console.log(`Listening on port ${httpPort}!`)
})

server.listen(httpsPort, function () {
  console.log(`Listening on port ${httpsPort}!`)
})
What we’re doing is creating a server on port 80 (HTTP) and a server on port 443 (HTTPS). Whenever you try to access localhost with http://localhost, the HTTP is triggered and the middleware checks whether the connection (HTTPS) is secure. If it’s not, then it redirects as intended.
The next step is to make the application work even if the connection is lost. For that, we’ll use service workers.
Service workers
A service worker is a piece of JavaScript code that handles the cache for assets and data you choose to save for future requests.
A service worker has some rules you must follow to make it work:
- It only works with valid HTTPS or http://localhost
- It only grabs requests within its scope
- It only has access to the files on its folder or “below”
To expand on the scope, imagine the following structure.
/public
  |_drinks
    |_drinks-service-worker.js
    |_drinks.js
    |_coffee
      |_coffee.js
      |_coffee-service-worker.js
    |_tea
      |_tea.js
      |_tea-service-worker.js
For this example, both tea and coffee service workers will only trigger if a call is made for files in their respective folders, such as tea.js or coffee.js. On the other hand, the drinks service worker will be triggered regardless of what you call; its scope is everything in its folder and “below.”
Since it’s a worker, it doesn’t have access to the DOM — meaning that, inside a service worker file, you can’t access anything with, for example, document.querySelector.
To register your worker, first check whether the browser is compatible. If it is, add the registration and error functions.
public/js/pwa.js
document.addEventListener('DOMContentLoaded', init, false);
function init() {
  if ('serviceWorker' in navigator) {
    navigator.serviceWorker.register('/service-worker.js')
      .then((reg) => {
        console.log('Service worker registered -->', reg);
      }, (err) => {
        console.error('Service worker not registered -->', err);
      });
  }
}
public/service-worker.js
self.addEventListener('install', function(event) {
  console.log('used to register the service worker')
})

self.addEventListener('fetch', function(event) {
  console.log('used to intercept requests so we can check for the file or data in the cache')
})

self.addEventListener('activate', function(event) {
  console.log('this event triggers when the service worker activates')
})
You won’t need the other events for your service worker, but for good measure, they are message, sync, and push.
Since install is the first thing that is triggered when you try to register an SW, change your event to the following and specify the files you want to save in your cache.
const CACHE_NAME = 'sw-cache-example';
const toCache = [
  '/',
  '/index.html',
];

self.addEventListener('install', function(event) {
  event.waitUntil(
    caches.open(CACHE_NAME)
      .then(function(cache) {
        return cache.addAll(toCache)
      })
      .then(self.skipWaiting())
  )
})
Add skipWaiting for when you update the SW to avoid the need for the user to navigate away from the page.
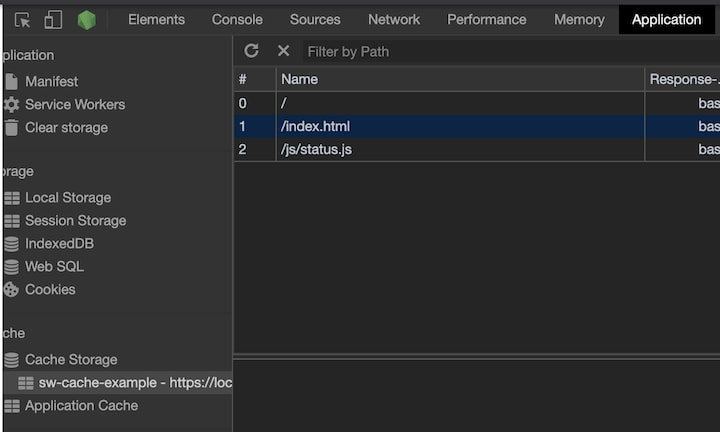
To see your service worker, inspect the page again. In Chrome DevTools, in the application tab, you can see the current status of your service worker, set the page to offline to test it out (spoiler alert: it won’t do anything yet). check the current cache, and clear everything if you want to restart.
You might recall that the service worker requires a valid HTTPS certificate. As a result, you may find yourself with the following error.
![]()
One way to avoid this is to run Chrome via the command line with a flag for https://localhost.
/Applications/Google\ Chrome.app/Contents/MacOS/Google\ Chrome --user-data-dir=/tmp/foo --ignore-certificate-errors --unsafely-treat-insecure-origin-as-secure=https://localhost
This should generate a more pleasant register.
![]()
Whenever we update our service worker, we want the old ones to be removed instead of leaving them hanging in the client’s browser. Go to your activate event and change it to the following.
self.addEventListener('activate', function(event) {
  event.waitUntil(
    caches.keys()
      .then((keyList) => {
        return Promise.all(keyList.map((key) => {
          if (key !== CACHE_NAME) {
            console.log('[ServiceWorker] Removing old cache', key)
            return caches.delete(key)
          }
        }))
      })
      .then(() => self.clients.claim())
  )
})
This ensures that the old service workers are removed and claims your newly installed SW as the one to use from now on.
That leaves us with the fetch. We haven’t used our cached files at all, so it’s time to update our fetch event.
self.addEventListener('fetch', function(event) {
  event.respondWith(
    fetch(event.request)
      .catch(() => {
        return caches.open(CACHE_NAME)
          .then((cache) => {
            return cache.match(event.request)
          })
      })
  )
})
This checks every request that is made on the page. If there is a match found in the cache — take localhost/, for example, since we have it cached — it will use the cached version.
In this case, the / is the index.html file, which will include other resources, such as /js/pwa.js. This is not in your cache, so a normal request will be made to the server to fetch the dependencies of that file.
We can store as much as we want in the cache, but bear in mind that each browser has a limit that widely varies. In my experience, the safe value is not more than 50MB, which, on the web, is quite a bit.
With all three events done, it’s time to create a file to change the page state from online to offline whenever the client loses connection and is using purely service workers.
public/js/status.js
document.addEventListener('DOMContentLoaded', init, false);

function init() {
  if (!navigator.onLine) {
    const statusElem = document.querySelector('.page-status')
    statusElem.innerHTML = 'offline'
  }
}
public/index.html
<html>
  <head>
    <link rel="manifest" href="/js/pwa.webmanifest">
    <link rel="apple-touch-icon" href="/images/apple-touch.png">
    <meta name="viewport" content="width=device-width, initial-scale=1">
    <meta name="theme-color" content="#764ABC"/>
  </head>
  <body>
    <span>This in an examples for here article of progressive web apps that can be found in LogRocket</span>
    <br>
    <span>You are now</span> <span><b class="page-status">online</b></span>
    <script src="/js/pwa.js"></script>
    <script src="/js/status.js"></script>
  </body>
</html>
public/service-worker.js
const CACHE_NAME = 'sw-cache-example';
const toCache = [
  '/',
  '/index.html',
  '/js/status.js',
];

self.addEventListener('install', function(event) {
  event.waitUntil(
    caches.open(CACHE_NAME)
      .then(function(cache) {
        return cache.addAll(toCache)
      })
      .then(self.skipWaiting())
  )
})

self.addEventListener('fetch', function(event) {
  event.respondWith(
    fetch(event.request)
      .catch(() => {
        return caches.open(CACHE_NAME)
          .then((cache) => {
            return cache.match(event.request)
          })
      })
  )
})

self.addEventListener('activate', function(event) {
  event.waitUntil(
    caches.keys()
      .then((keyList) => {
        return Promise.all(keyList.map((key) => {
          if (key !== CACHE_NAME) {
            console.log('[ServiceWorker] Removing old cache', key)
            return caches.delete(key)
          }
        }))
      })
      .then(() => self.clients.claim())
  )
})
The code above adds a status file to check whether the browser is online and, if not, changes to offline. We included the file in both the index.html and the cache of our SW so it can be used offline.
To try it all out, reload the page and, on the DevTools application tab, view your files in the cache.
If the connection is working, you should see this:

If you select the offline option, you should see the status change.
![]()
You should see some errors on the console since we didn’t add the manifest and other files that index.html requires — which won’t affect anything in offline mode, but if it’s bothersome, all you need to do is add them to the cache.
Finally, to make sure everything is green in Lighthouse, run it the app without the offline check. You should get a result similar to this:
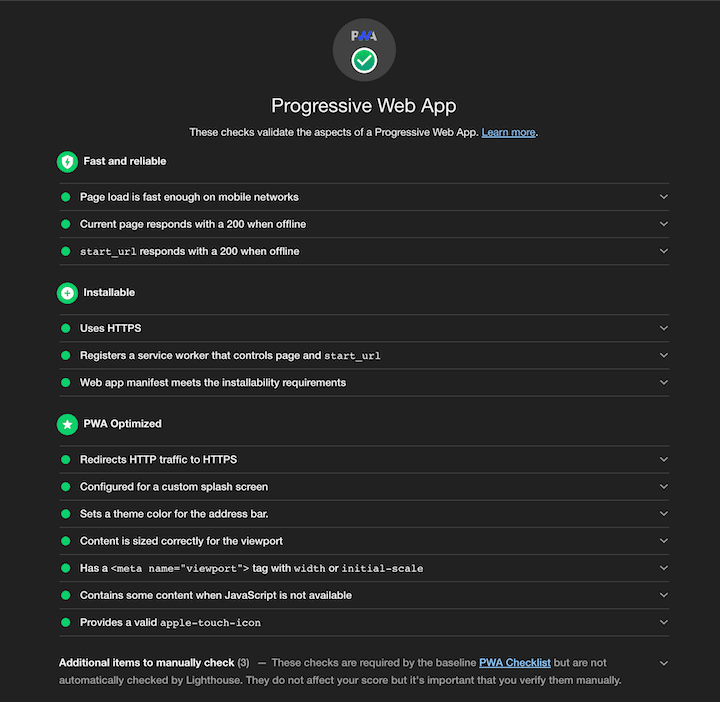
Congratulations — you’ve just built your first PWA with all criteria checked in Lighthouse!
Compatibility
Compatibility is all over the place with PWAs since we’re not talking about just one technology, but an ecosystem of elements such as service workers, web app manifest, notification, push, and add to home screen, each of which have completely different compatibilities across the board.
That said, service workers generally have very good support. On the other hand, web app manifest, which doesn’t work for Firefox or Safari at the moment of writing, is much less compatible.
Always check for polyfills and, in case there aren’t any, make sure you have a fallback for when the browser doesn’t have that technology implemented.
Pros and cons of PWAs
Companies such as Twitter and Alibaba have improved engagement by switching to PWAs, among many others who have made the switch.
Based on my experience and personal reading, below is a short list of advantages and disadvantages associated with PWAs.
On the pro side, PWAs:
- Are fast after the first visit to the website since a lot of assets are cached
- Are easy to implement gradually on an existing website
- Use less data, again, since many assets are cached
- Are independent technologies, meaning you’re not bound to a library that comes with 10 technologies when you only need one or two. For example, you can use service workers without using notifications
Some drawbacks:
- The first visit to a page will be slow since it must download the files and data to the cache
- Add to home screen functionality is seldom used, at least to my knowledge
- Support between browsers varies widely depending on what technology you’re using. For example, service workers have good support but web app manifest does not, so it can be tricky to identify what you can use safely out of the box and what requires a polyfill from the start
Conclusion
Is it worth it to implement PWA technology? I would say yes. A website, even when offline, should have accessible information. If you run a news website, for example, you might give your users the option to make their favorite news available offline or notify them when something of interest happens, like a promotion on on item in their shopping cart.
What do you think of PWAs? Do you prefer a more native approach? Have you built anything with it?
You can reference the code used in this tutorial on GitHub.
200's only ✅: Monitor failed and show GraphQL requests in production
While GraphQL has some features for debugging requests and responses, making sure GraphQL reliably serves resources to your production app is where things get tougher. If you’re interested in ensuring network requests to the backend or third party services are successful, try LogRocket.

LogRocket is like a DVR for web apps, recording literally everything that happens on your site. Instead of guessing why problems happen, you can aggregate and report on problematic GraphQL requests to quickly understand the root cause. In addition, you can track Apollo client state and inspect GraphQL queries' key-value pairs.
LogRocket instruments your app to record baseline performance timings such as page load time, time to first byte, slow network requests, and also logs Redux, NgRx, and Vuex actions/state. Start monitoring for free.
The post How to build a progressive web app (PWA) with Node.js appeared first on LogRocket Blog.

Top comments (1)
you can use easy platform like wappaa.com