
Whenever I hear people talking about Node.js, many questions arise about what it is exactly, what this technology is good for, and whether there is a future for it.
Let’s try to address the first part. The easiest way for me to answer such a question would be by listing out many definitions of what Node technically is:
- Node.js is a Javascript runtime environment built on Chrome’s V8 JavaScript engine.
- Node.js uses an event-driven, non-blocking I/O model that makes it lightweight and efficient.
- Node package ecosystem (npm) is the largest ecosystem of open source libraries in the entire world.
But still, all these answers aren’t satisfying for me; there’s something missing. After reading the bullet points above, you might think of Node.js as just another JavaScript technology, yet the most important part of understanding it is by analyzing how it can be asynchronous and have a non-blocking I/O system altogether.
That is really what mutated it into a must-have for every web developer out there.
Understanding exactly how Node works behind the scenes will not only generate a greater knowledge of this technology, but it will also create traction for the people out there who haven’t used it to actually dive in and start learning it.
And for all the people out there who are already professionals in this field, understanding the in and outs of it will turn you into a new, up-to-date developer fully equipped to enhance its performance based on your needs.
So, in order to excavate into the world of Node, we will examine its core part: the event loop , which, in fact, is the part responsible for its non-blocking I/O model.

A brief refresh on threads
Before diving deep into the event loop, I would like to spend some time on threads. If you are wondering why this is necessary, I will tell you that in order to better understand a concept, we must first start to form a vocabulary in our minds that will help us to recognize each part of a system. This will eventually be of great advantage when later reading about the event loop, how it works, and how the concept of a thread applies to it.
Whenever we run a program, we create an instance of it, and, associated with that instance, we have something internal called threads. A thread can be seen as a unit of operations that our CPU has to perform for us. Many different threads can be associated with a single process of a program. Here is a graphic to help you form this idea in your mind:
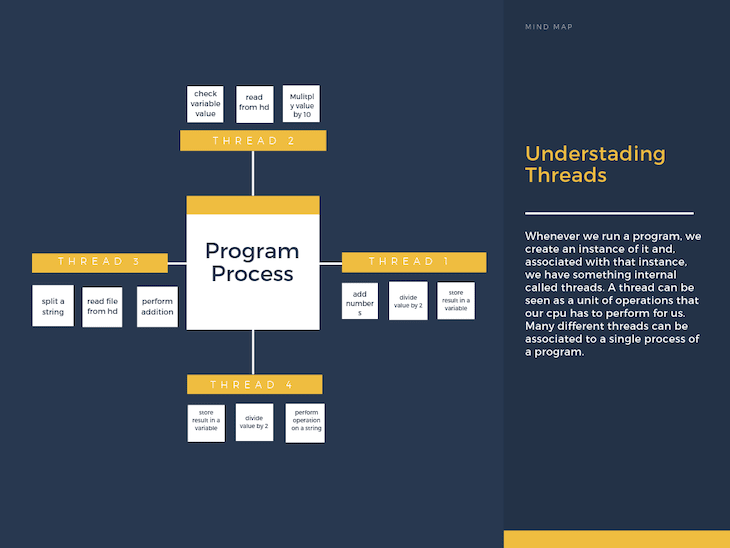
The most important piece to understand when talking about threads is: How can our machine determine which thread to process at any given moment in time?
As we know, our machines have a limited amount of resources (CPU, RAM), so it’s very important to correctly determine where we are going to allocate them or, better, which operations take precedence over others. And this all has to happen while still ensuring that no one operation takes too much time — nobody likes a slow laptop.
The mechanism used to solve the allocation problem is called scheduling, and it’s managed by our operating system by an entity called the OS scheduler. The logic behind this can be very complex, but to make a long story short, we can group two of the biggest ways in which this operation is performed:
- Multi-core machines: assigning different threads to different cores.
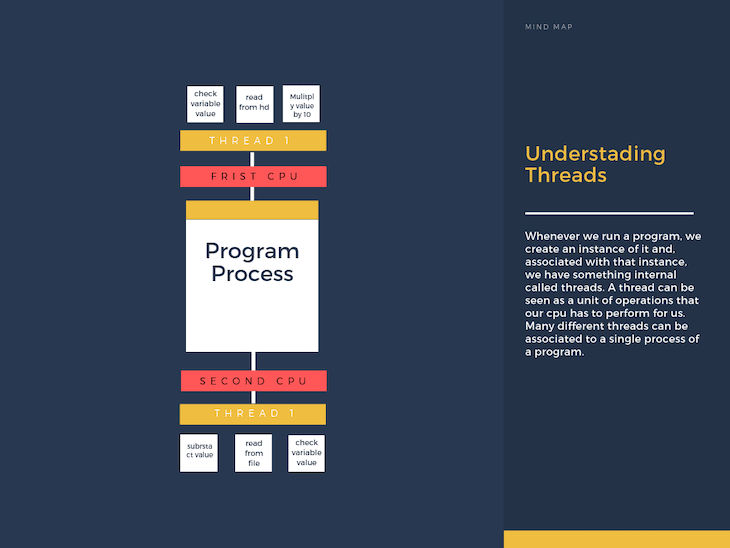
- Using an optimization logic that reduces dead times: this is the most relevant approach for us. If we get a closer look at how threads work, we will see that our OS scheduler can recognize when our CPU is waiting for some other resource to perform a job, so it can be allocated to perform other operations in the meantime. This usually happens for very expensive I/O operations such as reading from the hard drive.
The event loop
Now that we have got a healthy refresh on how threads work, we can finally tackle the Node.js event loop logic. By reading this, you will understand the reason behind the previous explanation, and every piece will go at the right spot by itself.
Whenever we run a Node program, a thread is automatically created. This thread is the only place where our entire codebase is going to be executed. Inside of it, something called the event loop is generated. The role of this loop is to schedule which operations our only thread should be performing at any given point in time.
Please note: the event loop doesn’t get generated instantly as soon as we run our program. In fact, it only runs once the whole program has been executed.
In detail
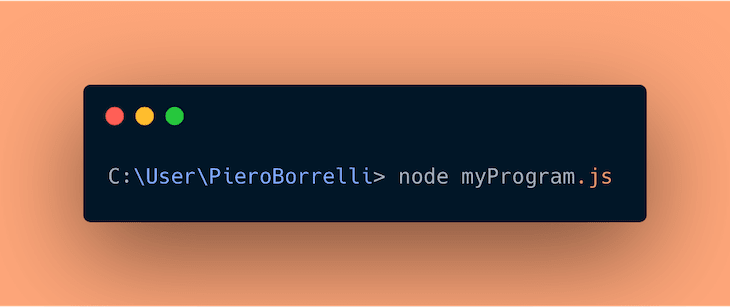
Let’s now try to simulate how the event loop works and what it does to make our program work. To do this, I’m going to pretend that I’m feeding Node with a file called myProgram and then get into the details of what the event loop will do with it.
In particular, I’m going to first write a brief little graphical explanation of what is happening during any event loop tick, and then I’m going to explore these phases in a deeper way.

Step 1: performChecks
I shouldn’t need to tell you the event loop is, in fact, a loop. This means it has a specific condition that will determine if the loop needs to iterate again or not. Every iteration of the event loop is called a tick.
What are the conditions for the event loop to perform a tick?
Whenever we execute our program, we will have a series of operations that need to be performed. These operations can be split into three main types:
- Pending timer operations (
setTimeout(),setInterval(),setImmediate()) - Pending operating system tasks
- Pending execution of long running operations
We will go into more details on these later; for now, let’s just remember that whenever one of these operations is pending, the event loop will perform a new tick.
Step 2: Performing a tick
For every loop iteration, we can distinguish the following phases:
Phase 1: Node looks at its inner collection of pending timers and checks which callback functions passed to
setTimeout()andsetInterval()are ready to be called in case of an expired timer.Phase 2: Node looks at its inner collection of pending OS tasks and checks which callback functions are ready to be called. An example of this could be the completed retrieval of a file from our machine’s hard drive.
Phase 3: Node pauses its execution waiting for new events to occur. With new events, we include: a new timer completion, a new OS task completion, a new pending operation completion.
Phase 4: Node checks if any function related to pending timers related to the
setImmediate()function are ready to be called.Phase 5: Manage close events, used to clean the state of our application.
Common questions and myths about the event loop
Is Node.js completely single-threaded?
This is a very common misconception about this technology. Node runs on a single thread, but some of the functions included in the Node.js standard library do not (the fs module functions, for example ); their logic runs outside of the Node.js single thread. This is done in order to preserve our programs’ speed and performance.
Where are these other threads outsourced?
When using Node.js, a special library module called libuv is used to perform async operations. This library is also used, together with the back logic of Node, to manage a special thread pool called the libuv thread pool.
This thread pool is composed of four threads used to delegate operations that are too heavy for the event loop. The above-mentioned long-running tasks in the event loop logic represent those operations described here as too expensive for the event loop.
So the event loop is kind of a stack-like structure?
In that sense, while some stack-like structures are involved in the above-mentioned process, a more precise answer would be that the event loop is composed of a series of phases, each with its own specific tasks, all processed in a circular repetitive way. For more info about the event loop’s exact structure, check out this talk.
Conclusion
Understanding the event loop is a vital part of using Node.js, whether you are trying to get more insights about this technology, learn how to improve its performance, or find a new, interesting reason to learn a new tool.
This guide should have helped you in exploring this subject. Feel free to leave a comment down below, opinions and feedbacks are extremely useful to help everybody to learn better.
For more content like this, follow my Twitter and my blog.
Plug: LogRocket, a DVR for web apps

LogRocket is a frontend logging tool that lets you replay problems as if they happened in your own browser. Instead of guessing why errors happen, or asking users for screenshots and log dumps, LogRocket lets you replay the session to quickly understand what went wrong. It works perfectly with any app, regardless of framework, and has plugins to log additional context from Redux, Vuex, and @ngrx/store.
In addition to logging Redux actions and state, LogRocket records console logs, JavaScript errors, stacktraces, network requests/responses with headers + bodies, browser metadata, and custom logs. It also instruments the DOM to record the HTML and CSS on the page, recreating pixel-perfect videos of even the most complex single-page apps.
Try it for free.
The post A complete guide to the Node.js event loop appeared first on LogRocket Blog.


Top comments (0)