A Beginner’s Guide To Setting Up a FailProof WordPress Backup
Below we will show you how to run an On-Demand WordPress Backup using cPanel hosting control panel, in this guide we’ll use both the cPanel built-in backup feature and the File Manager manual backup using the archive option alongside the phpMyAdmin Database export option. We will also show you how to automate your WordPress backups using WP Backup Bank free and premium features.
One of the most neglected tasks of site owners is making sure they always have a recent backup available and easy to access. Backing up your WordPress site should be the first thing to do after setting up your WordPress Vanilla installation. If you think that this is a set and forget task then you should think twice because you must initially check the backup is running without any issues and the generated files are actually ready to be used for restoring your WordPress site. If you’re using an automated service for your backing your WordPress site then you need also to check often that they are running and working as expected.
Do I Really Need to Backup my WordPress Site Files and Database?
If there was one advice we would give to all of my clients is to make sure they have set up a running daily backup for their WordPress sites. If they did then they wouldn’t have to worry for losing their site content or important configurations due to hacking, hosting going down or even downtime from maintenance tasks which went wrong. When we start cleaning a WordPress hacked website the first and the last thing we do is to create a backup of the WordPress site files and database, this way we make sure their site content is fully protected and maintained.
How Often Should I Run a WordPress Backup?
Daily backups of both your WordPress site files and database are recommended. You can either keep backups for a whole week or a whole month, it all depends on where you want to store them and how big your site is in terms of space. Additionally, you should always create a WordPress backup before an upgrade or maintenance task.
Where Should I Store my WordPress Backups
You can store them locally under a directory not available to public access but you should also consider a remote service such a Dropbox or Google Drive. The latter option is preferable because if your site goes offline or your hosting provider bans you from accessing your hosting account then you will be able to restore your WordPress site using the remote backup. This also satisfies another important principle; avoiding a Single Point of Failure(SPOF) in your WordPress site infrastructure.
Should I Run a Manual Backup or an Automatic One for my WordPress Site?
We strongly recommend to set up a system where backups run automatically using either WordPress plugins or other 3rd party services like ManageWP. On-demand backups are also useful before a major upgrade or maintenance task.
Manual Backup in cPanel
Any given WordPress site consists of two parts: the files and the database.
The files contain images, plugins, themes, any other media or uploaded scripts, WordPress core, configuration files, etc.
The database contains users and their credentials, posts, pages, settings, etc. (For example, WooCommerce orders are stored in the database).
When creating a WordPress backup you will need to backup both the files and the database properly. However, you will not need to backup all of your site files. You only need to archive and download the ‘wp-content’ directory and export the database. Here are step-by-step instructions on how to do it.
Accessing the files

Log in to your cPanel dashboard and click on the ‘File Manager’. You will see a list of different directories. Enter the ‘public_html’ directory. You should see the following directories: wp-admin, wp-content, wp-includes and a number of WordPress core files (like wp-config.php).
The WordPress core consists of directories and files starting with the ‘wp-‘ prefix. You will not need to create a backup of these files. Almost none of the customizations or information is stored in the core files and they are never altered in any way (or at least, they shouldn’t be altered).
Backup your WordPress Core Configuration Files
There’s a number of config files that you will see in your WordPress installation, the following are the most important which must be stored in a backup:
.htaccess – This is the Apache server configuration file. It can control redirections, cache headers, and permalinks. If you have customizations in this file, it is not a bad idea to create a copy and save it.
wp-config.php – The main WordPress configuration file. It controls the connection between the WordPress files and database, among other things.
The .ini files – These are configuration files that can control PHP settings on the server: memory limit, the maximum file size for upload, etc. It can be named ‘.user.ini’ or ‘php.ini’ (also php5.ini and php56.ini for older PHP versions). Again, if you have important customizations in this file, make a copy.
Creating a .zip archive of the ‘wp-content’ WordPress Directory
Next, locate the ‘wp-content’ directory, right-click on it and select ‘Compress’. You will see a number of options including the type of compression that will be used. I suggest using .zip although you can use other types of compression if you are comfortable with them.
It is wise to exclude some directories from the backup. For example, you will not need to include ‘cache’ or any backup plugin directories (like ‘updraft’). I recommend going inside the ‘wp-content’ directory and creating a partial backup. You can select ‘plugins’,’themes’ and ‘uploads’ directories and zip them.
In some special cases, you might want to exclude something from the ‘uploads’ directory. This directory is used to store images and plugin data, but some backup plugins store the backups inside this directory as well.
Download the Compressed Backup File
Right-click on the archive you just created and download it to your local machine. You can keep the backup on your HDD or upload it to DropBox or similar cloud service.
Exporting the database

Go back to the homepage of the cPanel dashboard. You will see the ‘phpMyAdmin’ icon under ‘Databases’ section. Click on the icon and a new tab will open with phpMyAdmin dashboard.
There might be more than one database on the server. To be sure which one is correct, check the wp-config.php. There will be a line that looks like this:
define('DB_NAME','xxxxxxxxxxxxxxxxxx');
The x’s are of course the database name you should look for.
Click on the desired database and then, on the right side, click on the ‘Export’ tab.

Generally, there’s no need to make any changes to the default settings. Just click ‘Go’ and wait for the database to download.

That’s it. You’ve successfully created a backup of your files and database.
Automated WordPress Backups
The BackupBank plugin is one of the easiest to use WordPress plugins which will help you automate the backup procedure of your WordPress website. Below we’ve created a small guide on how to set up and use this backup plugin in just a few minutes.
BackupWP Plugin Setup and Usage Instructions

BackupBank comes in free and Pro format. We will review the features available in the free version and discuss some advantages of the Pro version afterwards.
The first thing you need to do is install the plugin. Go to ‘Plugins -> Add New’ and search for the ‘BackupBank’ plugin. After you install the plugin, activate it and visit your the plugin dashboard. The first thing you will see is the Opt-In for Email Notifications and Updates. If you agree with this, some data about the usage of the plugin will be sent to the author. If this brings up a touch of paranoia, feel free to click ‘Skip & Continue’.
Configuring the WordPress Backup Plugin Options
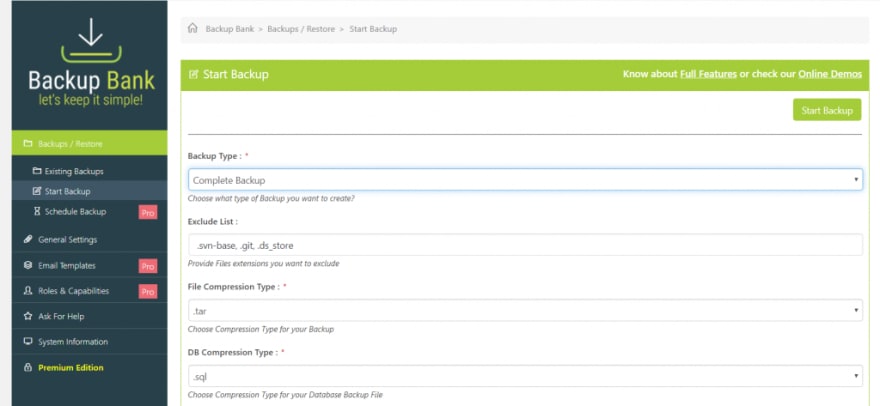
When you click on the ‘Start backup’ in the plugin dashboard, you will see a few options to choose from. For majority of purposes, going with the default settings is the best option. The settings that you can change are:
- *Backup type * – You can choose between Complete Backup or partial backup (plugins, themes, themes + plugins, etc.)
- *Exclude list – * You can exclude files that you know you won’t need in a backup (like .zip files)
- *File Compression type – * zip, tar, etc. Choose whatever you prefer
- *DB Compression type – * It is probably the best to go with the .sql but again, it’s a matter of preference
Furthermore, you can exclude certain tables from the database backup. Only do this if you are certain that the absence of data in a database table will not bring the site down. An example of unnecessary data is 404 redirections table coming from certain plugins. If uncertain, don’t exclude any of the tables.

Last but not the least is choosing the *destination * of the backup. As you can see from the screenshot above, the available destinations in the free version are:
- Local folder – meaning, the folder on the server where your site is hosted
- Email – Not recommended, as most email providers limit the size of the data to 25MB and your site will most likely be bigger than that
- FTP – You can use this to store the backups on a different server using FTP credentials
- Dropbox – This will require getting the API keys from Dropbox (not covered in this article)
- Google Drive – This will require getting the Cliend ID and Client Secret from Google (covered in this article)
Storing backups on Google Drive
To follow the instructions in this section, you will need a Google account. If you have a Gmail address, you’re good to go.
Access the Google API library
In the previous screenshot, you’ll notice that there’s a link labelled ‘Configure!’ next to the ‘Google Drive’ radio button. Click on it and you will be taken to the configuration page that looks like this:
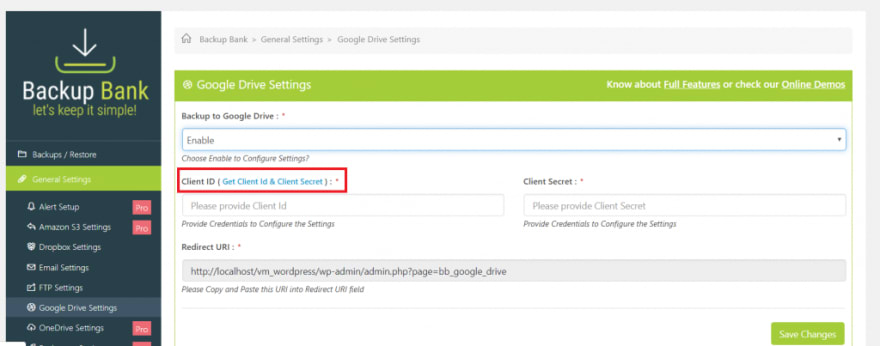
Click on ‘Get Client Id & Client Secret. This will take you to the Google Developers Console. Do not be intimidated by the ever-confusing Google as we are going to tackle it in the next steps. Just follow through and you’ll be set in a few minutes.
Find & enable the Google Drive API

The API will be located in the library. Just type ‘Google Drive API’ in the search bar (see screenshot above) and then click ‘Enable’. If you’ve already activated it, you will see the blue ‘Manage’ button. It’s not necessary to click on it right now. Proceed to the next step.
Create a project

We already created a project. You should click on the new project and enter its name. That will be enough for now. Proceed to the next step.
Creating credentials and API keys

First thing you need to do is create OAuth Client ID. Click on ‘Credentials’ in the left sidebar and then click on OAuth Client ID from the drop-down.

On the next screen, select ‘Other’ under ‘Application type’ and name it anything you want. After you click create, you will see the Client ID and Client Secret that you need to copy and paste into the corresponding fields in the BackupBank plugin.

After that click on ‘Save changes’ on the plugin page and you will be taken to the verification page.

Choose the Google account where you created the credentials.

To keep this simple, we haven’t completed all of the steps needed to verify the connection, therefore, this will result in a warning. Click on ‘Advanced’ and then click ‘Go to BackupBank’.

After this, you will be prompted to allow access. Click ‘Allow’ and you’ll be able to store your backups directly to Google Drive.
The Pro features
There are features available in the Pro version that can make it even easier to run your backups timely and properly. These features are:
- Different cloud storage services – OneDrive, Microsoft Azure, Amazon S3 and Rackspace are available only in Pro version
- Scheduling the backups – This is probably the most important Pro feature. That way, you can schedule your backups and not have to initiate them manually every time
- Alerts and notifications – The Pro version will notify you when the backup or restore has been generated, completed or has failed which is also an important feature
- Roles & Capabilities – This allows you to control what level of access a user needs to have to access and control backups
If you can go without these features, then the Free version will do just fine. If this sounds like too much of a hassle for you, you might want to consider subscribing to our WordPress Maintenance Services which amongst other features, such as Malware Scanning and Cleaning, we offer to our clients we also keep daily backups of their WordPress sites.
The post How to Create an On-demand and Automatic WordPress Backup appeared first on WordPress Support Services by BitofWP.


Top comments (0)