The Basics
Important Concepts
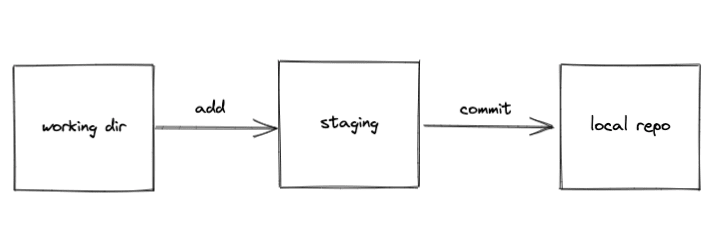
Git provides 3 different buckets locally for tracking and saving your changes. People may speak differently but I will keep using these words - working directory, staging, and local repo
Let's give you an example to see how these 3 buckets work in tandem. You're working by yourself and you need to make changes to your codebase. Git tracks your changes in working directory. After you finish modifying, you can promote your changes to staging before persisting your changes. You can think of stage as a review step since you can add/drop your changes. Now you can persist your changes to local repo by committing changes. After persisted, Git provides useful information such as time of commit, message, or author information.
There are more concepts and commands we can explore but this is the essence of Git. Simple, right?
Now let's take an each step for better understanding.
Installation
If it is your first time to use Git, first install the Git with
brew install git
Confirm it is installed with
git --version
Start projects
Typically, there would be 2 different scenarios.
First, you start a new repo from your local machine
Second, you start working on an existing repo
Initiate the Git repo
Simply rungit init, then you will see this prompt message. And .git directory will be created.Copy the existing repo
Make sure you have SSH or HTTP setup correctly and rungit clone <repo-url>
Stage/unstage your changes
Once you make changes, you can run git add . to stage all changes. Here . means the current directory.
If you want to stage a specific file, you can run git add path/to/file
Commit your changes
Now, it's time to persist your changes to your local repo.
Try running git commit -m "your commit message". -m is the option for your commit description. If this succeeds, try to run git log, you should be able to see your most recent commit
Push
Once you have your changes saved in local repository and we have one more step to persist this snapshot to remote repository!
Let's run
git push
If you have not set the remote url yet, you will probably see this error message.
No problem! We can simply set the remote repo by running
git remote add origin <url>
Then you can push to your remote branch! Congrats! You're the Git master now!
Congratulation!
We've learned the basics of Git so far. From starting a project to pushing your changes to a remote branch that others can look it up your changes. Unfortunately, when we work on a project with our peers, we're destined to face more complicated problems such as merge conflicts However, don't worry. I will cover all topics you need down the road!
For more useful content, follow me @bitethecode or on Github!

Oldest comments (2)
Hi there! If you accept a sugestion, maybe add "git config" with email and name information.
Sure! Thanks for the feedback. Actually I’m making series and I will put your thought there!