
The goal for this lesson is to build a drum kit app that runs in the browser. The main concepts presented in the video are key events and CSS animations.
The Code
Writing the HTML and CSS on my own was straightforward. Structurally, the biggest difference between the project’s code and mine was that I used an unordered list for the keys and I didn’t even think to use data attributes. My CSS was similar to the project CSS, although I used different class names.
All was well until I tried writing the JavaScript. I spent over an hour trying to figure out how to get anything to work. Finally, I swallowed my pride and followed along with the video lesson (note to self -- don’t waste more than 30 minutes trying to figure it out on my own).
To focus on the JavaScript in the lesson, I replaced my HTML and CSS with the project’s code. That way, I wouldn’t spend a lot of time rewriting most of the code with the data-keys and CSS classes used in the lesson's JavaScript.
The JavaScript
The main concept of this lesson is key events. I have built a lot of websites, forms, and UIs, but never worked with key events. This was new territory for me and the drum kit was a fun way to learn about them.
Key events begin with using the <kbd> HTML tag. I had never even heard of that tag before I started this lesson! Within each tag, the data-key attribute is created and its value is set to the key code value for each key. For example, the letter ‘A’ on the keyboard has a key code of ‘65’, the ‘S’ on the keyboard has a key code of ‘83’, and so on. To make the pressed key play its assigned sound, it’s bound to the <audio> tag with the data-key value, like so:
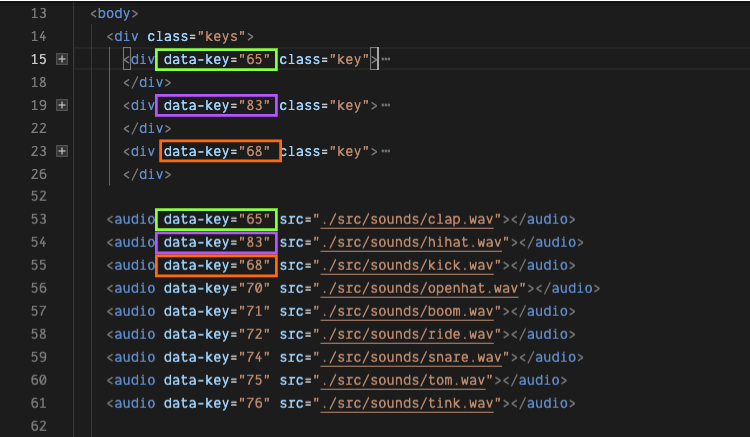
Each audio tag then has its source audio file added and voila -- the HTML for this project is complete.
So, what about the JavaScript? We’re getting to that now. It will make a lot more sense now that we have a clear context for what the JavaScript needs to do, which is:
- Listen for a
keydown eventto play a drum sound - Animate the keys on the screen when they are played
The ‘keydown’ event
To play the correct sound when a key is pressed, we need an event listener that will listen for a keydown event from the keyboard. Here is the code for that event listener and the function it triggers:

Rather than creating an event listener for every single key in this project, it’s more efficient to create an event listener that listens for any keydown event from the keyboard. The event listener triggers the playSound() function which plays a drum sound when a key is pressed.
Before going any further, I need to back up and explain what those const variables are. The const audio variable defines the HTML elements that play the drum sounds in this app. The const key variable defines the HTML elements by their key codes so that the correct sound plays when a specific key is pressed. The twist in this variable is the use of the template literal (see the bright green box in the screenshot below) to include the key codes as variables. Using the template literal in this context makes it simple to pull in the key code of any key pressed on the keyboard.

To make sure that sounds play only when the correct keys are pressed, an if condition is included. In plain English, it says, “if the triggered <audio> tag doesn’t have the data-key keyCode attribute, exit the function.” This isn’t all that intuitive, because what we’re actually doing is making sure that, if a key is pressed, it’s bound to an <audio> tag with the data-key attribute. For example, if you press down on the ‘H’ key, you’ll hear the ride cymbal sound. If you press the ‘Y’ key, nothing will happen, because the ‘Y’ key isn’t defined in the HTML.
We could just run the audio.play() method, but this creates a bit of a problem. The sound plays once, but won’t play again if the key is pressed fast or held down. To allow the key to play the sound repeatedly, we need to ‘rewind’ (reset) the sound. We do that by setting audio.currentTime to 0. Now, when we press the same key really fast or hold it down, the sound plays over and over again, like it should.
With the audio part of this project covered, let’s dig into the animation.
Animation
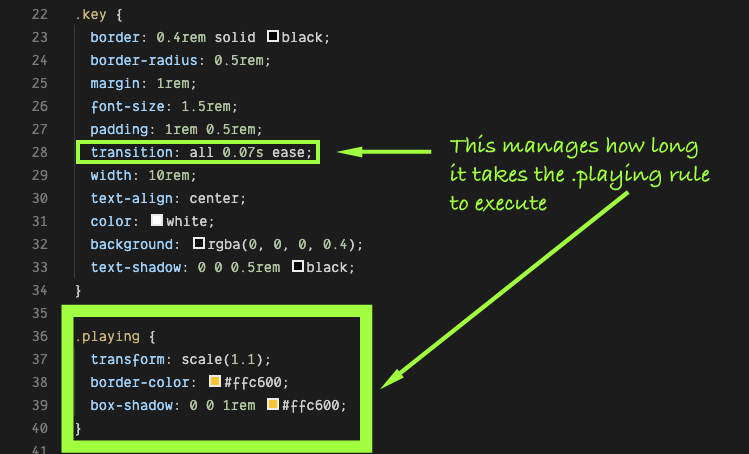
The nifty little animation that executes every time a drum key is played happens through a combination of CSS and JavaScript. First, the relevant CSS rules:
...and the JavaScript:

There are a few things going on here. First, we need to identify which HTML elements to target with const keys. To accomplish that, we use the forEach() loop to add the event listener to every key on the keyboard.
Before adding the event listener, when a key was played, the animation triggered, but was stuck on, like below:

This is definitely an undesired effect. What we want is for the effect to automatically disappear after the sound has played. To do that, we need to use a new method, ‘transitionend’, for the event listener.
When a drum key is pressed, the event listener listens for the CSS transition property to end.
With the event listener implemented, each drum key displays the transition and returns to its original state automatically.
What I Learned from This Project
I learned how to code key events and bind them to other HTML tags to do something, like play a sound. While animations are nothing new to me, I learned about the addEventListener transitionend method, and plan to use this in other projects.
Gaining the new knowledge and putting it to work right away is great, and I am doing that. Aside from the technical aspects of this project, I learned a lot about how I tend to approach new projects and where I need improvement.
Test The Code, Stupid!
One new trick I learned is to run console.log() to test every single new function and method (unless it’s part of JavaScript). I generally have written the code first, then went back to debug. This is a huge waste of time and effort! I’ll be adopting this new ‘test as I code’ approach to every project I work on.
You Don’t Know What You Don’t Know
I wasted time trying to do this project without first watching the course. My takeaway from this is to spend time carefully researching something before I dive in. Part of me feels like this is cheating, but it really isn’t. It’s about looking at similar projects from other developers and seeing their code before I jump into a project blind. This saves a lot of time and frustration.
I value your feedback. Please share your thoughts in the comment section. Thanks!

Top comments (3)
I watched this video couple of years ago, and I'm still thinking it has been one of the best videos in the JavaScript 30 by Wes Bos. 🎉 Congratulations Brian! :D
Thanks, Edwin!
Is there a way to make it usable for mobiles and touchscreens?