
Learn how to use Adobe Document Generation and Adobe Sign with Microsoft Power Virtual Agents.
Very recently, I was taking a flight and had to change my flight to the following day. Instead of jumping onto a phone call, I was able to work with a chatbot reschedule. The bot was able to look up my information and saved me a lot of time, and saved me the hassle of listening to muzak waiting on hold.
These days, chatbots are all over the place. They are on websites, built into apps, and or even built into intranets and communication tools like Microsoft Teams. According to IBM, chatbots can reduce customer service costs by 30% because it saves on expensive call center calls, gets answers more quickly for users who prefer to text rather than talk, and gives you much more reliable data to improve customer experiences.
I don’t know how many times my customer interaction has basically been verbally giving my information so someone else could key it into a computer to fill out a form or input data into a CRM or generate all of the paperwork needed for me. It would be really great if a customer could answer questions in a chatbot. It can automatically fill out any of the necessary paperwork and even present the signature for me.
In this article, we’ll learn how you can:
- How to create a basic chatbot using Microsoft Power Virtual Agents.
- Populate and generate documents using Adobe Document Generation in Microsoft Power Automate.
- Present a document for signature using Adobe Sign from the chatbot.
For this article, we aren’t going to focus on the tagging of the document and use this document for our example. However, other articles are beneficial for learning how to create invoices, tag documents for Adobe Document Generation, etc.
If you haven’t already, sign-up for a free trial of Adobe PDF Services to be able to generate documents and use PDF actions inside of Microsoft Power Automate.
What you are going to need
To get started on this, you are going to need the following:
- Subscription to Microsoft Power Virtual Agents (there are free trials for Microsoft 365 customers)
- Adobe PDF Services to dynamically generate documents and populate forms from Word documents (get a free trial here)
- Adobe Sign to present documents for signature (Get a developer license Adobe Sign).
This article also does assume some working knowledge of tools like Microsoft Power Automate, Adobe Sign, and Adobe Document Generation. Throughout the article, we will also provide some helpful links if you are new to many of these areas.
Scenario
For this scenario, we will create a basic chatbot that helps fill out a service order for some home services such as cleaning services, carpet cleaning, etc. We will use Microsoft Power Virtual Agents for the chatbot, generate our document using Adobe Document Generation, Microsoft Power Automate for creating our logic, and Adobe Sign to capture the signature on the service order.
There is a lot of logic to incorporate and different threads to the conversation we could configure. You could have the data from the chatbot create leads in Microsoft Dynamics or SalesForce, and you could trigger follow-up emails, etc. We will keep it simple to limit to showing you how Adobe PDF Services and Adobe Sign can work with a virtual agent.
You can certainly do the same using Microsoft Bot Framework, Logic Apps, or even using Adobe Sign and PDF Services using our APIs for more advanced users.
Create sales order template
For this scenario, we are creating a Word template for our sales order. We are using the following JSON example:
{
    "customer": {
        "@context": "https://schema.org",
        "@type": "Person",
        "address": {
            "@type": "PostalAddress",
            "addressLocality": "Seattle",
            "addressRegion": "WA",
            "postalCode": "98052",
            "streetAddress": "20341 Whitworth Institute 405 N. Whitworth"
        },
        "email": "mailto:jane-doe@xyz.edu",
        "jobTitle": "Professor",
        "name": "Jane Doe",
        "telephone": "(425) 123-4567",
        "url": "http://www.janedoe.com"
    },
    "tax": {
        "state":"WA",
        "rate": 0.08
    },
    "referencesOrder": [
        {
            "description": "Carpet Cleaning Service - 3BR 2BA",
            "totalPaymentDue": {
                "price": 359.54
            },
            "orderedItem": {
                "@type": "Service",
                "description": "Carpet Cleaning Service"
            }
        },
        {
            "description": "Home Cleaning Service - 3BR 2BA",
            "totalPaymentDue": {
                "price": 299.99
            },
            "orderedItem": {
                "@type": "Service",
                "description": "House Cleaning Service"
            }
        }
    ]
}
Understand the JSON data
This JSON schema above is based on the invoice schema from Schema.org. Let’s understand the data structure a little better.
In the schema, you will see the referencesOrder array, which lists each item listed in the invoice.
The customer object is used to populate the customer information.
Create your template
Use this template for this example. Save it into SharePoint or OneDrive to be easily referenced in Microsoft Power Automate when we create our documents.

To explain a little more how this template works, see the diagram above:
(1) The customer information is populated into using the tokens that look like {{customer.name}} and other tags and follow the structure of the JSON data.
(2) Will iterate through each of the items in the referencesOrder array and place the appropriate field in. You can learn more about how to do this from this video here.
(3) There are sum calculations that calculate the sum of each of the referencesOrder items and uses the $formatNumber() function to format them into currency. If you want to learn more about using the $formatNumber and other functions, see this article here.
Now that we have this file stored in Microsoft SharePoint or OneDrive (we will show SharePoint), we can get started creating a virtual agent.
Create your virtual agent to collect information
Creating a virtual agent using Microsoft Power Virtual Agents is super-easy and doesn’t require a single line of code.
Create your virtual agent
- Log into Microsoft Power Virtual Agent.
- In the sidebar, click on Topics.
- Click on New topic.
- Set your Name (ex. Request Services).
- Enter a Trigger Phrase. (ex. I want to order cleaning services).

It is a good idea to add multiple, multiple trigger phrases to learn and understand the types of phrases to begin the conversation. It is good to have 5–10 examples. Some examples include:
- I want cleaning services
- I want someone to clean my house
- I need a carpet cleaner etc.
Once you are done, click on Go to authoring canvas. This might take a moment for Power Virtual Agent to create a new topic.
Here is the overall topic that we are going to create:

As you can see, it is essentially doing the following:
- Prompt to get information about the customer (name, address, email, phone)
- Prompt to determine whether they want cleaning and/or carpet cleaning services
- Trigger Microsoft Power Automate to generate documents and send them for signature using Adobe Sign
Let’s break down a few of the ways that you can do this.
To create a question prompt:
- In the Authoring canvas, click the + sign to add a new action.
- Click Ask a question.
- Enter in your question.
- Under Identify, select the type of response you are looking for. This allows it to format and ask questions appropriately. For example, Boolean will ask the person Yes or No.
- Under Save Response As, you will see a variable. Click on the pencil edit button to edit the variable.
- Give the variable a name. Ex. Name.
That’s all you need to do to create questions. You can add all of the questions we asked in the screenshot above. You can also create conditions which you can learn more about here.

Once we have all of our questions and information asked, we are ready to create a Microsoft Power Automate flow for you to generate the order and then present it for signature.
Create flow to generate documents
One of the key powers of Microsoft Power Virtual Agents is that it ties into the rest of Microsoft Power Platform like Microsoft Power Automate so that you can connect to over 300+ connectors. Some of the key connectors for this are Adobe PDF Services and Adobe Sign.
If you haven’t used Adobe PDF Services in Microsoft Power Automate, check out this article that helps you learn how to get started.
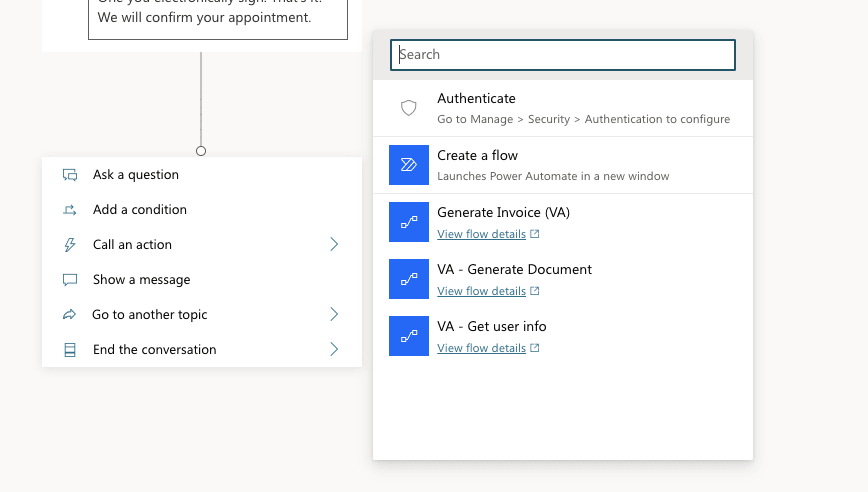
To create a new flow related to this Virtual Agent, click on + and select Call an action and select Create a flow.

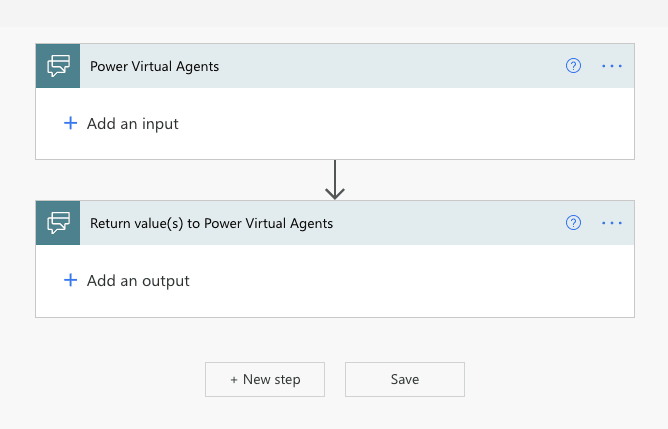
This will bring you to the Microsoft Power Automate authoring screen and will already have a trigger to get your inputs and final action to return a response to Power Virtual Agents.
Now for the rest of the logic. What we are creating here is a flow which:
- Confirms that the person wants to purchase course cleaning services
- Confirms whether or not the person wants carpet cleaning services
- Get the document template to generate from Microsoft SharePoint
- Generate the document using Adobe PDF Services
- Upload the file to Adobe Sign
- Send an agreement with Adobe Sign
- Wait till the Signing URL for Adobe Sign is available
- Return the Signing URL to Virtual Bot to prompt a person to sign.
For Power Automate power users, here is a copy you can download for reference. Here is also a screenshot of the final result:

Set the inputs (Step 1)
First, you need to set your inputs. You can click on + Add an input and add an input for every one of your questions as input in Power Virtual Agents. This will allow us to pass this information to use in our flow.
For our return values, we are going to want to return a text output called SigningURL. This will be used to pass the signing URL from Adobe Sign back to the bot. More on that.
Your input and output should look something like this:

Conditional inclusion of products (Steps 2–6)
Depending on whether the customer elected to have Home Cleaning Services or Carpet Cleaning Services, we want those to be included as line items in our resulting document.
The first thing in this flow is that we create a variable called products. This is an array so that we can collect the different products we want to include.
Next, we only want certain products to be included if the customer elected them, so we add a condition that checks the input value cleaningServices if the customer selected it.
If true, we have an append to array variable action, which allows us to add JSON data to the array. If you remember from the sample data, a referencesOrder object has objects for each item to list. We have the variables fixed for this example, but you could look up this information from a database, CRM, etc. We will then repeat this action for the carpet cleaning services in Steps 5 and 6.
Initialize variable for document data (Step 7)
You do not have to do it this way, but it helps debug to have the data in a variable before passing it to actions like Adobe PDF Services. That way, if there are issues with your data, you can see it clearly rather than waiting for the API to tell you why the data is wrong (which isn’t always reliable).
Here is where we have pasted the sample JSON code and placed in the values for address, email, name, and the products variable we created earlier.
Generate document from a template (Steps 7–8)
Now that we have all of our information and data structure, we are ready to send the data to Adobe PDF Services.
First, we need to get the Word template from SharePoint to get using the Get file content action.
Second, we need to generate the document, which we can do using the Generate document from Word template action in Adobe PDF Services.
For your Template File Name, set it to the name of the file or whatever you want as long as the file extension is .docx.
For Merge Data, we want to pass the variable we created earlier. Unfortunately, because it is an object variable, Power Automate makes it a little tricky, so we have to write an expression.
- Click in the Merge Data field.
- In the Dynamic content menu, click Expression and type in variables(‘documentData’) or whatever the name of your variable is.
- Click OK.
This will now place the variable out into that field.

Send a document for signature with Adobe Sign (Steps 9–10)
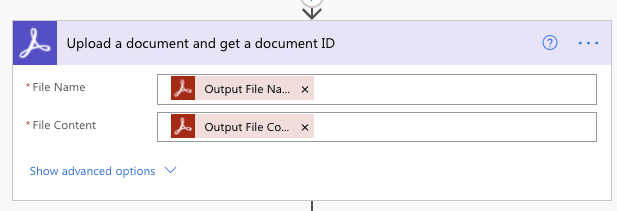
Now that we have a document generated, we need to send it for signature using Adobe Sign. The first thing we need to do is take the generated document and upload it to Adobe Sign for it to be referenced. We can do this using the Upload a document and get a document ID action.
You will then need to set the filename, which can be anything as long as it corresponds to the output format of the generate document step (.pdf or .docx).
For File content, you can use the Dynamic content menu to add the PDF file content variable.
Once you have the file uploaded, you need to send the document for signature. You can do this by using the Create an agreement from an uploaded document and send for signature action and provide the following inputs:
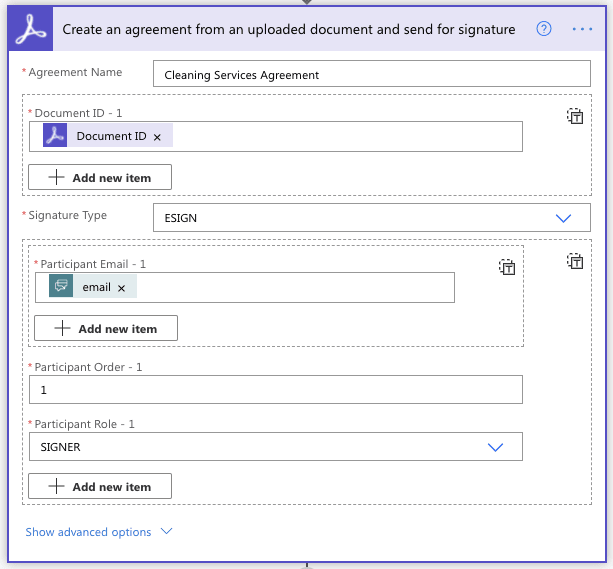
- Agreement Name: The name of the agreement as it will show in Adobe Sign.
- Document ID: The Document ID variable is output from Upload a document and gets a document ID.
- Participant Email: Use the email variable from the input.
This will give a lot of information about the agreement, but the primary thing that we are interested in is the Agreement ID variable.
Get Signing URL from Adobe Sign (Steps 12–16)
Now we are going to learn how to present the signing URL back in Power Virtual Agent. The action to get the signing URL from Adobe Sign isn’t available instantly after you send the agreement, so you have to poll it until it is ready. To get the signing URL, you have a few steps you need to do:
- Create a variable to track the statusCode from the request
- Create a loop that has a 2-second delay, requests the signing URL, and sets the URL statusCode variable to the result from the request. If the statusCode is equal to 200, the loop can end. If not, then it continues to loop until it is ready.
DISCLAIMER: While you can functionally do this, there are some caveats. When dealing with legally compliant electronic signatures, you need to have a unique identifier for the signer. In this case, it is the email address. If we deliver the signing URL back in the chat without authenticating the user, this could question the electronic signature.
For this reason, we recommend that you only provide back the signing URL if you have a means of authenticating the user like a login prompt or using the Authentication method built into Power Virtual Agents.
Alternatively, Adobe Sign will email the email address specified with a link for the person to view and sign. You can alternatively provide the option that the virtual agent asks the customer to check their email to view and sign.
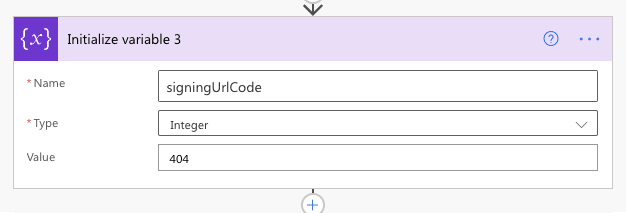
The signingUrlCode variable is used to track the statusCode of the action that gets the signing URL. We will use this to loop until we have a 200 statusCode.

We then create a Do Until loop, which will check the signingUrlCode and see if it equals 200. If not, then it will keep repeating until it has one.
The Delay action is a 2-second delay. Typically, it takes about 3–5 seconds for Adobe Sign to return a signing URL, so a delay throttles the unnecessary API calls.
The Signing URL uses the Retrieve Signing URL action from Adobe Sign. Its only input is Agreement ID from the Create an agreement from an uploaded document and send for signature action.
As the last step, as part of the loop, you need to set the signingUrlCode variable to update it with the status code. It might not show up in your Dynamic content panel to set the value, so you can get it by using expression. An example of that expression would be:
outputs(‘Retrieve_the_Signing_URL’)?[‘statusCode’]
Return Signing URL
As a final action in our flow, we need to return the Signing URL to Power Virtual Agent. To do this, first, add to the Return value(s) to Power Virtual Agents step an output called signingURL.
As the value, we need to write an expression:
outputs(‘Retrieve_the_Signing_URL’)?[‘body’]?[‘signingUrlSetInfos’]?[0]?[‘signingUrls’]?[0]?[‘esignUrl’]
What this expression basically means is that it is getting the first signer’s esignUrl from the body of the Retrieve the Signing URL action.
Now you have finished your flow. Save it and go back to Power Virtual Agent.
Create a prompt for the customer in Power Virtual Agent
Our next step is to create the action which triggers our flow, get the result, and prompt it to the customer. Click on + and select Call an action, and select your flow listed.
Use the dropdown to select which variable in Power Virtual Agents you want to pass to which value in Power Automate.

After that, if successful, you should have the signingUrl variable you can now use. Next, click on + and select Show a message. Put in a message something like “Please sign the following document to complete your order” or something like that.

Save your Virtual Agent.
Final Thoughts
Chatbots become a really cool and natural way to make customer and employee interactions much simpler. With low-code solutions like Microsoft Power Virtual Agent, you don’t have to be a developer to create useful chatbot that reduces people’s needs to jump on a phone. By being able to integrate with Adobe PDF Services and Adobe Sign, it allows you to even automate a lot of the paperwork that may be required as part of a customer interaction and make it entirely digital.
If you want to get started, go get started with Adobe PDF Services. It is also available as pay-as-you-go through AWS Marketplace which you can use with Microsoft Power Automate or your own apps. Also, join the conversation in the Adobe forums if you have questions and need answers.

Top comments (0)