
Circuit breakers were originally designed to protect electrical circuits from damage. Software development has adopted the concept as a type of resiliency pattern and it can now be found commonly in the cloud-native and microservices stacks. They can also be valuable in any codebase that needs to offer more flexibility, especially when relying on third-party APIs.
Welcome to Part 1 of this two-part series on building a circuit breaker in Node.js. In this post, we'll focus on building a starter circuit breaker in Node.js. In Part 2 we will build upon this version by adding features like user configuration and request fallbacks.
Our circuit breaker will also be 1-to-1 with the request that instantiates it. This means we aren't building a cache of endpoints and queries to check against. Each instance of the breaker will work for a specific async function.
For some background on circuit breakers, check out our previous post on The Circuit Breaker Pattern. It is important to remember that a circuit breaker is not the same as a retry. Circuit breakers can include retry functionality, but that is a feature rather than a requirement.
Planning
There are a few different ways we can implement the pattern:
- Option 1 focuses on HTTP requests specifically, and ties the implementation to a request library. This allows you to handle different error responses directly in the breaker, but means every request that uses the breaker has to match the format of that library.
- Option 2 focuses on general async functions. The breaker relies on a pass/fail assumption. This makes it more flexible, but is a little more general.
For simplicity and to avoid the details of a dependency, we'll use option 2.
Understanding how the circuit breaks
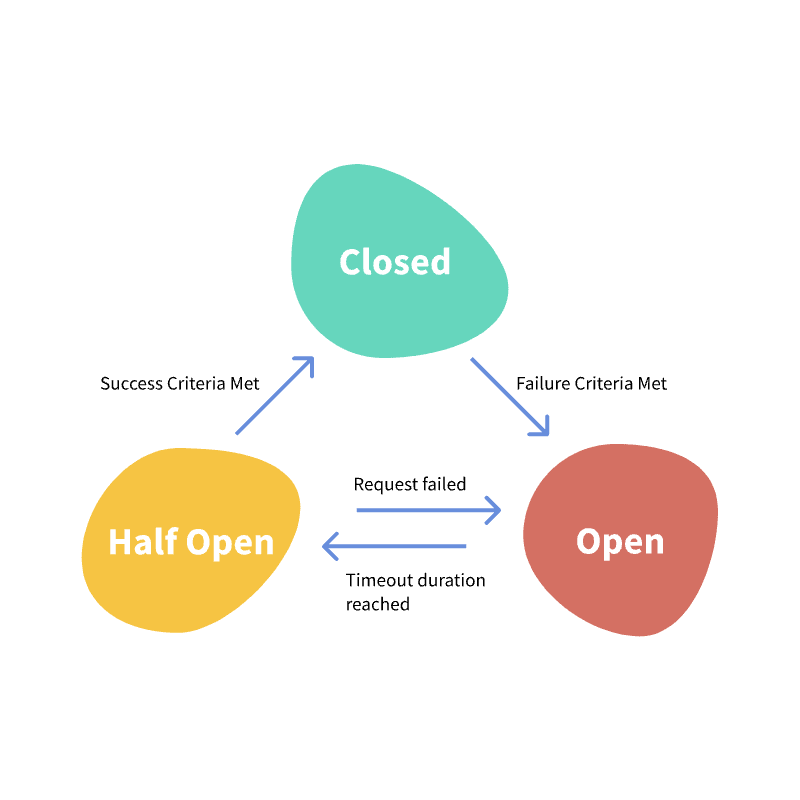
Next let's look at the conditions and thresholds we want to work with. To refresh, a circuit breaker has three states:
- Closed: Everything is working normally. Requests pass through.
- Open: Requests immediately fail for a set amount of time.
- Half-open: A set number of requests are let through to test the stability of the call.
The thresholds we determine will allow our code to make decisions about which state the circuit breaker is in. For this version, we'll keep things simpler and use a fixed failure rate. Traditionally you would use failures over a fixed timeframe, but to keep it simple we'll use failures in a row. Here are our starting properties and their default values for each instance of the circuit breaker:
-
request: The request that will be linked to the breaker. -
state: "CLOSED": The current state of the circuit. -
failureCount: 0: The number of failures made. -
failureThreshold: 3: The number of failures before the breaker is triggered. -
successCount: 0: The number of successful calls made in a row. -
successThreshold: 2: The number of consecutive, successful calls the HALF state needs to make before the circuit is CLOSED again. -
timeout: 6000: The amount of time the OPEN state will wait before switching to HALF. (Not to be confused with a request timeout) -
nextAttempt: Date.now(): The timestamp created using thetimeoutand the time of the most recent failure that determines when the next attempt will be allowed.
Using these values and our known states, we can start to build our logic for transitioning from state to state. In pseudo-code this looks like:
- CLOSED to OPEN: If
failureCount > failureThreshold. - OPEN to HALF: If the
current time > nextAttempt. - HALF to OPEN: If any failure occurs
- HALF to CLOSED: If
successCount >= successThreshold
This covers all our potential states and ways to move between them. Now let's dive into some code.
Set up your project
In your chosen directory, create a new node project if you don't have one already:
npm init -y
Next create two files in this directory. A test.js where we can experiment with using the breaker, and CircuitBreaker.js where we will keep the module itself.
In CircuitBreaker.js, we'll create a Class, define our properties and methods, and export it:
class CircuitBreaker {
  constructor(request) {
    this.request = request
    this.state = "CLOSED"
    this.failureThreshold = 3
    this.failureCount = 0
    this.successThreshold = 2
    this.successCount = 0
    this.timeout = 6000
    this.nextAttempt = Date.now()
  }

  fire() {
    // Logic to fire the request
  }

  success(response) {
    // Logic to handle successful requests
  }

  fail(err) {
    // Logic to handle failed requests
  }
}

module.exports = CircuitBreaker
In the code above, the values for each threshold have been hard coded. To make this more configurable, we could instead pass options to the constructor to allow for configuration when the class is instantiated (e.g., constructor(request, options)). For now, we'll keep it as is.
Build the logic
Next let's build the success and failure methods. These handle moving from state-to-state by adjusting the properties of our class.
First, the success method:
//...
success(response) {
 if (this.state === "HALF") {
   this.successCount++
   if (this.successCount > this.successThreshold) {
     this.successCount = 0
     this.state = "CLOSED"
   }
 }

 this.failureCount = 0
 return response
}
//...
The success method will always return a response.
If the request was successful from the HALF state, we increase the successCount by 1. If the new successCount is greater than the threshold we've set for consecutive successful requests, we reset the breaker to its CLOSED state. We also want any successful call to reset the failureCount, so we set it to 0 outside of the HALF condition. Finally, we return the response.
If the state is CLOSED and the request succeeds, nothing special needs to happen beyond resetting the failureCount.
This method doesn't check for OPEN because the OPEN state can never send a request.
Next, the fail method:
//...

fail(err) {
  this.failureCount++
  if (this.failureCount >= this.failureThreshold) {
    this.state = "OPEN"
    this.nextAttempt = Date.now() + this.timeout
  }
  return err
}
//...
Here, we are increasing our failureCount by 1 for each failure, similar to how we did with the successCount. Then, we are performing a check to decide if our state should change from CLOSED to OPEN. If we've hit more than failureThreshold failures in a row (as tracked by failureCount), then the state is changed and we set nextAttempt to the time + timeout. This sets up our OPEN state and prevents any request from being made until the timeout period has passed. We then return the error back to the client.
With our success and failure actions built, we need to handle the logic that will call them. Let's start with just the OPEN and HALF logic.
//...

async fire() {
  if (this.state === "OPEN") {
    if (this.nextAttempt <= Date.now()) {
      this.state = "HALF"
    } else {
      throw new Error("Circuit is currently OPEN")
    }
  }
}

//...
We have yet to make a request, but make sure this method is async, as we will use await inside it shortly.
The fire method does the following. First, it checks if the state is OPEN because the open state requires no action to be made. It swallows the request and never sends it, but throws an Error with a message to the user.
If the current time has surpassed the timeout represented by nextAttempt, the state switches into HALF-OPEN. Next, add the request logic.
//...

async fire() {
  if (this.state === "OPEN") {
    if (this.nextAttempt <= Date.now()) {
      this.state = "HALF"
    } else {
      throw new Error("Circuit is currently OPEN")
    }
  }
  try {
    const response = await this.request()
    return this.success(response)
  } catch (err) {
    return this.fail(err)
  }
}

//...
If the state isn't OPEN, the try/catch will run. This means CLOSED is handled. On a successful request, we trigger our success method. It takes over the responsibility of handling the half-open logic and returning the response to the client.
We are relying on async/await in the try block. If an error occurs in request(), an error will be thrown into the catch block. In the same way that a success in the try block calls this.success, the catch block delegates responsibility over to this.fail where the error is eventually sent to the client.
That's the core of our circuit breaker! You can see the full code here. Now let's test it.
Testing the implementation
Before we start making calls, let's add some logging into the CircuitBreaker class.
Create a new method called status, and call it from the success and fail methods right before the return statement:
//...

status(action) {
  console.table({
    Action: action,
    Timestamp: Date.now()
    Successes: this.successCount,
    Failures: this.failurecount,
    State: this.state
  })
}

success(response) {
  //...
  this.status("Success")
  return response
}

fail(err) {
  //...
  this.status("Failure")
  return err
}

//...
This table will give us some insight into what's happening in the breaker. This is also a great place to incorporate any internal logging you have in place.
Now, open the test.js file from earlier. In it we're going to:
- Import the CircuitBreaker module.
- Create an unstable request simulation.
- Instantiate the breaker with that request.
- Repeatedly make a request on a loop to test the circuit.
First, import the module and create the fake async request.
const CircuitBreaker = require('./CircuitBreaker.js')

// Our unstable request simulation
const unstableRequest() {
  return new Promise((resolve, reject) => {
      if (Math.random() > .6) {
        resolve({data: "Success"})
      } else {
        reject({data: "Failed"})
      }
  })
}
What's going on here? unstableRequest is returning a promise that randomly resolves or rejects. If you aren't familiar with how promises work, you can think of resolve and reject as pass/fail. Throw in a Math.random() check and we have a function that resolves about 60% of the time.
If you wanted to test with some latency, you could also wrap the random condition with a setTimeout.
Now instantiate the breaker using this new request:
const breaker = new CircuitBreaker(unstableRequest)
We need a way to simulate multiple calls going through the breaker. We can fire all of these off at once, but that will be hard to observe. Instead, add the following after the previous code block:
setInterval(() => {
  breaker
    .fire()
    .then(console.log)
    .catch(console.error)
}, 1000)
The above code wraps our fake API request in a setInterval that will run once per second.
Now, run node test.js and observe the logs. You should see logs similar to the following that contain details about the current request (inside CircuitBreaker), and the response (from unstableRequest):
❯ node test.js
┌────────────┬───────────────┐
│  (index)   │    Values     │
├────────────┼───────────────┤
│   Action   │   'Failure'   │
│ Timestamp  │ 1579641958197 │
│ Successes  │       0       │
│  Failures  │       1       │
│ Next State │   'CLOSED'    │
└────────────┴───────────────┘
{ data: 'Failed' }
...
.....
.......
Depending on the order of randomness from unstableRequest, you should see the breaker transition from CLOSED, to OPEN, to HALF-OPEN, and back to CLOSED or OPEN.
Beyond the basics
This completes our minimal implementation. You can take a look at the full, completed code for our circuit breaker class here. There are a few things it doesn't do. For example, many Node.js circuit breaker libraries are event-based, so your code can listen to changes in state. The concept can also be implemented as a state machine, or include a variety of additional features such as retries, logging, caching, and notifications.
Read on in Part 2 to explore how to add enhancements like configuration and fallback support to the breaker.
Seem like a lot of work just to manage inconsistencies in an API? At Bearer we're building an active solution that monitors your external API requests and shields them against the inconsistencies and downtimes that are inherent when using third-party APIs. See what it's all about and give Bearer a try today.
📢 Building a Circuit Breaker in Node.js was originally published on The Bearer blog.

Top comments (1)
Awesome Blog! I love how you broke down the process of building a circuit breaker in Node.js. The explanations were clear, and the step-by-step approach made it easy to follow, even for someone who’s newer to the concept. I also appreciate the practical examples you provided to show how this pattern can be applied in real-world scenarios. Looking forward to the next part—this is definitely going to help me improve the reliability of my own Node.js applications. Thanks for sharing such valuable content.