This article was originally published here
In my last post, we created a shader that tiled a bitmap across the filled area. In this post, we're going to change that bitmap to be a black-and-white mask, and use a color filter to change the color on the fly.
Our CreateBitmap method doesn't change much, we simply hardcode the colours to black and white:
private static SKBitmap CreateBitmap()
{
  var bitmap = new SKBitmap(20, 50);

  using var paint = new SKPaint() { Color = SKColors.White };
  using var path = new SKPath();
  using var canvas = new SKCanvas(bitmap);

  canvas.Clear(SKColors.Black);
  canvas.DrawRect(new SKRect(0, 0, 20, 20), paint);

  return bitmap;
}

public readonly static SKBitmap Bitmap = CreateBitmap();
Since this function will always return the same thing, we cache the result, which, rather predictably, looks the same but with the colours swapped:

Now, how do we map white to our hatch colour, and black to our background colour? The key is SKShader.WithColorFilter, which will allow us to remap black and white to blue and red.
There are two main ways to create such an SKColorFilter. There's a function SKColorFilter.CreateTable that takes four byte[256] arrays, which are interpreted as lookup tables for the A, R, G, and B channels respectively. For each colour c in the image, it applies this function:
c.A = alphaLookup[c.A]
c.R = redLookup[c.R]
c.G = greenLookup[c.G]
c.B = blueLookup[c.B]
Since our image only has two colours (black and white), you only need to set index 0 and index 255. For our purposes, this is a little wasteful, as it means allocating a kilobyte for what is a relatively simple filter. Unfortunately, be it out of concern for performance, or out of heretofore unknown masochism, I did not go with this option, I hope this was a good enough head start if you're interested.
The second way is to create a 4x5 matrix that all colours in our image will be multiplied by. I used to be a math minor, so I got a little overenthusiastic here. If you want to skip all the math you can jump to the bottom to see the code.
The Math (copy-pastable code below)
From this article in the Xamarmin docs, the matrix looks like this:
![a 4x5 matrix multiplied by a column vector [r, g, b, a, 1], yielding [r', g', b', a']](https://res.cloudinary.com/practicaldev/image/fetch/s--B4AAiqXO--/c_limit%2Cf_auto%2Cfl_progressive%2Cq_auto%2Cw_880/https://dev-to-uploads.s3.amazonaws.com/uploads/articles/nhqm367sla7j8b89vijw.png)
The formulas for each channel are as follows:

This matrix can encode an arbitrary affine transformation (i.e. any linear transformation, with the addition of translation). That's why we have a five-dimensional colour, and it's why the matrix has five columns, so we can encode translations as well.
However, we only care what this matrix does to two colours, black and white, which we'll denote the vectors and respectively. So we're going to create a matrix that maps these vectors to our hatchColor and backgroundColor, which has the geometric interpretation of placing every shade of gray onto a line between hatchColor and backgroundColor. Please note that black is actually the vector , and we'll correct our result at the end to account for the alpha channel.
We can start by translating all colours by the background colour . This maps black to , regardless of what the rest of the matrix looks like, as multiplying by the vector simply extracts the last column:
![The 5x4 matrix multiplied by the column vector [0, 0, 0, 0, 1], yielding the last column of the matrix, which is the vector [bg.R, bg.G, bg.B, bg.A]](https://res.cloudinary.com/practicaldev/image/fetch/s--ObFGEuLy--/c_limit%2Cf_auto%2Cfl_progressive%2Cq_auto%2Cw_880/https://dev-to-uploads.s3.amazonaws.com/uploads/articles/1hpha3njkqcr2gtgvlu5.png)
Now, we're going to define a vector . This vector will form the main diagonal of our matrix, the rest of which will be zero:
![A 5x4 matrix with the elements of diff along the main diagonal, and the elements of the background in the 5th column. This matrix is multiplied by [R, G, B, A, 1], yielding [R', G', B', A']](https://res.cloudinary.com/practicaldev/image/fetch/s--f_DydQSS--/c_limit%2Cf_auto%2Cfl_progressive%2Cq_auto%2Cw_880/https://dev-to-uploads.s3.amazonaws.com/uploads/articles/vlrtgkvbuhat1tjfchw1.png)
You may notice that, save for the last column, this is a diagonal matrix (aka a scaling matrix). Multiplying by a diagonal matrix is equivalent to multiplying the first component of the vector by the first element of the matrix's diagonal, the second component by second element of the diagonal, and so on. That is to say:

We can write this pairwise multiplication more concisely as
Crucially, since the colour white is represented by the vector , white maps to . Since , white maps to .
Now we have a matrix that maps black to the background colour and white to the hatch colour, but our alpha channel is incorrect. We pretended that black was , but it's actually . This means that the alpha of the background colour will be the same as the alpha channel of the hatch colour. We can fix this by placing the coefficient for the alpha channel in a different column (for example red) of the matrix:

Which changes the alpha channel so that:
![]()
We could've placed it in the blue or green channels as well, the only important part is it must be a channel that is 0 in the colour black, but 1 in the colour white. I also made another simplifying assumption, namely that colour channels are on the interval rather than . This is not true, so we also have to divide our matrix by 255 when we write our code.
SKColorFilter implementation
The code looks like this, note that I used foreground in place of hatchColor
public static SKColorFilter GetMaskColorFilter(SKColor foreground, SKColor background)
{
  float redDifference = foreground.Red - background.Red;
  float greenDifference = foreground.Green - background.Green;
  float blueDifference = foreground.Blue - background.Blue;
  float alphaDifference = foreground.Alpha - background.Alpha;

  var mat = new float[] {
    redDifference / 255, 0, 0, 0, background.Red / 255.0f,
    0, greenDifference / 255, 0, 0, background.Green / 255.0f,
    0, 0, blueDifference / 255, 0, background.Blue / 255.0f,
    0, 0, 0, alphaDifference / 255, background.Alpha / 255.0f,
  };

  return SKColorFilter.CreateColorMatrix(mat);
}
Now, to actually use this colour filter, GetShader becomes the following:
public static SKShader GetShader(SKColor hatchColor, SKColor backgroundColor, StripeDirection stripeDirection = StripeDirection.Horizontal)
{
  var rotationMatrix = stripeDirection switch
  {
    StripeDirection.DiagonalUp => SKMatrix.CreateRotationDegrees(-45),
    StripeDirection.DiagonalDown => SKMatrix.CreateRotationDegrees(45),
    StripeDirection.Horizontal => SKMatrix.Identity,
    StripeDirection.Vertical => SKMatrix.CreateRotationDegrees(90),
    _ => throw new NotImplementedException(nameof(StripeDirection))
  };

  var shader = SKShader.CreateBitmap(
    Bitmap,
    SKShaderTileMode.Repeat,
    SKShaderTileMode.Repeat,
    SKMatrix.CreateScale(0.25f, 0.25f)
      .PostConcat(rotationMatrix));

  return shader.WithColorFilter(ColorFilterHelpers.GetMaskColorFilter(hatchColor, backgroundColor));
}
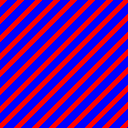
And this code gives the correct result for a hatch colour of red, and a background colour of blue:
Links
Example code on github: https://github.com/bclehmann/SkiaSharpHatching
The pull request from which this code is based on: https://github.com/ScottPlot/ScottPlot/pull/2221

Top comments (0)