
A crucial part of programming is the ability to communicate with different Application Programming Interfaces (APIs). If you visit Google API Explorer, you will find a huge library of APIs, including all of their well-known applications like Gmail, Drive, and Calendar. Simply put, an API allows you to fetch or send data to the services via HTTP requests.
The usage and documentation of these APIs might be a bit tricky at first, but once you learn it, you‘ll be able to apply your knowledge to most Google applications.
I decided to write a beginner’s guide for how to use and understand the Gmail API. The guide is based on the documentation, meaning you’ll learn what to look for and how to read it instead of just copying code. As most of the other Google API references documents are alike, you’ll see that adapting to them is much easier once you know how to actually read the docs. This will allow you to write your own code and actually understand what you’re doing.
Python 3 is used in this guide, but the usage should look quite similar in other languages as well.
Quickstart
Google usually offers a quickstart guide to make authorization easier. This guide will use the authorization from the quickstart guide, which means it’ll come with some limitations, but it’s sufficient for our purposes. The other way to get the API key is to create a new project, which is a bit trickier.
The Python quickstart guide can be accessed at this link, but I’ll follow along and show you how everything is done here.
Here’s what the quickstart looks like:

Turn on the Gmail API
The first step is to enable the API and download the credentials to use in our project. By pressing the “enable the Gmail API”* *button, we open a new window with our credentials.

Our Client ID and Client Secret will be shown. Choose the client configuration for download. A file will be saved, called credentials.json. We’ll save this to the same folder our code will be in.

Installing the Libraries

Installing the required libraries is done with a simple pip command, provided by Google. I pasted it below as well. I would recommend doing it in a virtual environment. That is, however, not covered in this guide.
pip install — upgrade google-api-python-client google-auth-httplib2 google-auth-oauthlib
First Run — Allow Access
Before we continue following the guide, we’ll need to allow access to the Gmail API for our script. Let’s start by making the actual script.
Create a .py file in the project directory (same as the directory with credentials.json). For the sake of it, let’s call it gmail.py.
Copy the example code from the Python quickstart to the gmail.py* *file. Ignore the code for now, we’ll dive into that later. We only need to allow access on the first run — it will be saved for all later runs as well.
Just run the file as you normally would, and you’ll be able to sign in to your Google account in the web browser.
python gmail.py
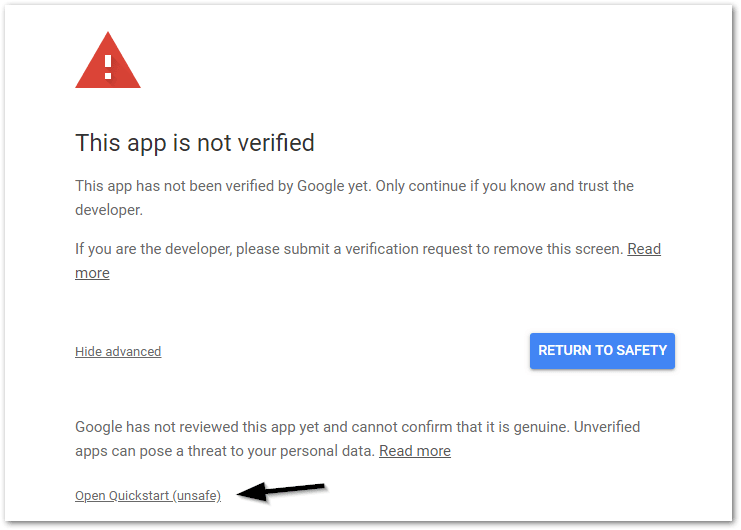
Login to your account. A warning saying that the app is not verified will be shown. As we are using the quickstart method, our app is not yet verified. Just click the link shown on the picture to continue for now and allow access.


Understanding the Code
The example code may look overwhelming at first, but I’ll divide it into smaller parts to keep it simple. By the end, you’ll see that it actually isn’t that difficult.
Import and scopes

As with any other Python script, we’ll start with the imports. Most imports are used for authorization with the credentials.json file. All of these are provided by default so we don’t need to change anything.
Scopes are, however, the most important part. This variable will be modified later, but for now, we’ll settle for the default scope provided.
What this is saying is that it will allow us to access data from the gmail.readonly scope. There are many more scopes, and this allows for a set of actions and requests we can make to the Gmail API. Some other requests require other scopes.
Later on, we will add another scope to use other functionalities.
Credentials
The authorization is probably to the most advanced part of the script. We will not dive too much into that for now, as it’s already configured to work from the box.
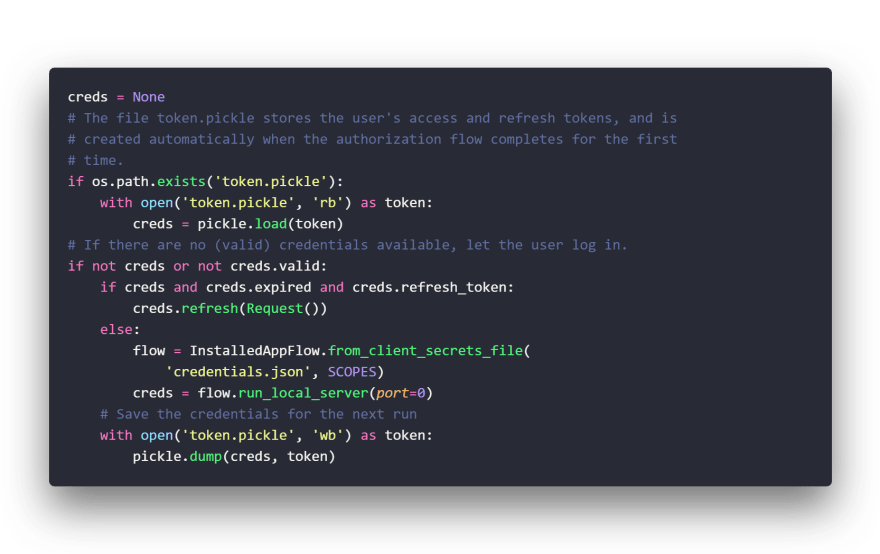
This is the part the gets the credentials you downloaded from credentials.json. First, it looks for a token.pickle file. That is the file that is created once you have allowed access to your account the first time. If the file already exists, it gets the credentials from it, meaning you don’t have to allow access several times.
If the token.pickle file doesn’t exist, it loads the credentials from your credentials.json file instead. This requires that you allow access via the web browser, which you did before.
The credentials are, in either case, saved in the creds variable for later use.
API

This is the fun part of the script: The part the fetches the data from the Gmail API. As you can see, it’s actually not that advanced. This is the part that we’ll look deeper into.
The service is built using the earlier imported build function. The credentials that we got earlier are passed as an argument to it.
service is then used to fetch all Gmail labels for the account that was authorized. The data is saved to the results variable.
The last line saves all labels to the labels variable. They are formatted as a list, therefore a default value ( [] ) is specified if the list is empty.
The next part of this guide will look at the documentation to make some sense of this.
Result
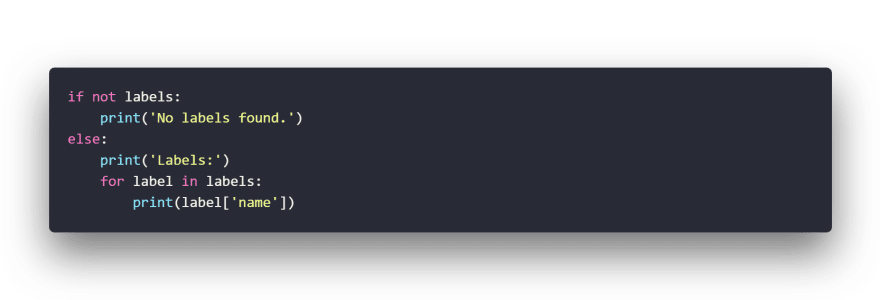
At the end, the label names are printed (if there are any).
Understanding the Documentation
So that was the quickstart example code. However, it doesn’t make much sense without reading the documentation. This part will show you how to actually understand what is written in the code, and how you’ll use the documentation to write your own code.
First, let's go to the “Reference”** **tab to access the docs.

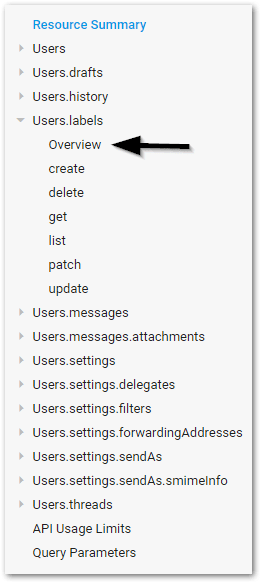
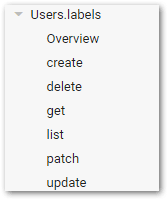
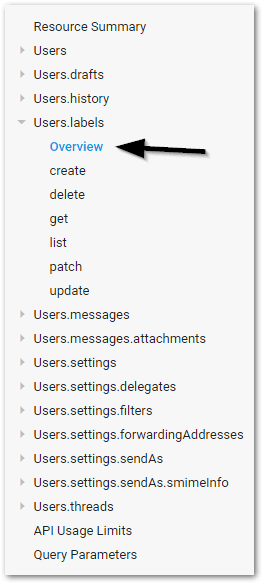
To the left, a large summary menu is shown. It’s full of a lot of information, but it’ll be extremely useful in the upcoming step.
As we’re working with labels, let's choose the Users.labels section, and the Overview part to get some basic information about labels.
We are greeted by this screen:

A text saying that that list of methods is at the end of the page, as well as the resource representations** **of the label. Information is usually sent as JSON, which is handled like dictionaries in Python.
This is the information that each label we fetch holds. If we scroll down further, we should see a table that provides information about each property in the dictionary.

I have highlighted the name part because we’ve used it before. We accessed the name of the label when we printed the labels earlier. Like this:

The label is, in this case, a dictionary, and we access the name property within it. We could access any other property that is named above, but for now, name is fine.
It’s important to note that name is a string, but some values might be integers. It’s easy to find in the documentation.
If we continue to scroll down to the bottom of the page, we’ll see all methods. A short description of each method is presented, as well as a hyperlink to the documentation.

You’ll use different methods depending on what you want to do. The quickstart example uses the list method to fetch all labels on the Gmail account. If we wanted to create a new label, we’d use the create method, which we’ll actually do later.
If we go back up to the top and look at the overview at our left, you’ll see that each method has its own menu button.
List Method
Let’s take a closer look at the list method, which we used before by clicking list on the menu bar.

This provides a lot of useful information. For starters, an HTTP GET request is sent to the labels URL to fetch all the labels:
https://www.googleapis.com/gmail/v1/users/userId/labels
We could do this manually using, for example, the requests library in Python. However, we’ll use the provided Google library in this guide.
Authorization is required, but we already took care of that part earlier.
And last, but not least, the parameters we can pass to the list method. As you can see, userId is the only one we can pass.
The userId is a string that represents the user's email address. The value me can be used instead to indicate the authenticated user. We actually used the me value in the example code.
We’ll soon go deeper into this, but first, we’ll read through the other parts of the list method documentation.
Authorization and scope

Scopes may sound familiar, that’s because we touched briefly on it earlier. To access the list method, at least one of the provided scopes are required.
As you can see, we have already added the gmail.readonly scope at the top of our code.

Response

The last part shows us what a successful request would return: a body in the JSON format. All labels are stored as a list that can be accessed with the labels key. Basically this:
list_of_labels = response["labels"]
Exactly like you would use a normal dictionary in Python.
Making the List Request
Let’s look back at the API part of our code now that we have gathered some more information from the documentation.
First, the service is built with our credentials. This is simply the base that is used for making requests (using the methods we previously saw).

Next, we actually make the request using the list method with this code. It might look a bit more familiar now once we have looked through the docs.

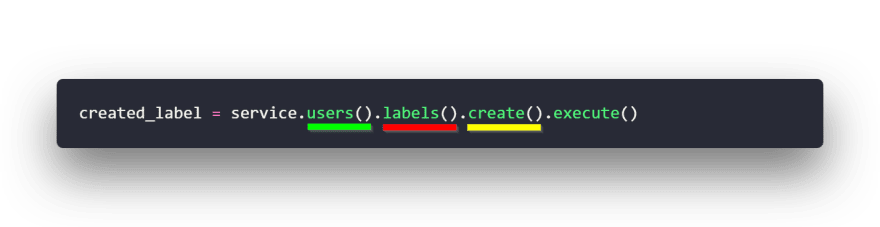
To easier show you how the syntax is built, I have color-coded the code along with the menu to show you how the API is working.

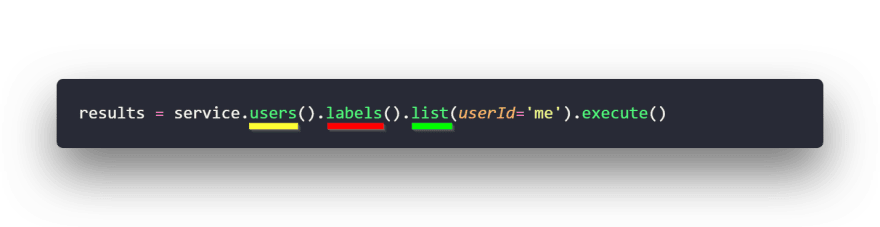
We start off with the service variable. By simply following the tree-like structure, method by method, we’ll finally get to the list method.
Let’s actually take a closer look at the list method, and especially the familiar userId parameter that has me passed as an argument.
If we scroll back up to the top of the list method documentation, we’ll see the summary of the parameters that we talked about earlier. The userId parameter is specified, in case we don’t know what it is.

We simply pass it as an argument to the list method in the code.
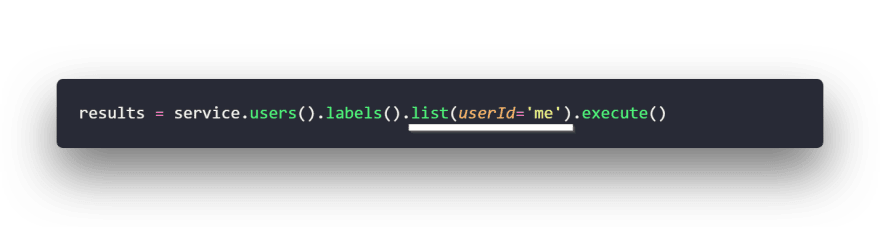
As you probably recall, the request should return a dictionary, according to the response part of the documentation. We store it in the results variable.
To access the labels, we use the .get method of the dictionary. The first argument we pass is the name of what we want to get ( labels ), and the second argument is what we get returned if it doesn’t find anything with that name.
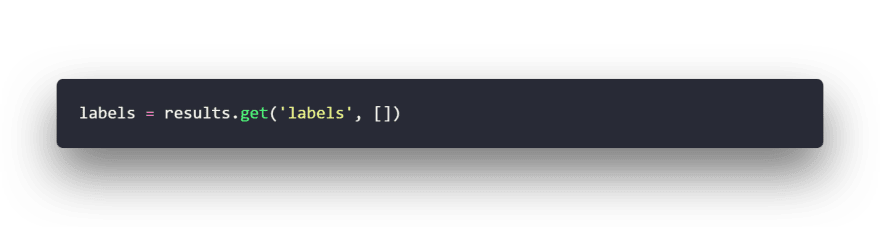
If there is no key called labels, an empty list will be returned.
So that is basically how the documentation is read, and how the list method works. Let’s try to do something else from start by following the API documentation instead.
Creating a New Label
Let’s use our newfound knowledge and do something new, something from scratch (almost).
Remove all API-related code from your document. Keep only the imports, the scope, and the credential handling. We’ll try to create a new label via the API.
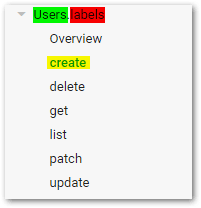
Let’s head to the Overview page of the labels. Scroll down to the methods to see which one we need to use to create our own method.


You may have noticed that there is a method that is literally called create that we’ll use. Go to the documentation of that method to see what we need.
Let’s start off with the authorization and the scopes.

As you can see, we require at least one of the three scopes that are present. However, we do not have any one of them in our code. Let’s add the gmail.labels scope.

The SCOPES variable takes a list, meaning that we could simply add the new scope with a comma separation.
As the old authorization was stored in the token.pickle file (and that file is used for authorization as long as it exists), we need to remove it and re-create it with our new scope.
Run the Python app again with python gmail.py to re-authorize, however, a minor change can be seen:

A new dependency is added. You might not understand it because of the Swedish language, but it basically says “Handle Labels.” So the new scope added a new dependency to our application.
The Code
If we look at the top of the create method documentation, we can see that it is quite similar to the list method. It requires authorization, it makes an HTTP POST request and a userId parameter is needed.

But somehow we need to pass the actual label in our request. If we scroll down to the request body, we’ll see how to do that.

In the body of our request, a label with at least the following properties should be present to create a label:
labelListVisibility
messageListVisibility
name
You can learn about which type they should be in, as well as what they are, in the documentation.
Exactly like we received the data in a dictionary, the data should be sent as a dictionary.
Creating the label
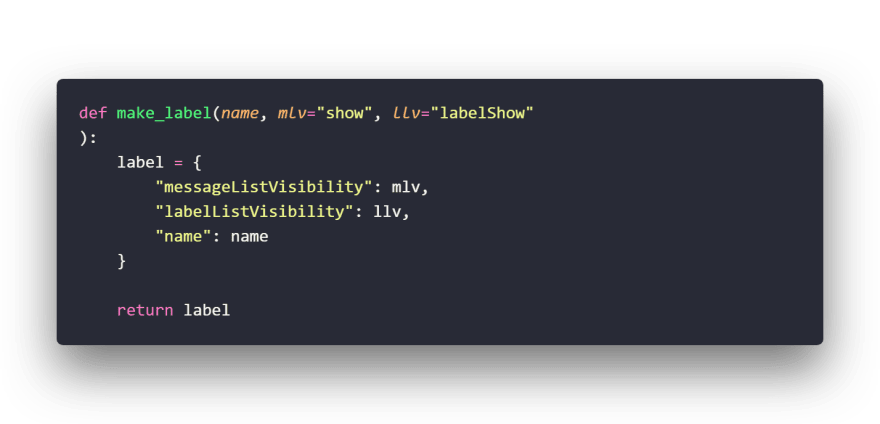
This is a simple function to create a label. It requires a name and two other optional arguments. If they are not specified, show and labelShow will be used as default.
The label is created as a dictionary, and then returned.
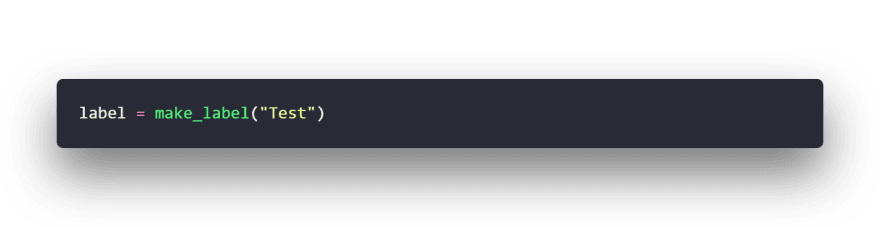
To create a label with the name Test we would use the syntax above.
Making the request to the API
Time to make the actual request to the API, and pass our label to our Gmail account. Let’s follow the same procedure as last time.
I have color-coded the path to the create method.
We are not changing much compared to our last API call. We start with service, which we created before, and add each method until we reach the create method. We are, however, not completely done there.
If we scroll to the Parameters** **part of the documentation, we see that we need to pass userId as a parameter, like our last call.
Let’s use me again, like the documentation suggests.

We’re still missing something: the actual label. We need to somehow pass the label in our request as well. Let’s scroll down to the request body again.

We’ve already created the label with all the required properties, so we need to pass it in the request body. This is done by simply adding another parameter to the create method called body.
Let’s pass our label object in it.

The actual call is done, but to add some error checking, let’s wrap it into a try/except statement.

If something goes wrong, the error message will be printed in our console. If everything goes as planned, Label created will be printed (and the label will be created).
So let’s look back at the parts of the code we created to make the new API request:

The API handling is in fact not that difficult. The actual fetching doesn’t require many lines of code — the tricky part is the authorization, which we don’t even need to handle ourselves.
If we save and run the code with python gmail.py, a new label should be created in our Gmail account.
![]()
Done!
We successfully made an API call to Gmail from scratch and created our own label. The same basic principle applies to most other methods in the Gmail API, and other Google APIs, as well.
Feel free to try making other requests just to get the hang of it. The best way to learn is to practice. Once you begin to understand the documentation, creating your own calls isn’t that hard.
Try creating your own mail drafts, or fetch all your inbox messages based on a query — everything is specified in the documentation.
I have provided the full code on GitHub if you want to look at the final results of our example. Good luck with your projects and happy coding!


Top comments (4)
Very detailed! If you wanted to make a service like this, do you need to go through the new gmail approval process to sell it as a service? (or do you know anything about that?) Thanks!
Thank you!
I'm sorry, what do you mean? But to answer your second question; I am not very familiar with that.
Ah, ok :) - I don't know much about it either, but I've heard gmail api users talk about a gmail authorization fee they've had to pay (to google) to get their apps approved. I was just wondering if you knew anything about that or not. Never mind then! I'll do some research :)
Oh I see! No sorry, I am not familiar with that ;)
Good luck!! :)