Computer vision is evolving on a daily basis. Popular computer vision techniques such as image classification and object detection have been used extensively to solve a lot of computer vision problems. In image classification, an entire image is classified. Object detection extends image classification by detecting the location of individual objects present in an image.
Image Segmentation:
Some computer vision problems require deeper understanding of the contents in the images. Classification and object detection may not be suitable to solve these problems. The need for an effective technique to solve some critical computer vision problems gives rise to the invention of Image Segmentation.
Every image is made up of a group of pixel values. Image Segmentation is the task of classifying an image at the pixel level. A machine is able to analyse an image more effectively by dividing it into different segments according to the classes assigned to each of the pixel values present in the image.
The distinct technique employed in Image Segmentation makes it applicable in solving critical computer vision problems. These are problems that require detailed information about the objects present in an image, details that cannot be provided by classifying the entire image or providing bounding boxes for the objects present in the image. Some of the major contributions of Image Segmentation include:
-Efficient vision system for driverless cars for an effective road scene’s understanding.
-Medical Image Segmentation provides segmentation of body parts for performing diagnostic tests.
-Satellite images' analysis.
There are two major types of Image Segmentation:
Semantic Segmentation: Objects classified with the same pixel values are segmented with the same colormaps.
Instance Segmentation: It differs from semantic segmentation because different instances of the same object are segmented with different color maps.

Semantic Segmentation
Instance Segmentation
PixelLib: is a library built for an easy implementation of Image Segmentation in real life problems. PixelLib is a flexible library that can be integrated into software solutions that require the application of Image Segmentation.
Semantic and instance segmentation is possible with five lines of code.
Install PixelLib and its dependencies:
Install the latest version tensorflow(tensorflow 2.0) with:
pip3 install tensorflow
Install opencv-python with:
pip3 install opencv-python
Install scikit-image with:
pip3 install scikit-image
Install Pillow with:
pip3 install pillow
Install Pixellib:
pip3 install pixellib
Implementation of Semantic Segmentation with PixelLib:
The code to implement semantic segmentation with deeplabv3+ model is trained on pascal voc dataset.
import pixellib
from pixellib.semantic import semantic_segmentation

segment_image = semantic_segmentation()
segment_image.load_pascalvoc_model("deeplabv3_xception_tf_dim_ordering_tf_kernels.h5")
segment_image.segmentAsPascalvoc("path_to_image", output_image_name = "path_to_output_image")
We shall observe each line of code:
import pixellib
from pixellib.semantic import semantic_segmentation
segment_image = semantic_segmentation()
The class for performing semantic segmentation is imported from PixelLib and we created an instance of the class.
segment_image.load_pascalvoc_model(“deeplabv3_xception_tf_dim_ordering_tf_kernels.h5”)
In the code above we loaded the xception model trained on pascal voc for segmenting objects. The model can be downloaded from here.
segment_image.segmentAsPascalvoc(“path_to_image”, output_image_name = “path_to_output_image)
We loaded the function to perform segmentation on an image. The function takes two parameters…
path_to_image:- this is the path to the image to be segmented.
output_image_name:- this is the path to save the segmented image. It will be saved in your current working directory.
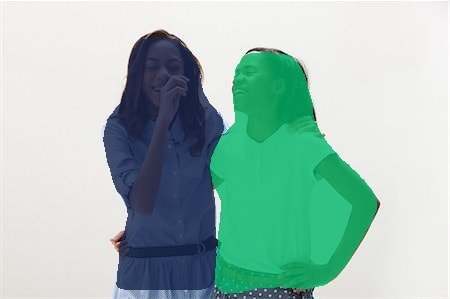
sample1.jpg

import pixellib
from pixellib.semantic import semantic_segmentation

segment_image = semantic_segmentation()
segment_image.load_pascalvoc_model("deeplabv3_xception_tf_dim_ordering_tf_kernels.h5")
segment_image.segmentAsPascalvoc("sample1.jpg", output_image_name = "image_new.jpg")

The saved image after segmentation, the objects in the image are segmented. You can apply segmentation overlay on the image if you want to.
segment_image.segmentAsPascalvoc("sample1.jpg", output_image_name = "image_new.jpg", overlay = True)

We added the extra parameter overlay and set it to true and we obtained an image with a segmentation overlay on the objects.
You can check the inference time required for performing segmentation by modifying the code below.
import pixellib
from pixellib.semantic import semantic_segmentation
import time

segment_image = semantic_segmentation()
segment_image.load_pascalvoc_model("pascal.h5")

start = time.time()
segment_image.segmentAsPascalvoc("sample1.jpg", output_image_name= "image_new.jpg")

end = time.time()
print(f"Inference Time: {end-start:.2f}seconds")
Inference Time: 7.38seconds
It took 7.38 seconds to run semantic segmentation on the image.
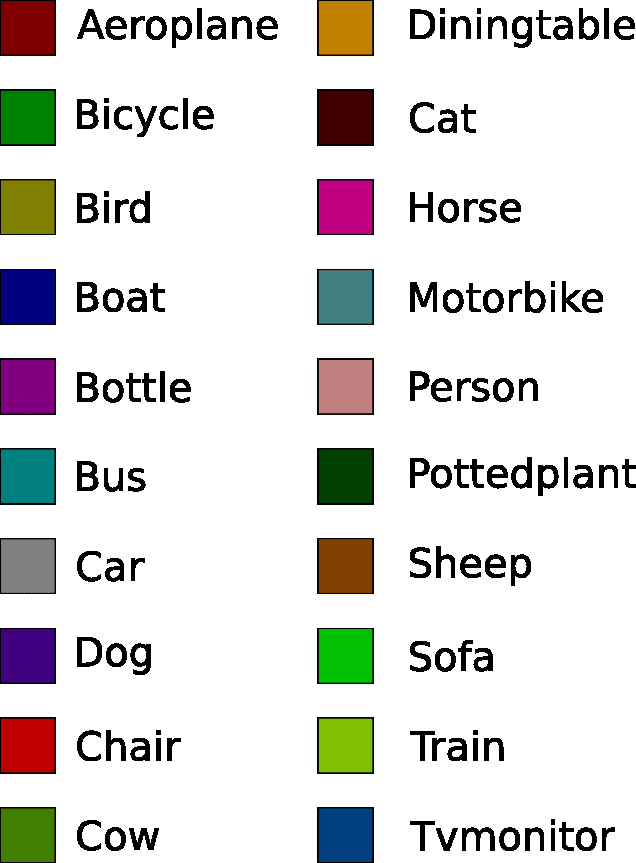
This xception model is trained on pascal voc dataset, a dataset with 20 object categories.
Objects and their corresponding color maps
Specialised uses of PixelLib may require you to return the array of the segmentation’s output:
Obtain the array of the segmentation’s output by using this code,
output, segmap = segment_image.segmentAsPascalvoc()
You can test the code for obtaining arrays and print out the shape of the output by modifying the semantic segmentation code below.
import pixellib
from pixellib.semantic import semantic_segmentation
import cv2

segment_image = semantic_segmentation()
segment_image.load_pascalvoc_model("pascal.h5")
output, segmap = segment_image.segmentAsPascalvoc("sample1.jpg")
cv2.imwrite("img.jpg", output)
print(output.shape)
INSTANCE SEGMENTATION WITH PIXELLIB:
Instance segmentation with PixelLib is based on Mask R-CNN framework.
Code to implement instance segmentation:
import pixellib
from pixellib.instance import instance_segmentation

segment_image = instance_segmentation()
segment_image.load_model("mask_rcnn_coco.h5")
segment_image.segmentImage("path_to_image", output_image_name = "output_image_path")
Observe each line of code
import pixellib
from pixellib.instance import instance_segmentation
segment_image = instance_segmentation()
The class for performing instance segmentation is imported and we created an instance of the class.
segment_image.load_model("mask_rcnn_coco.h5")
This is the code to load the mask r-cnn model to perform instance segmentation. Download the mask r-cnn model from here.
segment_image.segmentImage("path_to_image", output_image_name = "output_image_path")
This is the code to perform instance segmentation on an image and it takes two parameters:
path_to_image: The path to the image to be predicted by the model.
output_image_name: The path to save the segmentation result. It will be saved in your current working directory.
sample2.jpg

import pixellib
from pixellib.instance import instance_segmentation

segment_image = instance_segmentation()
segment_image.load_model("mask_rcnn_coco.h5")
segment_image.segmentImage("sample2.jpg", output_image_name = "image_new.jpg")
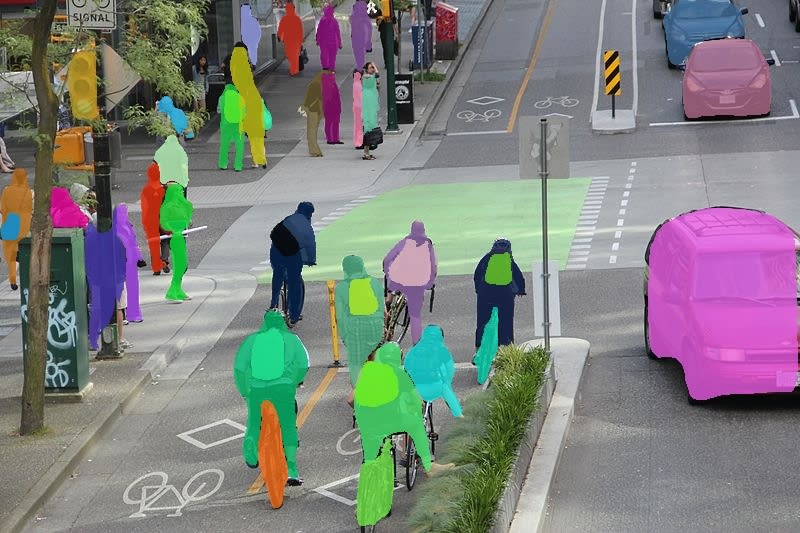
This is the saved image in your current working directory.
You can implement segmentation with bounding boxes. This can be achieved by modifying the code.
segment_image.segmentImage("path_to_image", output_image_name = "output_image_path", show_bboxes = True)
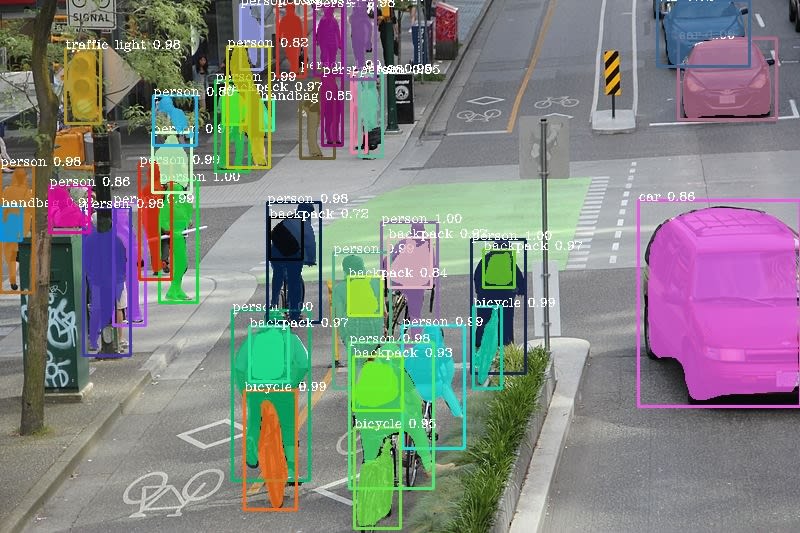
We added an extra parameter show_bboxes and set it to true, the segmentation masks are produced with bounding boxes.
You can check the inference time required for performing segmentation by modifying the code below.
import pixellib
from pixellib.instance import instance_segmentation
import time

segment_image = instance_segmentation()
segment_image.load_model("mask_rcnn_coco.h5")

start = time.time()
segment_image.segmentImage("former.jpg", output_image_name= "image_new.jpg")

end = time.time()
print(f"Inference Time: {end-start:.2f}seconds")
Inference Time: 12.87seconds
It took 12.87 seconds to run instance segmentation on the image.
The Mask R_CNN model is trained on Microsoft Coco dataset, a dataset with 80 common object categories. The model can perform instance segmentation on these object categories.
A list of the object categories present in Coco dataset:
[‘BG’, ‘person’, ‘bicycle’, ‘car’, ‘motorcycle’, ‘airplane’, ‘bus’, ‘train’, ‘truck’, ‘boat’, ‘traffic light’, ‘fire hydrant’, ‘stop sign’, ‘parking meter’, ‘bench’, ‘bird’, ‘cat’, ‘dog’, ‘horse’, ‘sheep’, ‘cow’, ‘elephant’, ‘bear’, ‘zebra’, ‘giraffe’, ‘backpack’, ‘umbrella’, ‘handbag’, ‘tie’, ‘suitcase’, ‘frisbee’, ‘skis’, ‘snowboard’, ‘sports ball’, ‘kite’, ‘baseball bat’, ‘baseball glove’, ‘skateboard’, ‘surfboard’, ‘tennis racket’, ‘bottle’, ‘wine glass’, ‘cup’, ‘fork’, ‘knife’, ‘spoon’, ‘bowl’, ‘banana’, ‘apple’, ‘sandwich’, ‘orange’, ‘broccoli’, ‘carrot’, ‘hot dog’, ‘pizza’, ‘donut’, ‘cake’, ‘chair’, ‘couch’, ‘potted plant’, ‘bed’, ‘dining table’, ‘toilet’, ‘tv’, ‘laptop’, ‘mouse’, ‘remote’, ‘keyboard’, ‘cell phone’, ‘microwave’, ‘oven’, ‘toaster’, ‘sink’, ‘refrigerator’, ‘book’, ‘clock’, ‘vase’, ‘scissors’, ‘teddy bear’, ‘hair drier’, ‘toothbrush’]
Specialised uses of PixelLib for Instance Segmentation.
Obtain the following arrays:
-Detected Objects’ arrays
-Objects’ corresponding class_ids’ arrays
-Segmentation masks’ arrays
-Output’s array
By using this code
segmask, output = segment_image.segmentImage()
You can test the code for obtaining arrays and print out the shape of the output by modifying the instance segmentation code below.
import pixellib
from pixellib.instance import instance_segmentation
import cv2

instance_seg = instance_segmentation()
instance_seg.load_model("mask_rcnn_coco.h5")
segmask, output = instance_seg.segmentImage("sample2.jpg")
cv2.imwrite("img.jpg", output)
print(output.shape)
Obtain arrays of segmentation with bounding boxes by including the parameter show_bboxes.
segmask, output = segment_image.segmentImage(show_bboxes = True)
import pixellib
from pixellib.instance import instance_segmentation
import cv2

instance_seg = instance_segmentation()
instance_seg.load_model("mask_rcnn_coco.h5")
segmask, output = instance_seg.segmentImage("sample2.jpg", show_bboxes= True)
cv2.imwrite("img.jpg", output)
print(output.shape)
Install PixelLib and test it with as many images you desire.
Visit the official github repository of PixelLib.
Visit the official documentation of PixelLib
Reach to me via:
Email: olafenwaayoola@gmail.com
Twitter: @AyoolaOlafenwa
Facebook: Ayoola Olafenwa
Linkedin: Ayoola Olafenwa


Top comments (0)