
If you are looking for ways to build easy authentication for Microsoft Teams custom tab development, Microsoft Graph Toolkit Login component provides a button and flyout control to facilitate Microsoft identity platform authentication with couple of lines of code.
How to build a tab with straightforward authentication flow?
- Enable Microsoft Teams Toolkit extension for Visual Studio Code
- Build Microsoft Teams tab
- Implement Microsoft Graph Toolkit:
- Login component: login button to authenticate a user with the Microsoft Identity platform
- Teams provider: Microsoft Teams tab to facilitate authentication
- Agenda component: displays events in a user or group's calendar
- Setup ngrok for tunneling
- Register your app in Azure Active Directory
- Import your app manifest to Microsoft Teams App Studio for testing
Enable Microsoft Teams Toolkit extension for Visual Studio Code
Install Microsoft Teams Toolkit from the Extensions tab on the left side bar in Visual Studio Code. For more information, Microsoft Teams Toolkit: Setup and Overview.

Build Microsoft Teams tab
- Select Microsoft Teams icon on the left side bar in Visual Studio Code and Sign in.

- Select Create a new Teams app,
- Give a name for the app
- Choose Tab for the capability
- Select Next

- Select Personal tab
- Select Finish

-
Open Terminal and run:
npm installnpm start
Implement Microsoft Graph Toolkit
Add a new file under src folder and name it as Auth.js.
import React from 'react';
import ReactDOM from 'react-dom';
import './index.css';
import App from './components/App';
import { Provider, themes } from '@fluentui/react-northstar' //https://fluentsite.z22.web.core.windows.net/quick-start

ReactDOM.render(
    <Provider theme={themes.teams}>
        <App />
    </Provider>, document.getElementById('auth')
);
Add a new file under public folder and name as auth.html. CTRL+SPACE for adding HTML Sample. Add below code in <body></body>
<div id="auth"></div>
<script src="https://unpkg.com/@microsoft/teams-js/dist/MicrosoftTeams.min.js" crossorigin="anonymous"></script>
<script src="https://unpkg.com/@microsoft/mgt/dist/bundle/mgt-loader.js"></script>
<script>
  mgt.TeamsProvider.handleAuth();
</script>
Add below code in index.html <body></body>
 <script src="https://unpkg.com/@microsoft/teams-js/dist/MicrosoftTeams.min.js" crossorigin="anonymous"></script>
 <script src="https://unpkg.com/@microsoft/mgt/dist/bundle/mgt-loader.js"></script>
 <mgt-teams-provider client-id="YOUR-CLIENT-ID" auth-popup-url="YOUR-NGROK-URL/auth.html"></mgt-teams-provider>
 <mgt-login></mgt-login>
 <mgt-agenda></mgt-agenda>
Setup ngrok for tunneling
- Open Terminal and run the solution. Default Teams tab will be running
https://localhost:3000:
npm start
Go to ngrok website and login.
Complete the setup and installation guide.
Save Authtoken in the default configuration file
C:\Users\[user name]\.ngrok:
ngrok authtoken <YOUR_AUTHTOKEN>
- Run below script to create ngrok tunnel for
https://localhost:3000:
ngrok http https://localhost:3000

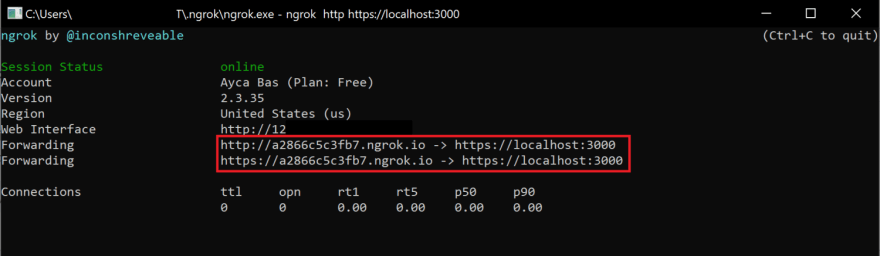
- Go to your project .publish > Development.env, replace
baseUrl0with ngrok urlhttps://xxxxxxxxxxxx.ngrok.io.

- Go to your project public > index.html, replace
YOUR-NGROK-URLwith ngrok urlhttps://xxxxxxxxxxxx.ngrok.ioin mgt-teams-provider > auth-popup-url.

Register your app in Azure Active Directory
- Go to Azure Portal, then Azure Active Directory > App Registration and select New Registration.

- Fill the details to register an app:
- give a name to your application
- select Accounts in any organizational directory as an access level
- place auth-popup-url as the redirect url
https://xxxxxxxxxxxx.ngrok.io/auth.html - select Register

- Go to Authentication tab and enable Implicit grant by selecting
Access tokensandID tokens

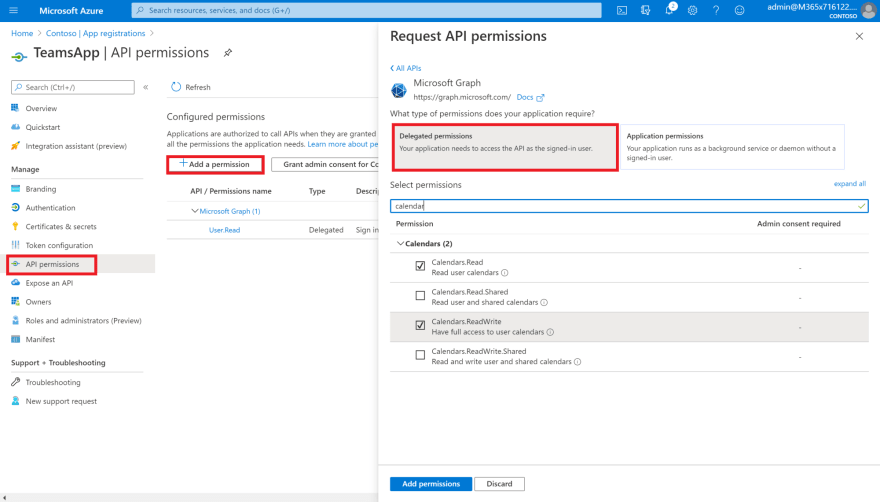
- Go to API permissions tab, select Add a permission > Microsoft Graph > Delegated permissions and add
Calendar.Read,Calendar.ReadWrite. - Then, select Grant admin consent.
- Go to Overview tab and copy Application (client) ID
- Then go to your project public > index.html, replace
YOUR-CLIENT-IDwithApplication (client) IDin mgt-teams-provider > auth-popup-url.


Import your app manifest to Microsoft Teams App Studio for testing
- Go to Microsoft Teams, open App Studio > Manifest Editor and select Import an existing app.

- Select Development.zip under your project folder > .publish.

- Scroll down and select Test and distribute, then click Install and Add your app.


- Click on Sign in for the authentication and give consent to AAD registered app you created.

- Your profile information
e-mail,nameand calendar should appear in your tab after the successful authentication.


Top comments (1)
Hi!
I'm trying to implement your solution to get a Token to use with Graph....
I've followed your example and I dont have the .publish > Development.env, folder/file... I've used the .env file and debug it on VSCode and I'm having the attached error....
Do you have an updated example? Thanks!!