I am always on the look out for interesting new projects to check out, and this week I came across Ragna, an open source Retrieval Augmented Generation RAG orchestration framework. It is a new project with a committed and active community, so I wanted to find out more about this project.
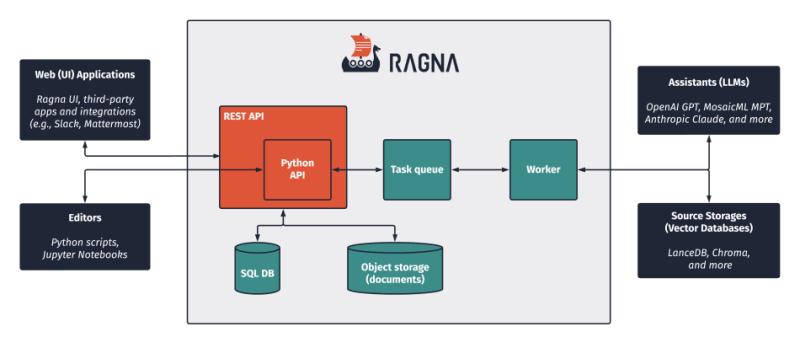
What piqued my interest was reading this blog post, Unveiling Ragna: An Open Source RAG-based AI Orchestration Framework Designed to Scale From Research to Production which takes a look at the background, or as I like to think of it, the "scratch that needed to be itched". I couldn't help notice some parallels from an architectural perspective to one of my favourite open source projects, Apache Airflow.
In this post I will share my experience of getting hands on with Ragna, and then also share how I was able to integrate it with Amazon Bedrock's foundation models, specifically Anthropic Claude. This is only a quick post, and just intended to show you how you can get started yourself, but includes everything you need to get up and running.
Pre-requisites
If you want to follow along, then you are going to need access to an AWS account in a region where Amazon Bedrock is available (I am going to be using Frankfurt's eu-central-1), as well as an API key for one of the out of the box providers (I will be using OpenAI).
Local installation
Getting up and running is nice and easy, and the project have done a great job in simplifying the job. The installation guide is straightforward.
Note! I was running Python 3.10.11 on my MacOS
python -m venv ragna
source ragna/bin/activate
cd ragna
git clone https://github.com/Quansight/ragna.git
cd ragna
pip install --upgrade pip
pip install 'ragna[all]'
Lets kick the tyres. Good to see the doc has some tutorials
When we run the command "ragna ui" we get the following:
The configuration file ./ragna.toml does not exist.
If you don't have a configuration file yet, run ragna init to generate one.
Running "ragna-init" lets us go through the ragna setup wizard.
ragna init

        Welcome to the Ragna config creation wizard!

I'll help you create a configuration file to use with ragna.
Due to the large amount of parameters, I unfortunately can't cover everything. If you want to customize everything, please have a look at the documentation instead.

? Which of the following statements describes best what you want to do? (Use arrow keys)
 » I want to try Ragna without worrying about any additional dependencies or setup.
   I want to try Ragna and its builtin source storages and assistants, which potentially require additional dependencies or setup.
   I have used Ragna before and want to customize the most common parameters.
It will ask you to provide inputs for three questions:
- Which of the following statements describes best what you want to do?
- Which source storages do you want to use?
- Which assistants do you want to use?
At this point it is probably worth reading the docs to understand what these mean in the context of this application. They have provided a page that provides the details of what is happening when you run the "ragna init". For the time beinng I just went with the defaults.
To start Ragna, from the command line you type "ragna ui" and you should start to see something similar to the following.
ragna ui
/Users/ricsue/Projects/GenAI/oss-ragna/ragna/ragna/__init__.py:6: UserWarning: ragna was not properly installed!
  warnings.warn("ragna was not properly installed!")
INFO:   RagnaDemoAuthentication: You can log in with any username and a matching password.
INFO:     Started server process [60960]
INFO:     Waiting for application startup.
INFO:     Application startup complete.
INFO:     Uvicorn running on http://127.0.0.1:31476 (Press CTRL+C to quit)
INFO:     127.0.0.1:62877 - "GET / HTTP/1.1" 200 OK
Launching server at http://localhost:31477
INFO:     127.0.0.1:62923 - "GET / HTTP/1.1" 200 OK
I was a bit worried that this was not going to work, but launching a browser and opening up the http://localhost:31477 did bring up a web page and prompted me to log in. From the output, it looks like I can just use any input to log in.
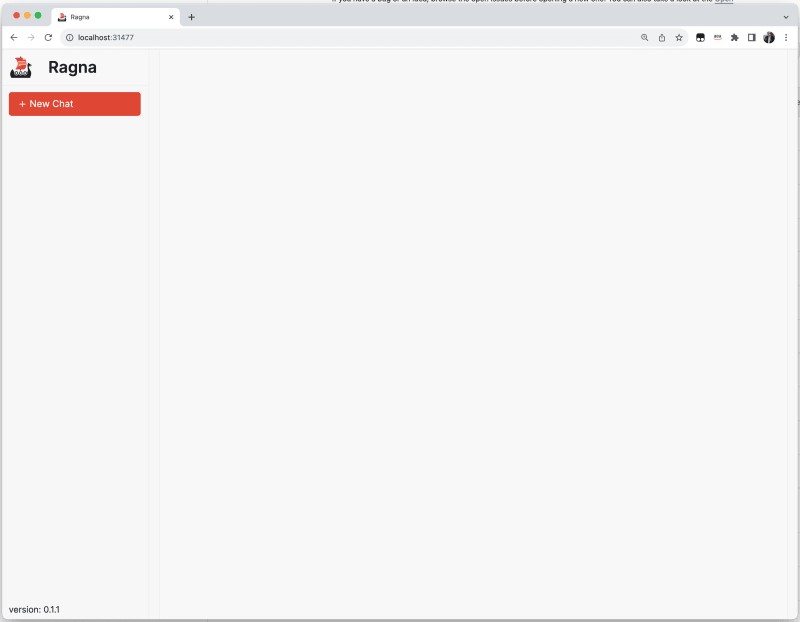
After a few seconds, I was greeted with the Ragna UI.
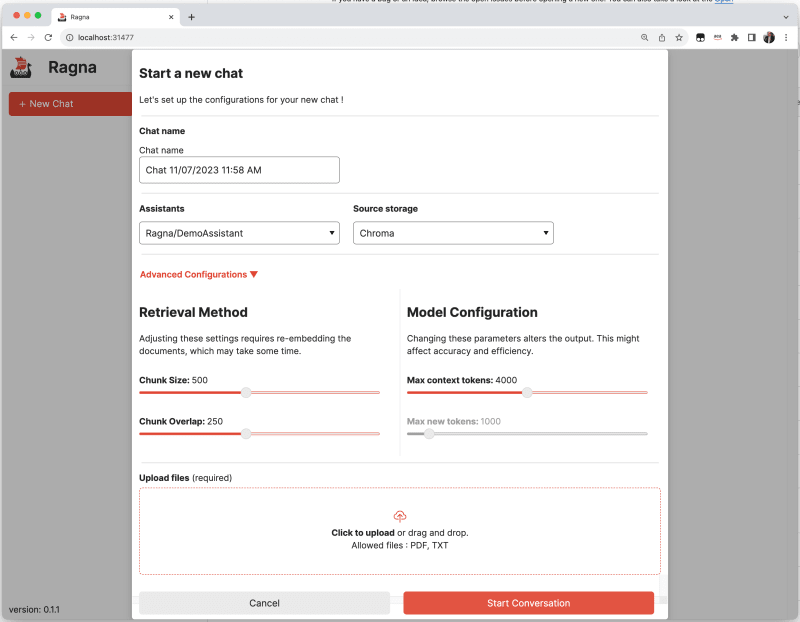
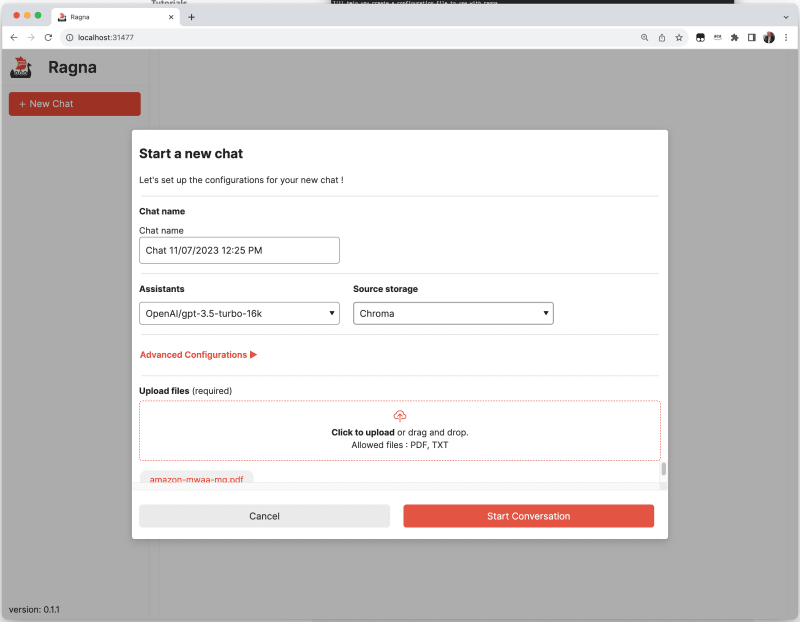
When we click on the NEW CHAT button, we can see the options that allow us to change both the vector store used for storing the documents we upload, as well as the AI assistant we want to use.
I like that it allows you to configure "dummy" configurations to kick the tyres of how this tool works.
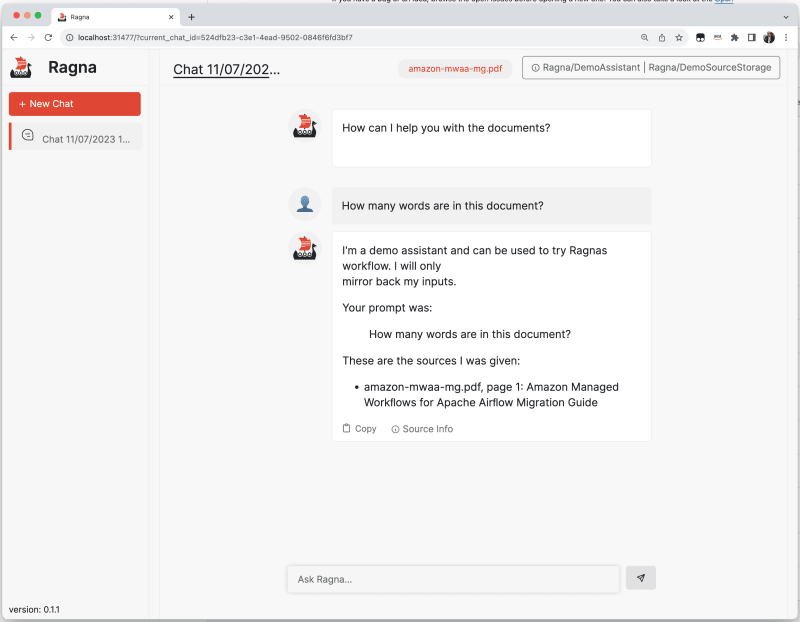
I configure the DemoSourStorage and then upload a local pdf I have (one about Apache Airflow) and I can then start to try and use the tool to interact with this document. As I have not actually configured a foundational model, this just gives me back dummy information. I like how this is presented, with a link to the source , and information about the model used (at the top).
Lets quit (^C from the running process) from this and now hook in a real model.
Configuring this with OpenAI
From the terminal I first export my OPENAI key
export OPENAI_API_KEY="sk-7mixxxxxxxxxxxxxxxx"
I now check out the ragna.toml configuration file that was created by the "ragna init" command, as I need to update this to include the OpenAI assistant.
I update it using info from the docs here
[core]
queue_url = "memory"
document = "ragna.core.LocalDocument"
source_storages = ["ragna.source_storages.Chroma", "ragna.source_storages.RagnaDemoSourceStorage", "ragna.source_storages.LanceDB"]
assistants = ["ragna.assistants.Gpt4"]
After saving the file, I re-run ragna in UI mode and try again. When I now start a new chat, I can see that OpenAI/gpt4 is my new default assistant.
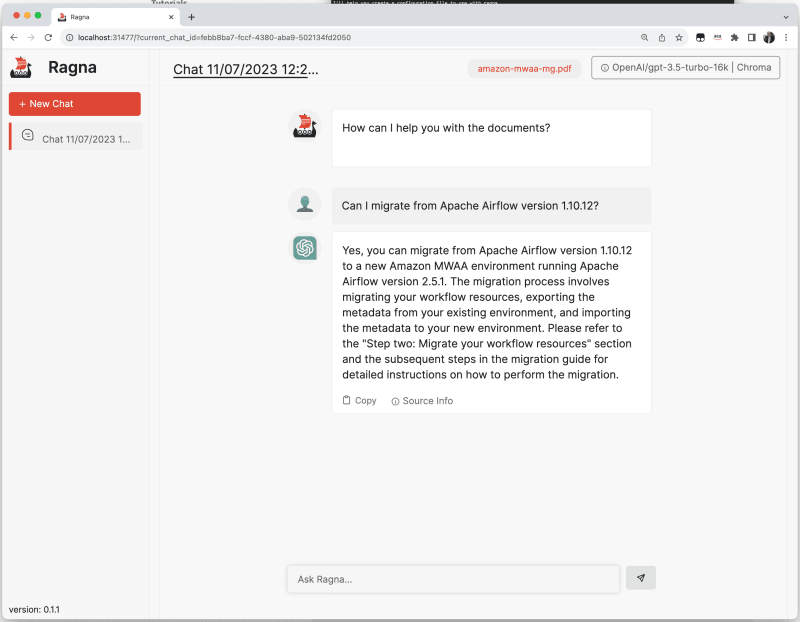
After uploading the same document, I can now being interacting with it.
After asking it some basic questions, I am not getting very far and it is not working as expected.
There are no errors, so wondering what might be the issue here. I suspect it is probably the defaults I used when initialising Ragna. I can reconfigure by re-running "ragna init".
Hint! When you are using the ragna init command, you can use the up and down arrows to choose, and then the space bar to select. You will notice that when you press the space bar, the option becomes highlighted/selected.
? Which of the following statements describes best what you want to do? I have used Ragna before and want to customize the most common parameters.

ragna has the following components builtin. Select the ones that you want to use. If the requirements of a selected component are not met, I'll show you instructions how to meet them later.

? Which source storages do you want to use? done (3 selections)

? Which assistants do you want to use? done (3 selections)

? Where should local files be stored? /Users/ricsue/.cache/ragna

? Ragna internally uses a task queue to perform the RAG workflow. What kind of queue do you want to use? file system: The local file system is used to build the queue. Starting a ragna worker is required. Requir
es the worker to be run on the same machine as the main thread.

? Where do you want to store the queue files? /Users/ricsue/.cache/ragna/queue

? At what URL do you want the ragna REST API to be served? http://127.0.0.1:31476

? Do you want to use a SQL database to persist the chats between runs? Yes

? What is the URL of the database? sqlite:////Users/ricsue/.cache/ragna/ragna.db

? At what URL do you want the ragna web UI to be served? http://127.0.0.1:31477

The output path /Users/ricsue/Projects/GenAI/oss-ragna/ragna/ragna.toml already exists and you didn't pass the --force flag to overwrite it.

? What do you want to do? Overwrite the existing file.

And with that we are done 🎉 I'm writing the configuration file to /Users/ricsue/Projects/GenAI/oss-ragna/ragna/ragna.toml.
This time I was asked a lot more questions, after selecting " I have used Ragna before and want to customize the most common parameters." from the first question. When I restart the UI and begin a new chat, I can see I have some more options.
When I upload the document it takes a lot longer this time to process it. I can see in the logs it is doing some more stuff
INFO:     127.0.0.1:50231 - "OPTIONS /document?name=amazon-mwaa-mg.pdf HTTP/1.1" 200 OK
INFO:     127.0.0.1:50231 - "GET /document?name=amazon-mwaa-mg.pdf HTTP/1.1" 200 OK
INFO:     127.0.0.1:50231 - "POST /document HTTP/1.1" 200 OK
INFO:     127.0.0.1:50232 - "POST /chats HTTP/1.1" 200 OK
INFO:huey:Executing ragna.core._queue._Task: 713407ab-d3f0-4df1-84a1-e4c3bf14c6e8
/Users/ricsue/.cache/chroma/onnx_models/all-MiniLM-L6-v2/onnx.tar.gz: 100%|██████████████████████████████████████████████████████████████████████████████████████████████████| 79.3M/79.3M [00:27<00:00, 3.02MiB/s]
INFO:huey:ragna.core._queue._Task: 713407ab-d3f0-4df1-84a1-e4c3bf14c6e8 executed in 30.799s
INFO:     127.0.0.1:50232 - "POST /chats/febb8ba7-fccf-4380-aba9-502134fd2050/prepare HTTP/1.1" 200 OK
INFO:     127.0.0.1:50232 - "GET /chats HTTP/1.1" 200 OK
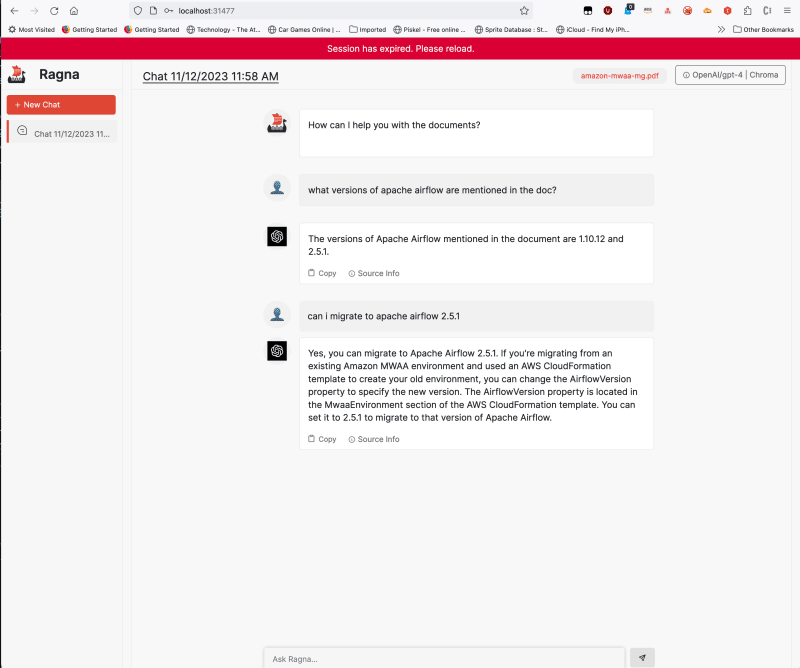
And now we are in business. Now it is working great.
Info Ragna writes stuff to ~/.cache/ragna, and I found it useful to purge this folder every now and then to reset my set up.
AWS Cloud9 installation
As regular readers of this blog will know, I am a big fan of using AWS Cloud9 to make it super easy to try out new projects like this. I wanted to make sure that I could get the same experience when running on my environment.
After creating a fresh Cloud9 instance (running Ubuntu 22.04 LTS), I was ready to go.
Note! I also increased my disk space using this to 30GB
I setup a new virtual environment, clone the project, and then install all the dependencies. This time however, I am going to use Conda to set up the virtual environment. First we have to install Conda, which we can do easily by using the code provided from the Miniconda webpage here
mkdir -p ~/miniconda3
wget https://repo.anaconda.com/miniconda/Miniconda3-latest-Linux-x86_64.sh -O ~/miniconda3/miniconda.sh
bash ~/miniconda3/miniconda.sh -b -u -p ~/miniconda3
rm -rf ~/miniconda3/miniconda.sh
~/miniconda3/bin/conda init bash
We can now set up our Ragna environment, by first checking out the source code and then creating a new environment for running Ragna using Conda. Remember, make sure you have started a new shell, otherwise conda will not be available
git clone https://github.com/Quansight/ragna.git
cd ragna
conda env create --file environment-dev.yml
conda activate ragna-dev
pip install chromadb
pip install 'ragna[all]'
cd ragna
Now we cam set up Ragna as we did for our local setup.
After running "ragna init" and answering the configuration choices, the tool generates our configuration file (called ragna.toml) which we can look at:
Configuration Choices - After running ragna init, I selected "I have used Ragna before and want to customize the most common parameters." as the first option. "Chroma" for the next option. I selected both "OpenAI/gpt-4" and "OpenAI/gpt-3.5-turbo-16k" for the next. I leave the default for the next options "/home/ec2-user/.cache/ragna". I select "File system" for the next. I leave the default option for the next " /home/ec2-user/.cache/ragna/queue", as well as the subsequent option for REST API "http://127.0.0.1:31476". I select Y to using SQL to persist chats, and then use the default URL for the database "sqlite:////home/ec2-user/.cache/ragna/ragna.db". For the final option, you should accept the default port number.
local_cache_root = "/home/ec2-user/.cache/ragna"

[core]
queue_url = "/home/ec2-user/.cache/ragna/queue"
document = "ragna.core.LocalDocument"
source_storages = ["ragna.source_storages.Chroma", "ragna.source_storages.RagnaDemoSourceStorage", "ragna.source_storages.LanceDB"]
assistants = ["ragna.assistants.RagnaDemoAssistant", "ragna.assistants.Gpt4", "ragna.assistants.Gpt35Turbo16k"]

[api]
url = "http://127.0.0.1:31476"
origins = ["http://127.0.0.1:31477"]
database_url = "sqlite:////home/ec2-user/.cache/ragna/ragna.db"
authentication = "ragna.core.RagnaDemoAuthentication"

[ui]
url = "http://127.0.0.1: 31477"
origins = ["http://127.0.0.1:31477"]
Checking the configuration
Ragna provides some nice cli tools to help you work with it. One of the tools is "ragna check" which allows you to validate a given Ragna configuration file (ragna.toml) to make sure it is going to work. If we run this now we get the following:
                               source storages
┏━━━━┳━━━━━━━━━━━━━━━━━━━━━━━━━┳━━━━━━━━━━━━━━━━━━━━━━━┳━━━━━━━━━━━━━━━━━━━━━┓
┃    ┃ name                    ┃ environment variables ┃ packages            ┃
┡━━━━╇━━━━━━━━━━━━━━━━━━━━━━━━━╇━━━━━━━━━━━━━━━━━━━━━━━╇━━━━━━━━━━━━━━━━━━━━━┩
│ ✅ │ Chroma                  │                       │ ✅ chromadb>=0.4.13 │
│    │                         │                       │ ✅ tiktoken         │
├────┼─────────────────────────┼───────────────────────┼─────────────────────┤
│ ✅ │ Ragna/DemoSourceStorage │                       │                     │
├────┼─────────────────────────┼───────────────────────┼─────────────────────┤
│ ✅ │ LanceDB                 │                       │ ✅ chromadb>=0.4.13 │
│    │                         │                       │ ✅ tiktoken         │
│    │                         │                       │ ✅ lancedb>=0.2     │
│    │                         │                       │ ✅ pyarrow          │
└────┴─────────────────────────┴───────────────────────┴─────────────────────┘
                             assistants
┏━━━━┳━━━━━━━━━━━━━━━━━━━━━━━━━━┳━━━━━━━━━━━━━━━━━━━━━━━┳━━━━━━━━━━┓
┃    ┃ name                     ┃ environment variables ┃ packages ┃
┡━━━━╇━━━━━━━━━━━━━━━━━━━━━━━━━━╇━━━━━━━━━━━━━━━━━━━━━━━╇━━━━━━━━━━┩
│ ❌ │ OpenAI/gpt-4             │ ❌ OPENAI_API_KEY     │          │
├────┼──────────────────────────┼───────────────────────┼──────────┤
│ ❌ │ OpenAI/gpt-3.5-turbo-16k │ ❌ OPENAI_API_KEY     │          │
└────┴──────────────────────────┴───────────────────────┴──────────┘
So it looks ok, except we have not yet configured our OpenAI key. We can quickly fix that now
export OPENAI_API_KEY="sk-7mxxxxxxxxxxx"
and when we re-run the tool
                             assistants
┏━━━━┳━━━━━━━━━━━━━━━━━━━━━━━━━━┳━━━━━━━━━━━━━━━━━━━━━━━┳━━━━━━━━━━┓
┃    ┃ name                     ┃ environment variables ┃ packages ┃
┡━━━━╇━━━━━━━━━━━━━━━━━━━━━━━━━━╇━━━━━━━━━━━━━━━━━━━━━━━╇━━━━━━━━━━┩
│ ✅ │ OpenAI/gpt-4             │ ✅ OPENAI_API_KEY     │          │
├────┼──────────────────────────┼───────────────────────┼──────────┤
│ ✅ │ OpenAI/gpt-3.5-turbo-16k │ ✅ OPENAI_API_KEY     │          │
└────┴──────────────────────────┴───────────────────────┴──────────┘
We can now see this looks ok.
Launching the Ragna UI on AWS Cloud9
In order to access the Ragna UI via a browser, we are going to first need to set up an ssh tunnel from your local developer machine (mine is my Macbook), to the AWS Cloud 9 instance. The steps involved are:
- set up ssh keys for our AWS Cloud 9 instance
- open up ssh access to our AWS Cloud 9 instance via the Inbound Security groups
- grab private IP and public DNS information for our ssh tunnel
- setup networking dependencies for the Ragna UI
- create our ssh tunnel
Seems like a lot, but it is all pretty straight forward.
Adding an ssh key to an existing AWS Cloud9 instance
If you used the default options when creating your Cloud9 instance, you will not have an AWS keypair to connect to your Cloud9 instance. (You can ignore the next section if you already have an ssh key you can use for tunnelling)
In order to use ssh tunnelling, you need to set up an ssh key on the instance that powers the AWS Cloud9 instance. To do this I used an existing keypair I had for the AWS region, and then generated a public key using the following command:
ssh-keygen -y -f {private-keypair.pem} > {public-key.pem}
This creates a copy of the public key, which I then connected to the EC2 instance running my Cloud9 instance, and then updated the "~/.ssh/authorized_keys" file, adding the key. This allowed me to now ssh to this instance using the private key.
Note! You will nned to open ssh via the Security groups, so don't forget to do that. Make sure you narrow the scope to only your IP address. You do not want to open it up to the world. If you do not do this, then when you try and initiate your ssh tunnel, it will just "hang" and eventually time out.
Setting up the local ssh tunnel
Now that I have my ssh key, the next thing I need to do is set up the tunnel on a local terminal session (on the machine you are running, not the browser based Cloud9).
First we need to grab both the private IPv4 address of the Cloud 9 instance, as well as the public IpV4 DNS name. The easiest way to do this is to use a tool called "ec2-metadata" which is available in a package we can easily install with the following command:
sudo apt install amazon-ec2-utils
To get the private IpV4 address we run the following command using the ec2-metadata tool:
ec2-metadata -o

local-ipv4: 172.31.11.101
Note! An alternative way is to get this information if you do not want to installed this package is to run some commands. The first thing we need to do is grab the instance-id, which we will use in subsequent commands. You can access the local instance meta data this way:
wget -q -O - http://169.254.169.254/latest/meta-data/instance-id
i-091a2adc81a4e3391
You can now use that with the following command to get the private IpV4 address
aws --region eu-west-3 \
ec2 describe-instances \
--filters \
"Name=instance-state-name,Values=running" \
"Name=instance-id,Values=i-091a2adc81a4e3391" \
--query 'Reservations[*].Instances[*].[PrivateIpAddress]' \
--output text

172.31.11.101
``
We now need to set up a local network alias on our Cloud 9 instance, which we will configure Ragna to use when listening for API requests. From a terminal window on the Cloud 9 instance, add the follow entry into your local hosts, replacing the IP address with the private IP you got from the output of the previous step:
172.31.11.101 api
Why? Why are we doing this? We are doing this to avoid getting CORS errors when accessing the Chat UI from our local machine.
The next step is to grab the Public IPv4 DNS name of our Cloud 9 instance. If you installed the ec2-utils package, then you can run the following command:
ec2-metadata -p

public-hostname: ec2-13-36-178-111.eu-west-3.compute.amazonaws.com
You now have everything you need: the private v4Ip address for your Cloud 9 instance, and the public v4Ip DNS name for your instance. We are good to go to setup our local SSH tunnel.
Note! If you did not install the ec2-metadata tool, use this command to get the Public IpV4 DNS name, grabbing the instance id from previous steps.
aws ec2 describe-instances --instance-ids i-091a2adc81a4e3391 --query 'Reservations[].Instances[].PublicDnsName'
To do that, you can run the following command, ensuring that you use your ssh key that you used to configure ssh access to your instance, and replacing the value with the IpV4 DNS name of our Cloud 9 instance :
ssh -i paris-ec2.pem -Ng -L 0.0.0.0:31476:ec2-13-36-178-111.eu-west-3.compute.amazonaws.com:31476 -L 0.0.0.0:31477:ec2-13-36-178-111.eu-west-3.compute.amazonaws.com:31477 ubuntu@ec2-13-36-178-111.eu-west-3.compute.amazonaws.com -v
Note! If you do not use the DNS name of your Cloud9 instance, and say use the IP address, you will likely find that your ssh tunnel does not work.
There is one final step before you can test. On your local machine, add the following into your local /etc/hosts
127.0.0.1 api
This will send all requests to http://api via the ssh tunnel.
Testing the Ragna UI
There are a couple of things we need to do before we can access Ragna from our browser.
The first is we need to update the Ragna configuration file, ragna.toml, with details of the api url. We change the configuration file from the default:
[api]
url = "http://127.0.0.1:31476"
origins = ["http://127.0.0.1:31477"]
database_url = "sqlite:////home/ubuntu/.cache/ragna/ragna.db"
authentication = "ragna.core.RagnaDemoAuthentication"
to the following:
[api]
url = "http://api:31476"
origins = ["http://127.0.0.1:31477"]
database_url = "sqlite:////home/ubuntu/.cache/ragna/ragna.db"
authentication = "ragna.core.RagnaDemoAuthentication"
We also have to change the ui url and origins too, from the default:
[ui]
url = "http://127.0.0.1:31477"
origins = ["http://127.0.0.1:31477"]
to the following, using the Cloud 9 v4Ip private address from the previous steps.
[ui]
url = "http://172.31.11.101:31477"
origins = ["http://172.31.11.101:31477", "http://127.0.0.1:31477"]
Now that we have updated, that, we can start Ragna by running the following command:
ragna ui
Which should now start showing the following info:
INFO:   RagnaDemoAuthentication: You can log in with any username and a matching password.
INFO:     Started server process [6582]
INFO:     Waiting for application startup.
INFO:     Application startup complete.
INFO:     Uvicorn running on http://api:31476 (Press CTRL+C to quit)
INFO:     172.31.11.101:58216 - "GET / HTTP/1.1" 200 OK
Launching server at http://localhost:31477
INFO:huey.consumer:Huey consumer started with 1 thread, PID 6590 at 2023-11-12 12:36:02.478338
From a browser, you can now open the Ragna UI by accessing "http://localhost:31477", and we can repeat the steps above and log in, upload a document, and then start interacting with it using OpenAI.
As you use it, you will see output appear in the logs. After playing with it and checking out its capabilities, shut it down by going to the Cloud 9 terminal where you ran the "ragna ui" command, and hit CTRL and C (^C) to break the running process.
Configuring this with Amazon Bedrock
I have started using Amazon Bedrock, so how can we use that with Ragna? As this is open source, we can take a look at the documentation and code, and see if we can build a new assistant. Specifically I want to add Anthropic Claude v1 and v2 as options so I can use these within the API and Chat UI. Lets see how we can do this.
The project does outline in the contribution guide how to get started with local development, so we can start there. When we complete the steps, we check the version we are running.
Note!! A quick note before proceeding. In my AWS account I had been using Amazon Bedrock's foundational models already, but by default these are not all enabled and available. I had to specifically enable Anthropic Claude v1 and v2 models in my eu-central-1 AWS region, so make sure you do this otherwise when you go to make the API calls, they will fail.
I am going to set up a new Python environment to do this, following the instructions from the guide.
git clone https://github.com/Quansight/ragna bedrock-ragna
cd bedrock-ragna
I make one small change, and edit the name of the virtual python environment in the environment-dev.yml file (changing the "name: ragna-dev" to "name: bedrock-ragna-dev", and run this to install everything I need.
conda env create --file environment-dev.yml
conda activate bedrock-ragna-dev
pip install --editable '.[all]'
..
<takes about 5-10 mins to build/install>
..
When can now check we are running the local version by running this command:
ragna --version
ragna 0.1.2.dev1+g6209845 from /home/ubuntu/environment/bedrock-ragna/ragna
This looks good, we are now ready to see how to get Amazon Bedrock's foundation models integrated.
As Amazon Bedrock is new, we need to make sure that we are using the latest version of the boto3 library. At the time of writing, the version I was using is 1.28.79, so if you have anything later than this, you should be good to go.
From a quick look at the code, it looks like I need to make two changes, both in the assistants directory.
├── _api
├── _cli
├── _ui
│   ├── components
│   ├── imgs
│   └── resources
├── assistants
│   ├── __init__.py
│   ├── _anthropic.py
│   ├── _api.py
│   ├── _demo.py
│   ├── _mosaicml.py
│   └── _openai.py
├── core
└── source_storages
The first is to create a new assistant in the assistant directory. I created a new file called "_bedrock.py" and then added this code:
from typing import cast
import boto3
import json
import os
from ragna.core import RagnaException, Source

from ._api import ApiAssistant


class AmazonBedrockAssistant(ApiAssistant):
    _API_KEY_ENV_VAR = "BEDROCK_AWS_REGION"
    _MODEL: str
    _CONTEXT_SIZE: int

    @classmethod
    def display_name(cls) -> str:
        return f"AmazonBedRock/{cls._MODEL}"

    @property
    def max_input_size(self) -> int:
        return self._CONTEXT_SIZE

    def _instructize_prompt(self, prompt: str, sources: list[Source]) -> str:
        instruction = (
            "\n\nHuman: "
            "Use the following pieces of context to answer the question at the end. "
            "If you don't know the answer, just say so. Don't try to make up an answer.\n"
        )

        instruction += "\n\n".join(source.content for source in sources)
        return f"{instruction}\n\nQuestion: {prompt}\n\nAssistant:"

    def _call_api(
        self, prompt: str, sources: list[Source], *, max_new_tokens: int
    ) -> str:
        # Make sure you set your AWS credentials as evnironment variables. Alternatively you can modify this section
        # and adjust to how you call AWS services
        bedrock = boto3.client(
            service_name='bedrock-runtime',
            region_name=os.environ["BEDROCK_AWS_REGION"]
            )
        # See https://docs.aws.amazon.com/bedrock/latest/APIReference/API_runtime_InvokeModel.html
        prompt_config = {
            "prompt": self._instructize_prompt(prompt, sources),
            "max_tokens_to_sample": max_new_tokens,
            "temperature": 0.0
            }

        try:
            response = bedrock.invoke_model(
            body=json.dumps(prompt_config),
            modelId=f"anthropic.{self._MODEL}"
            )

            response_body = json.loads(response.get("body").read())

            return cast(str, response_body.get("completion"))
        except Exception as e:
            raise ValueError(f"Error raised by inference endpoint: {e}")


class AmazonBedRockClaude(AmazonBedrockAssistant):
    """[Amazon Bedrock Claud v2](https://docs.aws.amazon.com/bedrock/latest/userguide/what-is-bedrock.html#models-supported)

    !!! info "AWS credentials required. Please set AWS_ACCESS_KEY_ID, AWS_SECRET_ACCESS_KEY, and AWS_REGION environment variables"


    """

    _MODEL = "claude-v2"
    _CONTEXT_SIZE = 100_000

class AmazonBedRockClaudev1(AmazonBedrockAssistant):
    """[Amazon Bedrock Claud v1](https://docs.aws.amazon.com/bedrock/latest/userguide/what-is-bedrock.html#models-supported)

    !!! info "AWS credentials required. Please set AWS_ACCESS_KEY_ID and AWS_SECRET_ACCESS_KEY, and AWS_REGION environment variables"


    """

    _MODEL = "claude-instant-v1"
    _CONTEXT_SIZE = 100_000
Now that we have our assistant, the next job is to update the "init.py" which provides Ragna details of the available assistants.
__all__ = [
    "Claude",
    "ClaudeInstant",
    "Gpt35Turbo16k",
    "Gpt4",
    "Mpt7bInstruct",
    "Mpt30bInstruct",
    "RagnaDemoAssistant",
    "AmazonBedRockClaude",
    "AmazonBedRockClaudev1"
]

from ._anthropic import Claude, ClaudeInstant
from ._demo import RagnaDemoAssistant
from ._mosaicml import Mpt7bInstruct, Mpt30bInstruct
from ._openai import Gpt4, Gpt35Turbo16k
from ._bedrock import AmazonBedRockClaude, AmazonBedRockClaudev1


# isort: split

from ragna._utils import fix_module

fix_module(globals())
del fix_module
That should be it. Lets give it a go.
First we need to configure Ragna using the "ragna init" command. We will choose similar options as to before, the key difference this time is that we should now hopefully see Amazon Bedrock appear as an option.
? Which of the following statements describes best what you want to do? (Use arrow keys)
   I want to try Ragna without worrying about any additional dependencies or setup.
   I want to try Ragna and its builtin source storages and assistants, which potentially require additional dependencies or setup.
 » I have used Ragna before and want to customize the most common parameters.

? Which source storages do you want to use? (Use arrow keys to move, <space> to select, <a> to toggle, <i> to invert)
 » ● Chroma
   ● Ragna/DemoSourceStorage
   ● LanceDB

? Which assistants do you want to use? (Use arrow keys to move, <space> to select, <a> to toggle, <i> to invert)
   ○ Anthropic/claude-2
   ○ Anthropic/claude-instant-1
   ○ Ragna/DemoAssistant
   ○ MosaicML/mpt-7b-instruct
   ○ MosaicML/mpt-30b-instruct
   ○ OpenAI/gpt-4
   ○ OpenAI/gpt-3.5-turbo-16k
   ● AmazonBedrock/claude-v2
 » ● AmazonBedrock/claude-instant-v1
We can see that our new providers (assistants) are there. I deselected the others so that only the two Amazon Bedrock providers are listed.
You have selected components, which have additional requirements that arecurrently not met.

To use the selected components, you need to set the following environment variables:

- BEDROCK_AWS_REGION

Tip: You can check the availability of the requirements with ragna check.

? Where should local files be stored? /home/ubuntu/.cache/ragna
Don't worry about this, we will set this before we run Ragna. Accept the default value for this.
? Ragna internally uses a task queue to perform the RAG workflow. What kind of queue do you want to use? (Use arrow keys)
   memory: Everything runs sequentially on the main thread as if there were no task queue.
 » file system: The local file system is used to build the queue. Starting a ragna worker is required. Requires the worker to be run on the same machine as the main thread.
   redis: Redis is used as queue. Starting a ragna worker is required.

? Where do you want to store the queue files? /home/ubuntu/.cache/ragna/queue

? At what URL do you want the ragna REST API to be served? http://127.0.0.1:31476

? Do you want to use a SQL database to persist the chats between runs? Yes

? What is the URL of the database? sqlite:////home/ubuntu/.cache/ragna/ragna.db

? At what URL do you want the ragna web UI to be served? http://127.0.0.1:31477

And with that we are done 🎉 I'm writing the configuration file to /home/ubuntu/environment/bedrock-ragna/ragna/ragna.toml.
Ok, so we now have our configuration file, which we can check by opening up "ragna.toml"
local_cache_root = "/home/ubuntu/.cache/ragna"

[core]
queue_url = "/home/ubuntu/.cache/ragna/queue"
document = "ragna.core.LocalDocument"
source_storages = ["ragna.source_storages.Chroma", "ragna.source_storages.RagnaDemoSourceStorage", "ragna.source_storages.LanceDB"]
assistants = ["ragna.assistants.AmazonBedRockClaude", "ragna.assistants.AmazonBedRockClaudev1"]

[api]
url = "http://127.0.0.1:31476"
origins = ["http://127.0.0.1:31477"]
database_url = "sqlite:////home/ubuntu/.cache/ragna/ragna.db"
authentication = "ragna.core.RagnaDemoAuthentication"

[ui]
url = "http://127.0.0.1:31477"
origins = ["http://127.0.0.1:31477"]
We are going to make a few changes so that we can access this via our browser, specifically the api and ui changes, so that we end up with the following:
local_cache_root = "/home/ubuntu/.cache/ragna"

[core]
queue_url = "/home/ubuntu/.cache/ragna/queue"
document = "ragna.core.LocalDocument"
source_storages = ["ragna.source_storages.Chroma", "ragna.source_storages.RagnaDemoSourceStorage", "ragna.source_storages.LanceDB"]
assistants = ["ragna.assistants.AmazonBedRockClaude", "ragna.assistants.AmazonBedRockClaudev1"]

[api]
url = "http://api:31476"
origins = ["http://127.0.0.1:31477"]
database_url = "sqlite:////home/ubuntu/.cache/ragna/ragna.db"
authentication = "ragna.core.RagnaDemoAuthentication"

[ui]
url = "http://127.0.0.1:31477"
origins = ["http://127.0.0.1:31477"]
If we now do a "ragna check" we can see the following:
                               source storages
┏━━━━┳━━━━━━━━━━━━━━━━━━━━━━━━━┳━━━━━━━━━━━━━━━━━━━━━━━┳━━━━━━━━━━━━━━━━━━━━━┓
┃    ┃ name                    ┃ environment variables ┃ packages            ┃
┡━━━━╇━━━━━━━━━━━━━━━━━━━━━━━━━╇━━━━━━━━━━━━━━━━━━━━━━━╇━━━━━━━━━━━━━━━━━━━━━┩
│ ✅ │ Chroma                  │                       │ ✅ chromadb>=0.4.13 │
│    │                         │                       │ ✅ tiktoken         │
├────┼─────────────────────────┼───────────────────────┼─────────────────────┤
│ ✅ │ Ragna/DemoSourceStorage │                       │                     │
├────┼─────────────────────────┼───────────────────────┼─────────────────────┤
│ ✅ │ LanceDB                 │                       │ ✅ chromadb>=0.4.13 │
│    │                         │                       │ ✅ tiktoken         │
│    │                         │                       │ ✅ lancedb>=0.2     │
│    │                         │                       │ ✅ pyarrow          │
└────┴─────────────────────────┴───────────────────────┴─────────────────────┘
                                assistants
┏━━━━┳━━━━━━━━━━━━━━━━━━━━━━━━━━━━━━━━━┳━━━━━━━━━━━━━━━━━━━━━━━┳━━━━━━━━━━┓
┃    ┃ name                            ┃ environment variables ┃ packages ┃
┡━━━━╇━━━━━━━━━━━━━━━━━━━━━━━━━━━━━━━━━╇━━━━━━━━━━━━━━━━━━━━━━━╇━━━━━━━━━━┩
│ ❌ │ AmazonBedRock/claude-v2         │ ❌ BEDROC_AWS_REGION         │          │
├────┼─────────────────────────────────┼───────────────────────┼──────────┤
│ ❌ │ AmazonBedRock/claude-instant-v1 │ ❌ BEDROCK_AWS_REGION         │          │
└────┴─────────────────────────────────┴───────────────────────┴──────────┘
Lets fix this by setting the region of the Amazon Bedrock API we want to access. As I am the UK, I will use Frankfurt, eu-central-1.
export BEDROCK_AWS_REGION=eu-central-1
And now when I run "ragna check" I get the following:
                               source storages
┏━━━━┳━━━━━━━━━━━━━━━━━━━━━━━━━┳━━━━━━━━━━━━━━━━━━━━━━━┳━━━━━━━━━━━━━━━━━━━━━┓
┃    ┃ name                    ┃ environment variables ┃ packages            ┃
┡━━━━╇━━━━━━━━━━━━━━━━━━━━━━━━━╇━━━━━━━━━━━━━━━━━━━━━━━╇━━━━━━━━━━━━━━━━━━━━━┩
│ ✅ │ Chroma                  │                       │ ✅ chromadb>=0.4.13 │
│    │                         │                       │ ✅ tiktoken         │
├────┼─────────────────────────┼───────────────────────┼─────────────────────┤
│ ✅ │ Ragna/DemoSourceStorage │                       │                     │
├────┼─────────────────────────┼───────────────────────┼─────────────────────┤
│ ✅ │ LanceDB                 │                       │ ✅ chromadb>=0.4.13 │
│    │                         │                       │ ✅ tiktoken         │
│    │                         │                       │ ✅ lancedb>=0.2     │
│    │                         │                       │ ✅ pyarrow          │
└────┴─────────────────────────┴───────────────────────┴─────────────────────┘
                                assistants
┏━━━━┳━━━━━━━━━━━━━━━━━━━━━━━━━━━━━━━━━┳━━━━━━━━━━━━━━━━━━━━━━━┳━━━━━━━━━━┓
┃    ┃ name                            ┃ environment variables ┃ packages ┃
┡━━━━╇━━━━━━━━━━━━━━━━━━━━━━━━━━━━━━━━━╇━━━━━━━━━━━━━━━━━━━━━━━╇━━━━━━━━━━┩
│ ✅ │ AmazonBedRock/claude-v2         │ ✅ BEDROCK_AWS_REGION         │          │
├────┼─────────────────────────────────┼───────────────────────┼──────────┤
│ ✅ │ AmazonBedRock/claude-instant-v1 │ ✅ BEDROCK_AWS_REGION         │          │
└────┴─────────────────────────────────┴───────────────────────┴──────────┘
Side note I did raise an issue and then a PR which you can check out. It is probably worth checking back with the project once they have built a system that allows additional assistants to be plugged in.
We can now start Ragna
ragna ui
INFO:   RagnaDemoAuthentication: You can log in with any username and a matching password.
INFO:     Started server process [16252]
INFO:     Waiting for application startup.
INFO:     Application startup complete.
INFO:     Uvicorn running on http://api:31476 (Press CTRL+C to quit)
INFO:     172.31.11.109:39566 - "GET / HTTP/1.1" 200 OK
Launching server at http://localhost:31477
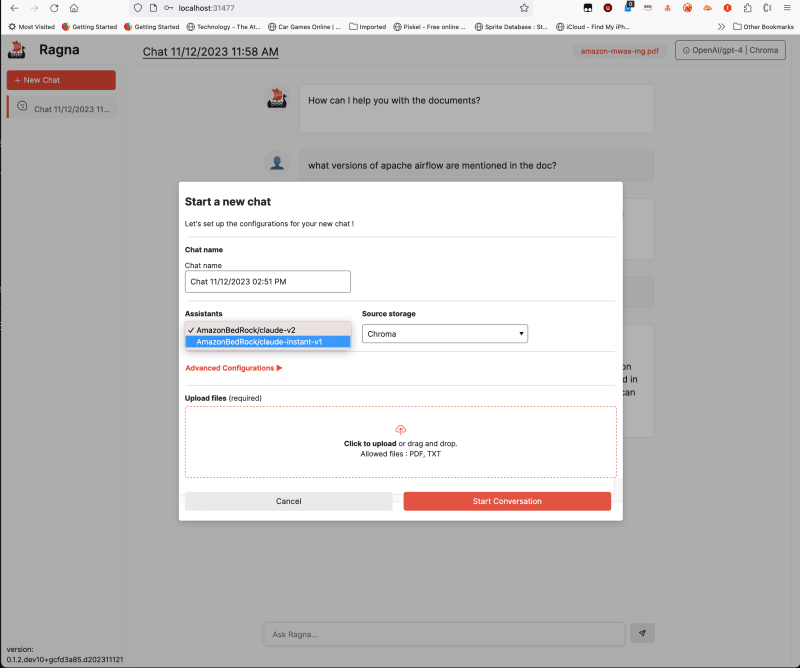
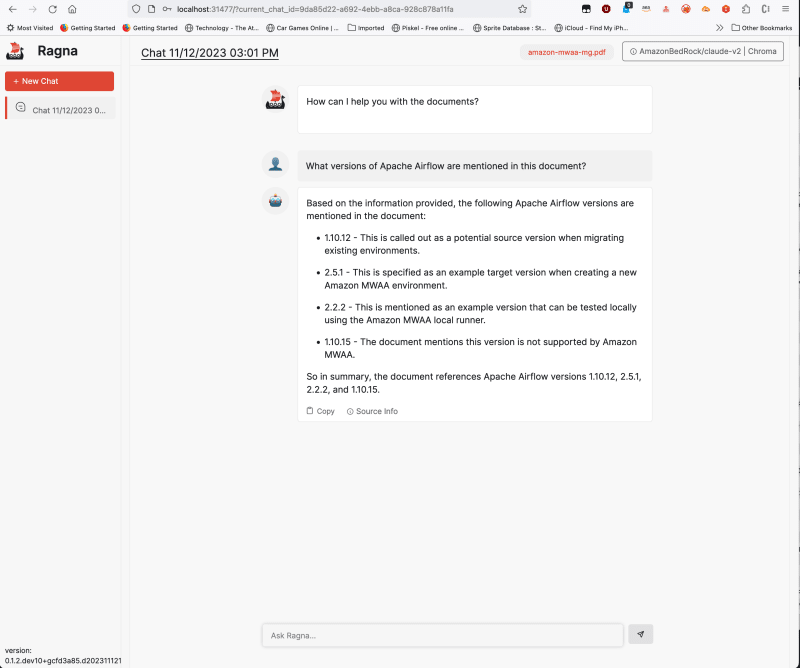
and then open up a browser and open up http://localhost:31477 (remembering to ensure our ssh tunnel is up and running). We can now add a new chat, and we see that we have Amazon Bedrock as an option which we will select.
Once the document has been uploaded, you can now interact with the document.
You can see information in your terminal that will look similar to the following.
INFO:     172.31.11.109:33096 - "GET /document?name=amazon-mwaa-mg.pdf HTTP/1.1" 200 OK
INFO:     172.31.11.109:33096 - "POST /document HTTP/1.1" 200 OK
INFO:     172.31.11.109:33100 - "POST /chats HTTP/1.1" 200 OK
INFO:huey:Executing ragna.core._queue._Task: f1f33e37-c54f-4cb8-bc3c-da0f46c95e60
INFO:huey:ragna.core._queue._Task: f1f33e37-c54f-4cb8-bc3c-da0f46c95e60 executed in 3.652s
INFO:     172.31.11.109:33100 - "POST /chats/9da85d22-a692-4ebb-a8ca-928c878a11fa/prepare HTTP/1.1" 200 OK
INFO:     172.31.11.109:33100 - "GET /chats HTTP/1.1" 200 OK
INFO:huey:Executing ragna.core._queue._Task: 6f6cdb8f-ca93-4367-be21-89eb708779d1
INFO:huey:ragna.core._queue._Task: 6f6cdb8f-ca93-4367-be21-89eb708779d1 executed in 0.098s
INFO:huey:Executing ragna.core._queue._Task: 5b071f0e-f078-4d12-bf5b-f4f116dcdd02 2 retries
INFO:botocore.credentials:Found credentials in shared credentials file: ~/.aws/credentials
INFO:huey:ragna.core._queue._Task: 5b071f0e-f078-4d12-bf5b-f4f116dcdd02 2 retries executed in 8.216s
INFO:     172.31.11.109:52654 - "POST /chats/9da85d22-a692-4ebb-a8ca-928c878a11fa/answer?prompt=What%20versions%20of%20Apache%20Airflow%20are%20mentioned%20in%20this%20document%3F HTTP/1.1" 200 OK
Congratulations, you have now configured Ragna to use the Claudev2 large language model within Ragna. You can try with Claudev1 models if you want, and try different documents and queries.
Conclusion
In this blog post we introduced a new open source RAG orchestration framework called Ragna, and showed you how you can get this up and running on your local machine, or up on AWS running in an AWS Cloud 9 developer environment. We then looked at adding a new large language model, integrating Amazon Bedrock's Anthropic Claude v1 and v2 models.
Ragna is still in active development, so if you like what you saw in this post, why not head over to the project and give it some love. I would love to hear from any of you who try this out, let me know what you think.
That is all folks, but I will be back with more open source generative AI content soon. If you have an open source project in this space, let me know, as I always on the hunt for new projects to check out and get up and running on AWS.
Before you leave, I would appreciate if you could provide me some feedback on what you thought of this post.
I will leave you with some of the issues and errors I encountered along the way, these might help some of you if you run into the same issues.
Handling errors
I ran into a few errors whilst I was playing around with getting familiar with Ragna and integrating Amazon Bedorck's foundation models. I thought I would share these here in case they help folk out.
Dangling thread
When I was playing with the Ragna API, I ran into a problem whereby when I was using Jupyter to interact with the API, and then tried to restart the Ragna UI, I could not. It would start ok, and there were no errors generated, but the Ragna UI would not work. I could log in but then nothing.
I initially cleared out the existing temporary data (removing everything in ~/.cache/ragna) and then restarting. At this point, I could then no longer log in, with sqlite errors appear. Looking back in the ~/.cache/ragna directory I could see that the data files were not being created.
After messing about, I realised that there was still an open thread holding open a port, which was causing the Ragna ui to fail to start cleanly. Running this command
lsof -nP -iTCP -sTCP:LISTEN | grep 31476
Allowed me to identify and then kill the offending thread. Once I did this, Ragna restarted as expected.
Chromadb and sqlite3
When using Ragna you need to install the Python library, chromadb ("pip install chromadb>=0.4.13") which appears to install. However, when you go to use it, you get the following error:
Traceback (most recent call last):
  File "<stdin>", line 1, in <module>
  File "/home/ec2-user/environment/ragna/lib/python3.10/site-packages/chromadb/__init__.py", line 78, in <module>
    raise RuntimeError(
RuntimeError: Your system has an unsupported version of sqlite3. Chroma                     requires sqlite3 >= 3.35.0.
Please visit                     https://docs.trychroma.com/troubleshooting#sqlite to learn how                     to upgrade.
In order to get this working, I switched to using Conda to provide my virtual Python environment. I did try and follow the links provided, and lost many hours trying to get this working (without being too hacky and just disabling the check!). With Conda it just worked first time. I will come back to this when I have more time, to see if I can get a proper fix.
error: subprocess-exited-with-error
If you get this error, which I got a few times, it was down to a compatibility issue with newer versions of pip. When installing pydantic libraries, I got the following errors:
   error: subprocess-exited-with-error

 × Preparing metadata (pyproject.toml) did not run successfully.
  │ exit code: 1
 ╰─> [6 lines of output]
Running "pip install pip==21.3.1" resolved this issue. This might get fixed by the time you are reading it, but including this as a reference:
Hat tip to this StackOverflow answer




Top comments (1)
Amazing!! Also folks, I came across this post and thought it might be helpful for you all! Reranker Rag