
Introduction
In my first post on the CUDOS solution, I showed you how you can implement implement SSO access to CUDOS using AWS Single Sign-on service. Leveraging this capability you can enable users to sign in to QuickSight using their corporate credentials and avoid having to give them full access to the AWS console. Now that we've got our users setup via SSO, let's leverage these same user objects to enable additional functionality.
By default, when a user accesses your CUDOS dashboard, they will have the ability to see billing data for every account in your AWS organization. If you have a large environment with dozens or even hundreds of AWS accounts, this may be less than desirable. Users may have a hard time figuring out how to just see the data for accounts they are interested in, or as an admin you may have a desire to limit what data they can see.
In this article, I'm going to show you a method to limit what account data any given user can see in the CUDOS dashboard. Once implemented, the user will only be able to see billing data for the accounts that you have granted them access to.
The Solution
There are two primary components to this solution. The first is QuickSight Groups. QuickSight groups are just what you would expect, a feature that allows you to organize sets of users into groups that make it easier to manage access and security. When I first started working with QuickSight, groups were an absolute pain to manage. Originally they could not be managed via the AWS console...in fact they were not even visible in the console and could only be created, managed or listed using AWS CLI commands. Good news for you however is that as of March 2022 you can now manage QuickSight Groups in the QuickSight console.
The second component of our solution is something called row-level security (RLS). This is a feature of the Enterprise Edition of QuickSight that allows you to restrict access to a dataset using a set of dataset rules. Once implemented, dataset owners can still see all the data, but dataset readers will be restricted based on the criteria in your ruleset. Access to a dataset can be restricted by user/group based rules, tag-based rules, or both. Tag based rules are really targeted towards anonymous users if you are doing something like an embedded dashboard, so we will be focusing on user/group based rules for our architecture.
The diagram below outlines how the components outlined below come together for our solution.
- QuickSight users are placed into QuickSight Groups
- An input file is prepared in CSV format containing the dataset rules and stored in an S3 bucket
- The input file is imported into a QuickSight dataset
- The rules dataset is used to apply row-level security against the appropriate CUDOS datasets

Now that I've given you a high level overview of the solution, let's walk through the implementation in detail.
Implementation
Step 1 - Create QuickSight groups
The foundation for implementing your filtering is the creation of one or more QuickSight groups. These groups will be used later in our row-level security dataset to tell QuickSight how to filter data set views. You will need to create a QuickSight Group for each set of accounts that you want to group together.
To create a QuickSight group:
- Sign in to the AWS Console in the account where you are hosting QuickSight, navigate to the QuickSight service.
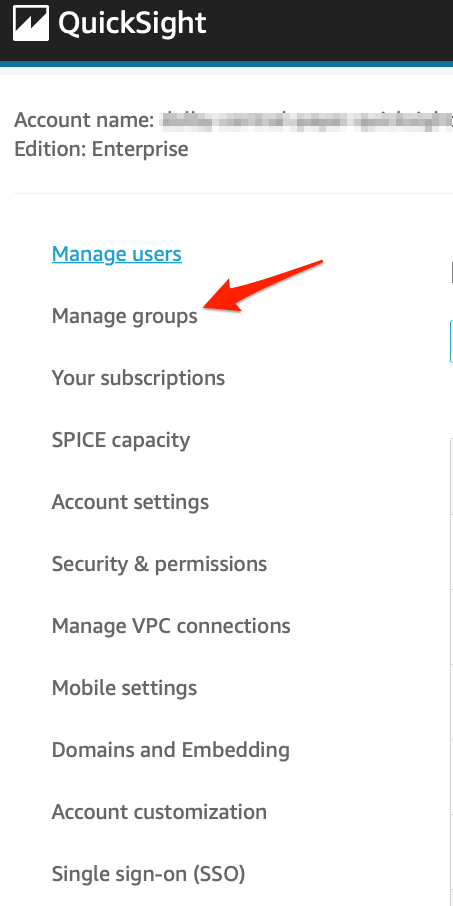
- On the QuickSight home page, click the menu in the upper right and select Manage QuickSight.
- On the QuickSight Management page, select Manage Groups from the left hand menu.
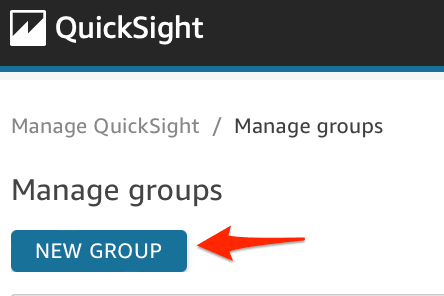
- On the Manage Groups page click the blue New Group button.
- On the Create a New Group screen, enter a Group name. Note the group name cannot contain any spaces or certain special characters. Optionally enter a group description and click the blue Create button.


6. After you create your new group, you will be take to the group membership page where you can now add QuickSight users to the group. Click the blue Add User button and add new users by user name or email address.
Repeat this process for each group that you need to create. My recommendation is to create groups for each logical grouping of accounts in your AWS Organization, could be by project team, business group, or whatever works best for you. Note also that a user can be a member of more than one QuickSight group, for example if you want to give them access to more than one set of accounts. In addition to team specific groups, I recommend creating a group called "FullAccess" for any QuickSight users that you want to be able to see all your AWS Accounts in the dataset. Once you've created your QuickSight Groups, it's time to setup your rules mapping file.
Step 2: Row Level Security Rules Input file
As documented in the QuickSight user guide, you can setup RLS with user-based rules by creating a query or a file that feeds the rules dataset. I'm not really a SQL guy, so I find the file based option to be simplest to setup and it makes it easy for me to change my ruleset as needed. I just edit the file and replace the version stored in the S3 bucket (more on this process later). To get started, create a new comma-separated value (CSV) file with two columns in it. Column A header should be "GroupName" and column B header should be "account_id".
Next, we will populate the GroupName column with the QuickSight Group names we created in step 1. In the account_id column, you will enter the AWS Account number you want that group to have access to, enclosed in double quotes. If you want to give a single QuickSight group access to more than one account, you will need to create a row for each account_id, all using the same GroupName. I was originally told by some folks at AWS that you could enter multiple account ids in a single column, separated by commas, but I could never get that to work and settled on this file format through trial and error. To grant your "FullAccess" group access to all data in the dataset, create a row with that group name and leave the account_id column empty. See the screenshot at right shows an example of what your file should look like.

<!-- /wp:column -->
Save your file, giving it a name like "cudos_dataset_rls.csv" or something similar. With our file created, we are now ready for the next step, creating the rules QuickSight dataset.
Step 3: Create a CUDOS RLS Rules Dataset
We need to create a new QuickSight Dataset to store our RLS rules so that we can then apply them against our CUDOS datasets. Since it is very likely we will want to make changes to these rules over time, we want to create a dataset that is looking at specific location in an S3 bucket rather than just uploading the file into a dataset. By using the S3 method, whenever we want to update our RLS rules, all we have to do is upload a new version of the file to S3.
In preparation for creating the S3 dataset, upload the CSV file you created in step 2 to a private S3 bucket in the AWS account where you are running QuickSight. This can be a new purpose-created S3 bucket or you can use an existing bucket, for example the bucket you use to store your QuickSight queries results. Then, we need to create an S3 manifest file that will tell QuickSight where our file is located in S3.
An S3 manifest is a JSON file that contains the S3 url of the file location. Create a new file called "CUDOS_manifest.json" and set it up like the example below, replacing "YOUR_BUCKET_NAME" and "YOURFILENAME" with the proper values for your file.
{
    "entries": [{
        "url": "s3://YOUR_BUCKET_NAME/YOURFILENAME.csv",
        "mandatory": true
    }]
}
You can store the manifest file in the same S3 bucket where you placed your CSV file. With the files in S3 prepared, you can follow this process to create the new dataset.

- Log in to the AWS Console in the account where you are running QuickSight, navigate to the QuickSight service.
- From the QuickSight home page, click Datasets on the left hand menu bar.
- On the Create Datasets screen, click S3.
- On the Datasets page, click the blue New dataset button.

5. For data source name enter "CUDOS_Dataset_rules" and enter the S3 URL of your manifest file in the "Upload a manifest file" field. Make sure the "URL" radio button is selected and click Connect

6. On the Finish dataset creation screen, click the Edit/Preview data button.
7. In the dataset preview screen, we need to verify the the account_ID field is a String datatype. If it appears as an Integer, change the data type for account_id to String. Follow the screenshots below for how to do this.

It is very important to make this change because it matches the same data type as the account_id field in all of the CUDOS datasets and prevents the loss of any leading or trailing zeros on an account_id. After you've finished changing the field type, click Save & publish in the upper right to save your dataset.
With our rules dataset prepared, we can move on to the last step, applying these rules against the CUDOS datasets.
Step 4: Apply Row Level Security to CUDOS datasets
On each of the datasets that the CUDOS dashboard is using, we will define row level security for the dataset by following these steps:

- In the QuickSight management console, choose Datasets from the left hand navigation menu.
- Click the dataset name, e.g. "cudos_summary_view"
- A dataset details window will pop open showing you more information about the dataset.
- Click the button bottom left labeled Row-level security

5. You will be taken to the Set up row-level security screen. Click the double-caret to expand the User-based rules section.
6. You will see that the selected dataset rules is currently set to None, and below you will see a list of all QuickSight datasets in your environment.
7. Click the radio button next to the CUDOS_dataset_rules dataset you created in Step 3 to select it.
8. Click the blue Apply dataset button to apply these rules against your dataset.

9. A confirmation window will open, confirming that the dataset rules will use the GroupName column to find matching rules. Click Apply and Activate.

10. You will be taken back to the row-level security screen, where you should now see your dataset listed under the Selected Dataset Rules.
To ensure the security filtering is consistent across all the CUDOS dashboard tabs, you will need to repeat these steps for all of the CUDOS related datasets. As of this writing, these are the CUDOS datasets that I applied the rules against:
- cudos_summary_view
- cudos_compute_savings_plan_eligible_spend
- cudos_s3_view
- cudos_ec2_running_cost
- cctd_view
- cudos_cur
Test!
Once you have completed applying the RLS ruleset against each of the CUDOS datasets, you should test to confirm that row-level security is working correctly. You can do this by logging into the QuickSight dashboard using a user that is a member of group that has limited access, and validate that the AWS Account IDs shown are only the ones specified in your rules dataset. You should also access the dashboard as a user who is a member of the FullAccess group and validate that all AWS Account IDs are still visible.
Updating RLS rules
Over time you may find that you wish to update your row-level security rules to reflect new AWS accounts or new QuickSight groups. The process to update your rules is simple:

- Update your CSV file with the new rules, adding new QuickSight groups or account_id values as needed.
- Upload the updated CSV file to your S3 bucket and replace the existing file.
- Navigate to the QuickSight management console
- Click on Datasets in the left hand menu.
- On the datasets screen, click your CUDOS_dataset_rules dataset.
- On the dataset summary screen, click the Refresh now button

7. A dialog box will open, click the blue Refresh button to complete the refresh of your dataset.

8. A "Warning" dialog will open, click Ok to confirm the dataset refresh. Afterwards you will get a Success dialog box confirming that the refresh has been queued. Click Ok.
QuickSight will automatically apply the new rules against your CUDOS dataset when the refresh has completed.
Conclusion
In this post, I've shown you a method to filter what data your QuickSight users can view in your CUDOS dashboard. Implementing this feature was incredibly useful in my environment where I have over 150 AWS accounts and I might only want a particular user to be able to view billing data for just a few accounts. It also makes it easier for your users since the data is pre-filtered for them and they don't have to manually filter out accounts they are not interested in.
I hope you've found this article useful, and please leave a comment if you have any questions or suggestions for improvement. Once again, I also have to give a big shout out to Aaron Edell, GTM for Customer Cloud Intelligence for AWS, who guided me on implementing the row-level security solution for QuickSight and answered the many questions I had.
References:
Amazon QuickSight User Guide - Creating and managing groups in Amazon QuickSight
Amazon QuickSight User Guide - Using row-level security (RLS) in Amazon QuickSight

Top comments (0)