The last database available in RDS that we will go over is the oldest commercial SQL-based database management system, Oracle. While originally strictly relational, Oracle is now considered a multi-model database management system, which means that it can support multiple data models, such as document, graph, relational, and key-value rather than simple supporting relational data like many of the systems we have been talking about up until now. It is also the database of choice for many different packaged software systems and is generally believed to have the largest RDBMS market share (based on revenue) – which means that it would not be surprising to be a .NET developer and yet be working with Oracle. And Amazon RDS makes it easy to do that in the cloud.
Oracle and .NET
Let’s first talk about using Oracle as a .NET developer. Since Oracle is a commercial database system, which is different from the rest of the systems we have talked about in this series, it has a lot of additional tools that are designed to help .NET developers interact with Oracle products. The first of these is the Oracle Developer Tools for Visual Studio.
Oracle Developer Tools for Visual Studio
There are a lot of .NET applications based upon Oracle, which means that it is to Oracle’s advantage to make that interaction as easy as possible. One of the ways that they did this was to create the Oracle Developer Tools for Visual Studio (ODT for VS). This tool runs within Visual Studio 2017 or 2019 (2022 was not supported at the time of this writing) and brings in features designed to provide insight and improve the developer experience. Examples of the features within this tool include:
- Database browsing - Use Server Explorer to browse your Oracle database schemas and to launch the appropriate designers and wizards to create and alter schema objects.
- Schema comparison – View differences between two different schemas and generate a script that can modify the target schema to match the source schema. You can do this by connecting to live databases or by using scripts within an Oracle Database project.
- Entity Framework support – Use Visual Studio's Entity Designer for Database First and Model First object-relational mapping. ("Code First" is also supported).
- Automatic code generation – You can use various windows, designers, and wizards to drag and drop and automatically generate .NET code.
- PL/SQL Editor and debugger – Allows you to take advantage of Visual Studio’s debugging features from within PL/SQL code, including seamlessly stepping from .NET code into your PL/SQL code and back out again.
You need to have a free Oracle account before you can download the tools from https://www.oracle.com/database/technologies/net-downloads.html. Please note that installing these tools will also install functionality to interact with Oracle Cloud, but those details are for a different article! Once the tools are downloaded and installed you will see a new section in your Tools menu as shown in Figure 1.
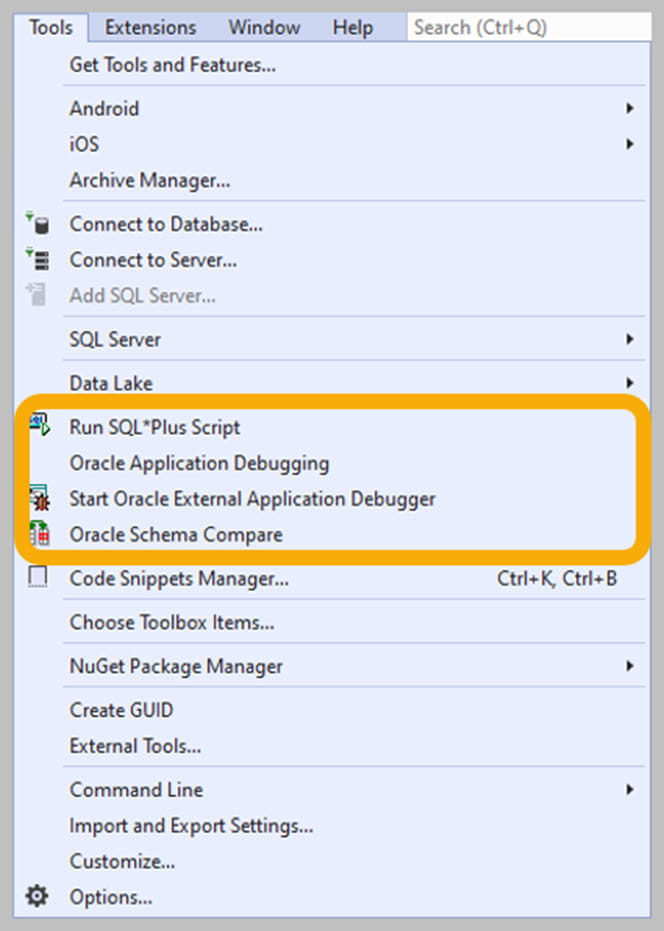 Figure 1. New features added to Tools menu by ODT for VS
You will also find four new project templates added to the Create a new project wizard:
- Visual C# Oracle CLR project – creates a C#-based project for creating classes to use in Oracle database
- Visual Basic Oracle CLR project – creates a Visual Basic project for creating classes to use in Oracle database
- Oracle Database project – creates a project for maintaining a set of scripts that can be generated using Server Explorer menus. This project type does NOT support schema comparison.
- Oracle Database project Version 2 – creates a project for maintaining a standardized set of SQL scripts that represent your Oracle database schema. This project type supports schema comparison.
There are additional features to these tools, so suffice to say that Oracle provides various ways to help .NET developers interact with their Oracle databases. Lots of ways. Many more than you will find for any of the other databases we have looked at in this series. And it should not surprise you to find that they also support connecting to Oracle databases from within your .NET application.
Oracle Data Provider for .NET (ODP.NET)
Where the ODT for VS is designed to help improve a developer’s productivity when interacting with Oracle databases, ODP.NET instead manages the interconnectivity between .NET applications and Oracle databases. ODP.NET does that by providing several NuGet packages, Oracle.ManagedDataAccess.Core and Oracle.EntityFrameworkCore, that support .NET 5 and more recent versions and several NuGet packages supporting .NET versions prior to 5.0, Oracle.ManagedDataAcess and Oracle.ManagedDataAccess.EntityFramework. Once you have the packages, the next thing that you need to do is to configure your application to use Oracle. You do this by using the UseOracle method when overriding the OnConfiguring method in the context class as shown below:
protected override void OnConfiguring(DbContextOptionsBuilder optionsBuilder)
{
    optionsBuilder.UseOracle("connection string here");
}
A connection string for Oracle has three required fields:
- User Id – username for use with the connection
- Password – password
- Data Source – the Transparent Network Substrate (tns) name is the name of the entry in tnsnames.ora file for the database server. This file can be found in the $ORACLE_HOME/network/admin directory.
This makes it seem like this should be an easy task to manage a connection string. However, of course, there is a caveat - you must be willing to deploy a file that has to be in a very specific place on the server and contain a reference to the server to which you need to connect. If you are okay with that approach then this is a simple connection string – “user id=prodotnetonaws;password=password123;data source=OrcleDB”. However, since a lot of the flexibility inherent in the cloud will go away if you start making this a requirement (you are no longer simply deploying just your application), then you will have to build a much uglier connection string using a Connect Descriptor:
"user id=prodotnetonaws;password=password123;data source="(DESCRIPTION=(ADDRESS=(PROTOCOL=tcp)(HOST=servernamehere)(PORT=1521))(CONNECT_DATA=(SID=databasename)))"
This means that we will need to build our connection string with additional values
- Host – The address of the server to which the application will connect
- SID – The database, on the host server, to which the application is connecting
Let’s now setup our Oracle database and see where you get those values from.
Setting up an Oracle Database on Amazon RDS
Now that we know how to setup our .NET application to access an Oracle database, let’s go look at setting up an Oracle instance. First, log into the console, go to RDS, select Create database. On the Create Database screen, select Standard create and then Oracle. This will bring up the remainder of that section as shown in Figure 2.
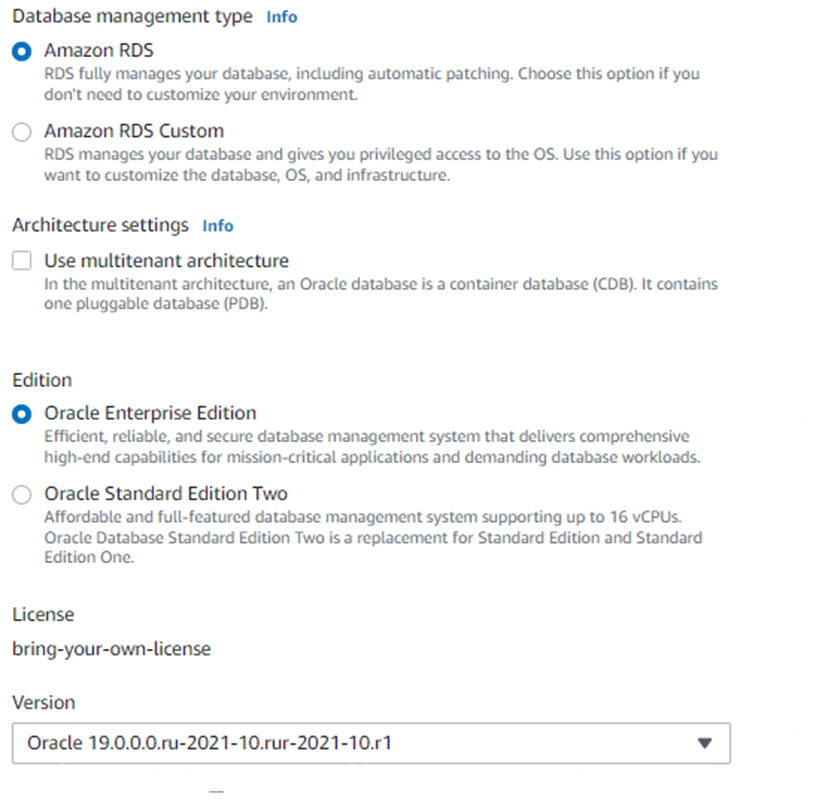 Figure 2. Options after selecting Oracle when creating a new RDS Database
As you can see, your next option is to select the Database management type, for which there are two options, the default Amazon RDS and Amazon RDS Custom. The Amazon RDS Custom management type requires you to upload your own installation files and patches to Amazon S3. Selecting that management type will change the UI as shown in Figure 3.
 Figure 3. Selecting Amazon RDS Customs management type
In Amazon RDS Custom, a custom engine version (CEV) is a binary volume snapshot of a database engine and specific AMI. You first upload installation files and patches to Amazon S3 from which you create CEVs. These CEVs are used as the resources for your database. While this gives you much more control over the resources used by your database as well as managing the extra options you may have purchased as add-ons, it is out of scope for this article, so select Amazon RDS instead!
The next configuration option is a checkbox to Use multitenant architecture. This is a very interesting Oracle feature that allows for the concept of a container database (CDB) that contains one or more pluggable databases (PDB). A PDB is a set of schemas, objects, and related structures that appear logically to a client application as a separate, fully functional database. RDS for Oracle currently supports only 1 PDB for each CDB.
The next configuration option is the database Edition, with Oracle Enterprise Edition and Oracle Standard Edition Two as the only available choices currently. When selecting the Enterprise edition, you will see that you must bring your own license, however, selecting the Standard edition will allow you to bring your own license or to choose a license-included version. Standard edition is significantly less expensive, so you should consider that approach unless you need the full enterprise functionality. We chose the standard edition, license-included, most-recent version.
Once you have gone through those, all the remaining sections are ones that you have seen before as they are the same as are available on MySQL, MariaDB, and PostgreSQL (there is no serverless instance approach like was available with Amazon Aurora). However, this will not enable us to be able to automatically connect with our .NET application.
If we look back at our Oracle connection string:
"user id=prodotnetonaws;password=password123;data source="(DESCRIPTION=(ADDRESS=(PROTOCOL=tcp)(HOST=servernamehere)(PORT=1521))(CONNECT_DATA=(SID=databasename)))"
There are two values that are needed, the servername and the databasename. We know that once the server has been created that there will be a servername, or host, but there is not yet a database with which to connect. Remember, this work you are doing right now is not to create the Oracle database, it is instead around getting the Oracle server set up and available. You can create an initial database by expanding the Additional Configuration section and filling out the Initial database name field in the Database options section as shown in Figure 4.
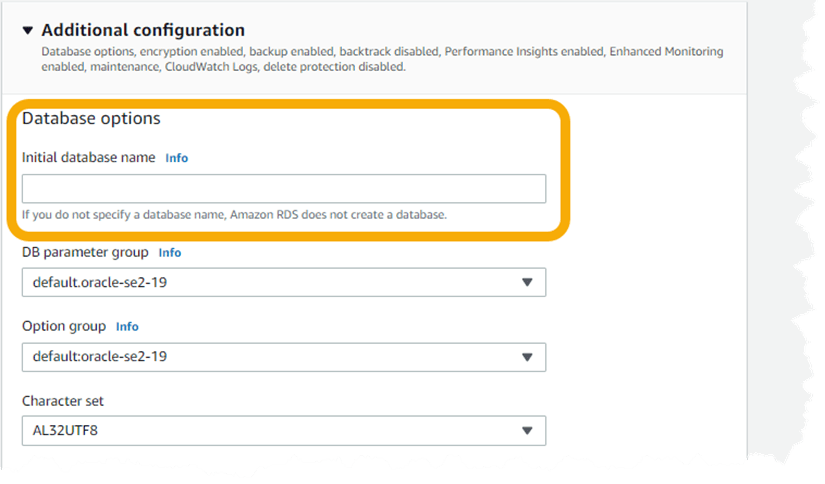 Figure 4. Creating an initial database during setup
Add in an initial database name and complete the set-up. Once you click the Create button then the process will start. However, since Oracle is a much more complicated server than any of the others, this initial creation and setup process will be considerably longer than it was with the other databases.
Once your database is available, clicking on the DB identifier will bring up the database details. This is where you will be able to see the endpoint of the server. Using that value plus the database name that you created during the setup process will finish the process for updating your application to use Oracle as its primary database.

Top comments (0)