Previously I went through the basics of react. By the end of that tutorial we had a simple todo app. Today I am going to explore the basics of react router.
Just as we have done in the previous tutorial, you can start this project by running create-react-app some-name or codesandbox.
I will assume you are using codesandbox mainly because it's simple for all of us to quickly get started. If you know how to work with the terminal then you don't need instructions on that, you can follow along just as easy.
Again, when navigating to codesandbox click "react" and you'll get a starter project.
Installing the router
Routes come in a separate package, so we need to install react-router-dom.
If you want to follow along at codesandbox then click on "Dependencies" on the right hand side, the packages that are already installed are revealed, then simply select "Add Packages" then just search for "react-router-dom".
Remember for the terminal users, run:
yarn add react-router-dom
Let's get started
In index.js, replace the existing code with the following.
import React from 'react';
import { render } from 'react-dom';
import { BrowserRouter, Route, Link } from 'react-router-dom';
const App = () => (
  <BrowserRouter>
    <div>
      Hello world
    </div>
  </BrowserRouter>
);
render(<App />, document.getElementById('root'));
Note how we take BrowserRouter, Route, and Link from the react-router-dom package.
Based on the documentation the BrowserRouter is
A that uses the HTML5 history API (pushState, replaceState and the popstate event) to keep your UI in sync with the URL.
As you can see in our code, you can think of BrowserRouter as the parent wrapper of the app. However, note that we still need to use an html wrapper to wrap the code.
Creating the first route
Let's create the first route using the Route module.
  <BrowserRouter>
    <div>
      <Route path='/' render={props => {
        return (
          <h1>Hello World</h1>
        )
      }} />
    </div>
  </BrowserRouter>
Now you'll see "Hello World" printed on the home page.
It's very easy to make sence of the code, we have made sure that when the client navigates to the home page - in other words to the specified path (path='/') then we render some code.
The code that we are rendering looks like a component, and it is a component. As such, "There are 3 ways to render something with a <Route>" (ref)
<Route component><Route render><Route children>
Let's use the component method. Of course, the component method takes a component, so let's create a basic component first. Create a new file called Helloworld.js and add the following:
import React from 'react';
const HelloWorld = () => (
  <h1>Hello world from a separate component</h1>
);
export default HelloWorld;
Now back in index.js let's import the component then use it
  import Helloworld from './HelloWorld'
  <BrowserRouter>
    <div>
      <Route path='/' component={Helloworld} />
    </div>
  </BrowserRouter>
Using multiple routes
Clearly the usefulness of routes is to have more than one. To keep the code simple lets just paste the above Route a few times
  import Helloworld from './HelloWorld'
  <BrowserRouter>
    <div>
      <Route path='/' component={Helloworld} />
      <Route path='/hello' component={Helloworld} />
      <Route path='/hello/world' component={Helloworld} />
    </div>
  </BrowserRouter>
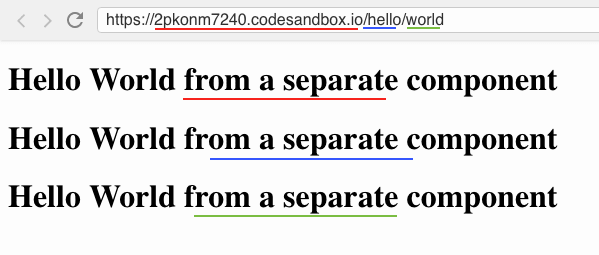
With that, the Helloworld component will be rendered on all three paths.
However there is an unexpected side effect, if we navigate to /hello/world we see all three components rendered on the page.
There are times when that is the effect we want, however not this time! There are two ways we can fix this issue. We could use Switch, which react-router-dom gives us. Or we could use exact as an attribute to each Route.
Referring to the documentation:
<Switch>is unique in that it renders a route exclusively. In contrast, every<Route>that matches the location renders inclusively
So we use a Switch to wrap our routes:
  <BrowserRouter>
    <Switch>
      <Route path='/' component={Helloworld} />
      <Route path='/hello' component={Helloworld} />
      <Route path='/hello/world' component={Helloworld} />
    </Switch>
  </BrowserRouter>
Now each route will be rendered exclusively.
The other way is to just use exact as the attribute in the Route.
  <BrowserRouter>
    <div>
      <Route exact path='/' component={Helloworld} />
      <Route exact path='/hello' component={Helloworld} />
      <Route exact path='/hello/world' component={Helloworld} />
    </div>
  </BrowserRouter>
Finally, we are able to use Link to link through these routes. Use Link instead of the usual anchor tag.
  <BrowserRouter>
    <div>
      <Link to="/">Home</Link>
      <Link to="/hello">Hello</Link>
      <Link to="/hello/world">world</Link>
    </div>
  </BrowserRouter>
Note that Link has to be used within the wrapping div.
That's it for the basics of routing in react.


Top comments (4)
I learned about Routers just a couple of weeks ago. One thing worth mentioning is that
<BrowserRouter>creates URLs like "example.com/hello/world" whereas<HashRouter>creates URLs like "example.com/#/hello/world".The
<BrowserRouter>is changing the URL paths dynamically using history API. When using<BrowserRouter>, your server should reflect all paths what the frontend allows to access. Otherwise you would get 404 errors when some page is refreshed.On the other hand, the
<HashRouter>is useful when you have a single page application or a single page website component. All the paths of<HashRouter>stay under the same path, only the hash part changes.That's cool.
Thanks so much
Thanks a lot from 2019
Well done!