Firebase is a platform that provides us with a number of google cloud services that are exposed through simple SDKs. The main features provided are: database, storage and authentication. In this tutorial I am going to connect to a database and show how we could perform CRUD actions (that is, how we can create, read, modify and delete data).
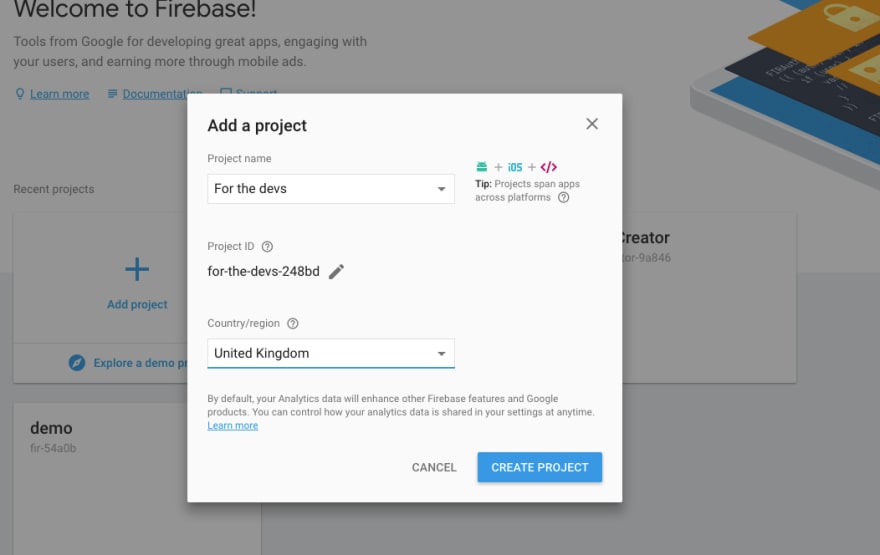
Let's start by going to firebase console console.firebase.google.com (clearly you have to be logged to your google account). Then just click on "Add Project" and give your project a name and create the project.
After that you are imediately directed inside your project. As you can see, you can easily link this project to an iOS, Android or a web app. We are going to use firebase with client side JavaScript, hence click on "Add Firebase to your web app"
There you get the information which you'll need to connect to this firebase project.
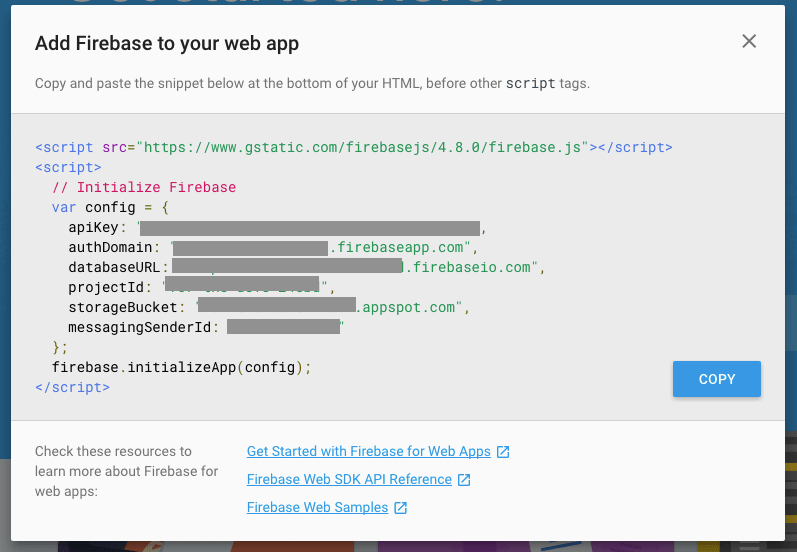
I covered the important information to mainly highlight that that information is private and the way we're working with this data today is not secure at all, but it's a fantastic way to get our head around how firebase works. In later tutorials we'll cover more secure approaches.
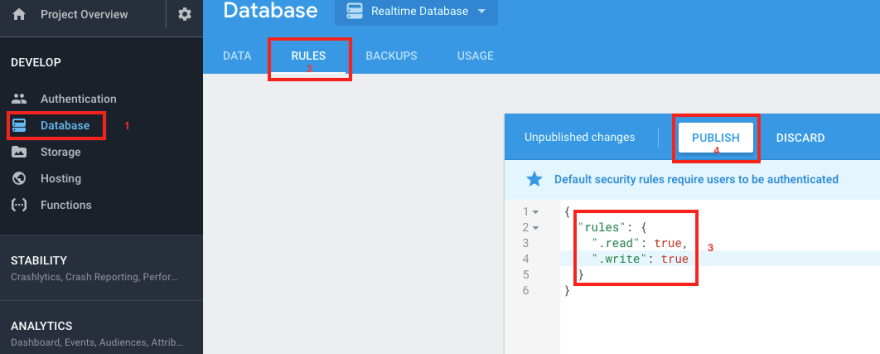
Before we start writing code, let's make sure that we are able to read and write to the database without needing an authentication. Clearly this is bad practice and should not be done in production mode but we are experimenting. Authentication will be covered at a later date
Close the above window and navigate to Database (located on the left) select "Realtime Database" then click on "rules", then just change "auth != null" to true for both read and write and select publish. The warning is logical but that's ok.
Start the project
We'll be working with client side JavaScript. If you want to follow along all you'll need is an index.html and a script.js file. Link the script.js file and the firebase.js file (which firebase itself instructed that we do) to the html file, something like so:
<!DOCTYPE html>
<html lang="en">
<head>
  <meta charset="UTF-8">
  <title>Playing with Firebase</title>
  <script type="text/javascript" src="https://www.gstatic.com/firebasejs/4.8.0/firebase.js"></script>
</head>
<body>
  <script type="text/javascript" src="script.js"></script>
</body>
</html>
In reality you might have more html, but that's just to illustrate how to setup firebase. In this tutorial I'll illustrate how data can be managed in firebase, where you place the results is up to you.
Inside script.js we'll start by pasting the initial code that firebase gave us above.
var config = {
  apiKey: "*******************",
  authDomain: "******.firebaseapp.com",
  databaseURL: "https://******.firebaseio.com",
  projectId: "******",
  storageBucket: "******.appspot.com",
  messagingSenderId: "***************"
};
firebase.initializeApp(config);
Firebase gives us a bunch of methods. Notably, auth(), database() and storage(). All of which respond to the services Firebase provides. In this tutorial we are working only with the database so let's add that to our code
const database = firebase.database()
Writing to the database
We are dealing with a non-sql database. The data is stored and organised as JSON or as a javaScript object. Consider the following as the kind of data we want to store in the database
{
  "items" : {
    "-L-stEfbU_e13v8dVUwe" : {
      "archived" : false,
      "completed" : false,
      "item" : "Get milk"
    }
  }
}
So, we want to push items into an items object. If you come from an SQL background, think of it as; we want to push data to an items table.
We therefore need to specify the name of the parent property which would then hold our data. We do that like so
const ref = database.ref('items');
All we need to do now is treat ref as a container where we add or read it's content and the changes would be reflected into the database.
database.ref('items') returns a bunch of methods, one of which is push, lets use it:
ref.push({
  item: "Get Milk",
  completed: false,
  archived: false
})
Immediately, our new object is added to the items object in the database. Firebase automatically creates a unique identifier for this new object.
The push() method returns an object also, we can access that, as we would normally do, by attaching the above into a variable
const result = ref.push({...})
If you console result, you'll see that we're able to use methods such as catch to catch any error that might have occurred whilst pushing the new object to the database, or a then method to give us the opportunity to do something when operation is complete. But also we're able to access the unique identifier that firebase auto-generated by running result.key
Reading data
There are two ways to read from the database. There's using once() or on(). As their names suggest, once() reads the data one time but doesn't listen for the changes, where as on() fetches the data every time it changes.
ref.on('value',callback(data))
once() is writen in the exact same way
ref.once('value',callback(data))
Both once() and on() observe events. value is an event that "[reads] and [listens] for changes to the entire contents of a path" - docs. (And the content path is what we specified in database.ref('items'), items being the content path)
One of many ways you might want to work with the resulting data is to loop through the object and inject it into your DOM.
let li = document.getElementById('items')
ref.on('value', function(data){
  let objKey = Object.keys(data.val());
  for(obj in objKey){
    let key = objKey[obj];
    li.innerHTML +=`
      <li>${data.val()[key].item}</li>
    `
  }
})
Updating data
As mentioned above, each object we add to the database gets a newly generated identifier. To update one of these objecs, we need to reach to that object by using it's identifier, then calling an update() method on it.
ref.update({
  "-L-t-BeCnrFAfcrYLMjE" : {
    "archived" : false,
    "completed" : true,
    "item" : "Get milk"
  }
})
Clearly we would not need to hardcode the unique identifier like that, but that's how the object is updated.
Deleting objects
Removing objects is very easy. There are multiple ways of doing it. We can just call remove() as we reference the object we want to delete:
database.ref('items/-L-t-BeCnrFAfcrYLMjE').remove();
Or we could use the update method and "update" the object to null, causing it to be removed
ref.update({ "-L-t-BeCnrFAfcrYLMjE" : null })
Conclusion
That's it for the basics of interacting with Firebase real-time database. If you open the same application in two separate browsers, simulating different clients, all database changes would be reflected to all the clients, hence real-time.
Next, read the tutorial to learn how to manage your asset files with firebase's storage service

Top comments (8)
Great piece but I think we have other great features of Firebase aside what you mentioned. Like the cloud functions comes in handy when you want to write server side code that operates based on certain events. One other feature I also like is the hosting services that allows you to host you app both static and dynamic.
Thank you
Of course I plan to cover almost all the features.
This tutorial was to cover the database. The next tutorial was storage, the upcoming will cover authentication. Then I'll cover hosting. I didn't want to cover the cloud functions but I might.
One by one. I wanted to explore each feature separately so that I can go in detail.
Okay. That is cool. I will learn a lot.
Great article. Are you doing one on authentication with facebook?
Thanks.
I covered storage the other day, the next tutorial is going to be all about authentication. I want to just cover github authentication but yes I'll do facebook as well.
Thanks a lot for the article!! Looking forward to an article about the production mode security practices :)
Thanks,
Security in production mode is going to be the fourth article in this mini series.
The second article is going to explore storage
I can't understand how to order data, make things like pagination etc. where can I find resources?