There can be a whole lot of reasons for you to be choosing to opt-out of any Google services. But the way different developers and companies have integrated there apps and services with google services is is a monopoly going on. But because of this kind of practice performed by these big companies have to lead the way of Open-Source and Non-google Software.
This tutorial is strictly based on The Phone Xiaomi Redmi Note 7(Lavender). This article is only for the enthusiasts and for those who know what they are doing. Please move forward with utmost caution.
**
Pre-Rooting process of Syncing/Backing up your data to the cloud
As soon as we start the process of unlocking the locked bootloader, we will lose all the data on this phone. So we need to first backup those data like contacts and calendar.
Now, this process of syncing contacts and calendar can be much simpler if you opt to use the Gmail account that you already have signed on to this phone because Gmail accounts sync up your calendar and contacts data to google drive by default. But if you are strongly committed to the De-googling process then you can not use the google account. You need to use a non-google account to do so. Like yahoo mail or Outlook mail. Now, I don't want to go with outlook or Yahoo for this tutorial cause I want to show you a different total open-source secure way of doing it without involving Google, Microsoft or any other big company's services.
- Proton Mail is a secure end-to-end encrypted Email service based on Open-source code. It's a perfect service to go with keeping your interests in mind. You can visit there a website or install their android app to create a mail account.
- After you have created the mail account we can now move forward with another fantastic alternative to another Google service, Google Drive. Nextcloud services is an open-source cloud service solution having options like being able to choose to have self-hosted cloud hub to be being able to choose other company's hosted service with different storage and amenities options with different premium options to choose from. Nextcloud services are as much flexible as you can imagine. Visit their website to choose a service provider or go with tab digital's solution that I am personally using for my needs. Sign up and get your storage access accordingly.
- So now you have an Open-source Mail account along with a Cloud Service solution. Next step will be to sync your contacts, photos, files and maybe your Calendar. I will initially talk about the process of syncing your contacts and photos using the Nextcoud Android app and the syncing client DAVx5.
Taking in the fact that you have now signed up for a service provider in NextCloud and have logged in to the NextCloud Android app, we will now move forward with the syncing setup.
Open the NextCloud app and
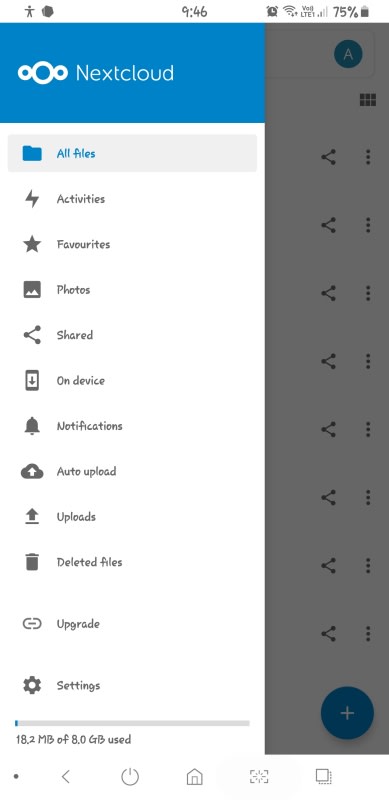
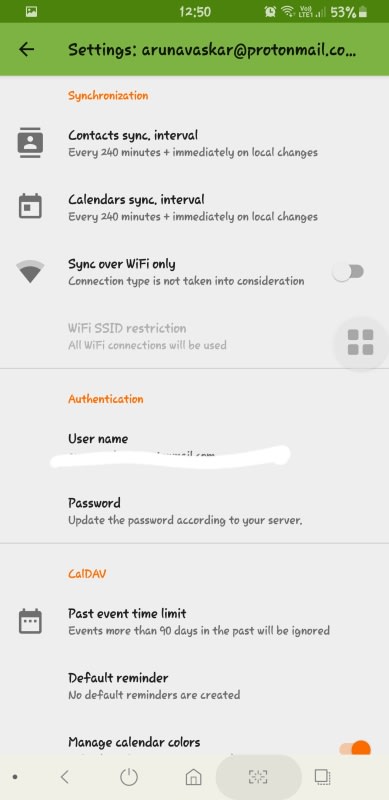
and go to settings and click on "Sync calendar & Contacts"

now this browser windows of DAVx5 will open up where you will need to log in to your nextcloud server accountM

After a successful log in press back button untill you see a screen like this one.
wait for this screen to go away

for this screen to show up.
The account name will be your mail address by default. You can change it by tapping on it or can skip that bit and tap on creating an account.

After account's successful creation you will see these two tabs of different content synchronisation.
CARDDAV is for all the contacts in your device. By default, options will be unchecked and you will have to manually select them and click on that orange sync button to start syncing process.

CALDAV is for your primary calendars. Google account signups don't sync calendars with DAVx5 without developer account Auth setup. This auth setup process requires an entire article of its own, so I will leave this here.

WEBCAL is for you online subscriptions. If you don't have any, then that tab won't require your attention.
Now got to these settings button

and tweak these syning interval settings and others according to your own convinience.
done
Now just the way you back up your contacts, you can go to nextcloud and backup your photos and the folders containing photos to get them back when you may need them.
Bootloader Unlocking
==I assume that you have an updated Windows 10 machine with Linux Terminal installed and updated for them to work correctly. You will need to install an application on your Windows machine for this process to work out. Before you proceed with any of these steps mentioned below, remember to keep your phone charged at a minimum of 80%==
A. Prerequisites

- For Windows 10 , You need to disable driver signature enforcement in windows computer incases it doesn't recognise Xioami drivers. Now you need to install ADB and fastboot tools. Download the tools here. * Now run the package using administrative permission * Press Y/Yes to install ADB and Fastboot or N/No to skip * Press Y/Yes to install ADB system-wide or N/No for current user only * Press Y/Yes to install Drivers or N/No to skip * Continue Driver installation * 15 seconds passed - finished! Now if you have older Google USB drivers installed, then uninstall the older ones from the control panel. If you want, you can download the latest Xiaomi drivers from here.
For Linux, open "TERMINAL" and do the following which will help you install android tools and fastboot:
sudo apt update
sudo apt install
android-tools-adb android-tools-fastboot
This is a very basic and standard way of installing adb and fastboot in Linux. But this commands sets should do the job. - After Installation is complete, restart your computer.
- Enable developer mode in your phone
- Enable OEM unlocking and USB debugging
- check if your bootloader is locked
- got to the folder where you have installed ADB and Fastboot tools and open a terminal in there.
- Enter your phone's fastboot mode by pressing volume down + power button and connect your phone to your computer using a USB cable
- Now enter the command
fastboot devices. If you a random integer in the screen then your device was connected. - If you see your device, enter the following command
fastboot OEM device-info. If your bootloader is locked, you will get the following status or something similar. ……………………………………………………………………. (bootloader) Device tampered: false (bootloader) Device unlocked: false (bootloader) Device critical unlocked: false (bootloader) Charger screen enabled: false (bootloader) Display panel: OKAY [ 0.058s] finished. total time: 0.063s ……………………………………………………………………… If your bootloader is unlocked then you will find this kind of status or similar. ……………………………………………………………………. (bootloader) Device tampered: false (bootloader) Device unlocked: true (bootloader) Device critical unlocked: true (bootloader) Charger screen enabled: false (bootloader) Display panel: OKAY [ 0.053s] finished. total time: 0.055s ………………………………………………………………………
- Now to unlock the bootloader you need to ask permission to Xiaomi for that. You need to create a MI account for that in case you already have not. And then you need to download this unlocking application provided by Xiaomi and install it in your Windows PC to proceed.
- After Mi account creation, login to your MI account in your Xiaomi Phone and then go to Settings/Additional Settings/Developer Options/Mi Unlock status and check "Add account and device".
B. Bootloader Unlocking via terminal
Bootloader unlocking will erase all your data and that's please remember to back up all your data before you proceed with the below-mentioned procedures
- Even though this was already mentioned above, you should check again if the USB debugging is turned on and OEM unlocking is enabled.
- Your MI account must be connected/added to the phone.
- Given the fact that you have followed the previous instructions and have installed the MI unlock tool properly, now enter the fastboot mode by holding down Volume down + Power button together and connect your phone to the PC using a USB cable.
- Now start the MI unlock tool and then log in to the same MI account you had logged in to your phone with.
- Now there will be a unlock button. Click on it to start the unlock process.
- follow the process until the process is finished and then reboot your device.
you might get a message saying you need to wait till 72 to 360hrs before you can start the unlocking process. If you got this message, then you will need to wait till that time passes to start the unlock process.
Installing a custom recovery
- First of all you need to download the Custom rom and the Recovery.
- Store these two files safely in a single folder and then open a terminal or a command prompt if you are using a windows machine for this flashing process.
- Now connect your phone to the PC using a USB cable.
- On the terminal run this following command while the phone is connected.
adb reboot bootloader - As the phone is now in fastboot, try this following command in the terminal
fastboot deviceto see if your phone is recognized by your PC. - now use this following command in the terminal to flash the custom recovery onto your phone that you downloaded.
fastboot flash recovery <recovery_file_name.img> - Now reboot into recovery by holding the Volume up + Power button at the same time.
 ## Installing LineageOS from Custom Recovery using your PC
Now in the last steps, we followed we were in the custom recovery. So keeping that in mind we can move forward with the process of installing the LineageOS from recovery.
## Installing LineageOS from Custom Recovery using your PC
Now in the last steps, we followed we were in the custom recovery. So keeping that in mind we can move forward with the process of installing the LineageOS from recovery. - Now we need to factory reset our phone by going to Factory reset options and then
- Format data, Format cache partitions and then Format system partitions to remove all the
 data including the whole OS from the from to make place for the new LineageOS rom.
 - Now return to the main menu and select Apply update/Apply from ADB

- Now on the PC terminal enter the following command to flash the
adb sideload filename.zipfilename.zip will be replaced by the name of the LineageOS rom file you downloaded. NOTE: Additional add-ons aren’t signed with LineageOS’s official key, and therefore when they are sideloaded, Lineage Recovery will present a screen that saysSignature verification failed, this is expected, please clickContinue. - Now download the Magisk manager to avail root authority after you reboot the phone in it's new Custom ROM.
- Now again to go to Apply update/Apply from ADB.
- In your PC terminal type in that same command
adb sideload filename.zipand replace the filename.zip with the magisk download file name to install the Magisk Manager. ## Now you are ready to boot into your seemingly NEW phone without any Google Play services baked onto it. Now you can make calls, text people and do every other mundane task you usually do on your phone. Right? haha Where are your contacts, applications and cloud services? Yes, you got the point. We need to work on that now. Thing from will be less technical and more of thorough follow up process.
You need AppStore before you do anything else
The open-source world of android and the world applications developed by people other than Google has got you covered here. There are plenty of options to choose from and sometimes soo many options can be overwhelming so here is a list of applications that you will ever need, at least during the time of using a phone without google's ecosystem.
APP-STORE


Aptoide is my favourite AppStore on the list because it has a huge array of applications and you may find applications not available for your region too! F-Droid places mostly known for trusted open source applications and it looks like a general AppStore but it isn't. It's like a repository of applications but not to make it more complicated, it works. Apkmirror is a fantastic place for getting the latest, beta or even alpha versions of applications, applications which sometimes even default system apps of some smartphone.
APPS for DAILY USE
1.Root Explorer

for accessing root files with root permission granted by Magisk manager.
2.Fennec F-Droid

for accessing the web. It's F-Droid fork of firefox mobile with proprietary bits and telemetry removed.
3.VLC
for media playback. Do I need to explain why should have VLC for media playback other than the fact that it's open-source software?
4.Nextcloud

for either self-host or using a service provider's server for cloud storage backups. It's open-source, secure and there is a ton of options to choose from.
5.Simple Gallery Pro
because the default gallery that is pre-installed in LineageOS is extremely basic. But this gallery app is not super complicated yet brings some subtle features to the table for ease of use when you may need it.
6.FairEmail

for all of your email accounts. The default Mail app is very basic and sometime later you might need some more horsepower.
7.System App Remover

to remove the unwanted system app with root access granted by the Magisk manager.
8.SMS Organizer

to get the best experience without rooting for Google. Fantastic auto separation of different texts, auto OTP detection and simple copying feature and there more to this application that you need to experience by your self to know better about.
9.Swiftkey keyboard

can be the best alternative to Gboard. fantastic typing experience out of the box and there is a whole lot of customization options available for you to go through to choose the best size and vibration type to choose from. And lot's of proper themes are there too.
10.Gcam and a supporting application for the Gcam to run without the Gapps that it needs to run on an android device.
11.Document Viewer

is an Open source application from F-droid. It supports PDF,DjVu, EPUB, XPS (OpenXPS),
Comic Books (cbz) (NO support for CBR (rar compressed)), FictionBook (fb2). IT DOES NOT SUPPORT DOC or DOCX files!
12.ICSx5

download this application only if you have calendar subscriptions to sync
for syncing your web calendar subscription. This is a way of syncing all your different calendars from Google calendars to any of your custom calendar provider. We will talk about this more later.
13.DAVx5

is for syncing your contacts and main calendar using your mail account. We will talk about this in more detail later in this article.
Now that we have all the essentials downloaded/installed we can now move forward to
Setting up the essentials
A: Contacts
- Open nextcloud application and tap on log in

- Now enter the server domain given by your nextcloud provider, and continue
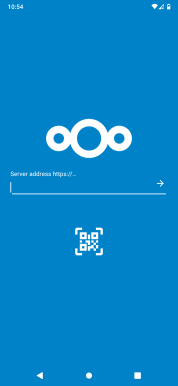
- Now tap on log in to log in to your account with mail and password

- Now grant access to your device

- now go to your nextcloud app settings to find out the sync contacts and calendar settings. Tap on it start the DAVx5 log in process.


Now a Browser window for DAVx5 log in screen will appear where you will need to log in to your nextcloud account, grant access and follow the same steps we previously followed to sync up your contacts before the bootloader unlock process. You will be able to choose contacts and calendar syncing interval times based on your preference.
B: Gcam
Gcam is no doubt the best camera application to use for getting the best possible outcome from a single random click. Extremely feature-rich application for almost every phone in the market. Download The Gcam and the supporting app that helps the Gcam run without any Gapps installed in the device.
- First install the Gcam service provider app

- then install Gcam app

- Open the app and enjoy. as simple as that


Top comments (2)
Great post.
It is indeed interesting. And I think that you should try it on a spare phone to begin with and understand what you are doing before doing it on your main phone.
Great post !! ... thanks ... it even give me some good ideas for not only degoogle a phone but also on how to deapple my laptop 😅