
I believe any developer at some point in time will need separate GitHub accounts for different types of projects. Since most companies use private repositories one might need a personal account to showcase their talent.
To do that we are going to be using SSH keys, which is another way of authenticating yourself rather than using the usual username and password.
So before I start going through the steps I would like to take you back a bit into how SSH keys work and how important they are:
SSH Keys
An SSH key consists of 2 parts, the public key that gets shared across many platforms, which is used to encrypt the message that can only be decrypted by the private counterpart, and the private key that is only stored locally in the machine.
SSH is very secure as it is difficult to reverse engineer your public key to get your private one.
Now let's get back to the stages, I will be using Windows 10 OS for my demonstration but the steps are the same, especially if you are using BASH(Bourne Again Shell).
STEP 1 : Generating the SSH keys
On my laptop, I have two accounts, one called workaccount@gmail.com and personalaccount@gmail.com .I will be creating SSH keys for both of them. Before we can generate the keys we have to create an ssh folder that is going to store all our keys. I would recommend making the folder hidden(should start with a dot/fullstop , like so .ssh) inside your root directory.
SSH key for the work account:
ssh-keygen -t rsa -b 4096 -C "workaccount@gmail.com" -f ~/.ssh/workaccount_key
SSH key for my personal acccount:
ssh-keygen -t rsa -b 4096 -C "personalaccount@gmail.com" -f ~/.ssh/personalaccount_key
-f is used to define the file name.
-C is for adding a comment so that you will know which account will be using which key.
After clicking Enter you will be asked to enter your passphrase, this will increase your level of security but you can leave it blank though.
STEP 2 : Adding your keys to Github
If you locate your .ssh folder you will see 2 files that end with a .pub extension, when you open them ,using any text editor of your choice, your contents should look somewhat like this.
This one is an example of my personal account key which we are going to add to GitHub.
ssh-rsa AAAAB3NzaC1yc2EAAAADAQABAAACAQCq7oreopBjhStlWXnYhhHIlEc2ch8J/AkqjgfBo/q5h/Q/YaQZGRWTDUQyiWdaon1swynSK13tIoU72K4avz/9i472THYVfdxacr+tHU5FtxludxN84Ss6Shglnom61gOwrkbgizrWm4vp41DfIzT+XBl8kG4o1zYWwXUOatsOGOnEKvTmXViCX2pTXSpF2+Lt3d/YI7UsSy2PnICzLxFjDDiWpWtI6VyK0bXJyvRMrwBX9XRjxjwPXK179BqmiuwauCTD9uYanBWgeu+hcJOO6phdFspph8zHje37K+fWoJzDytFK3Rr1mYX3xXN+UWo4w6sayjlP+41AtX8mJqOLjO1odm5OI250sIuVBjOTF4pUL/weL9FcU1BxKQk//OERXM0F9WKXu0I8GqMLiSUf6BQ7WXVtyHQ7IGAb1fDLrKEQy6oO6gEs5bORmeV93Yo8XclI3Q9MRKmTcM8nCSAobru8CQR0JI0nV2rNGJasVFXnc+NMaQfysXFo66c9oFpPu6h3lMhkdSh/SqBLwCjnpiUaLMzu+CvmqTxD0eWyxBpDFfwkeUYBauHNxw6Bqi3f4JQRqzBVTQlrCClPtXnlnLnxdRboV/YTEixZ4Z+xUQcb8IPqjYsaE7zBQp3VEW55O7V3war64oilbUJGkrtzF7qecbNqKaA9vR4JDSHRdQ== personalaccount@gmail.com
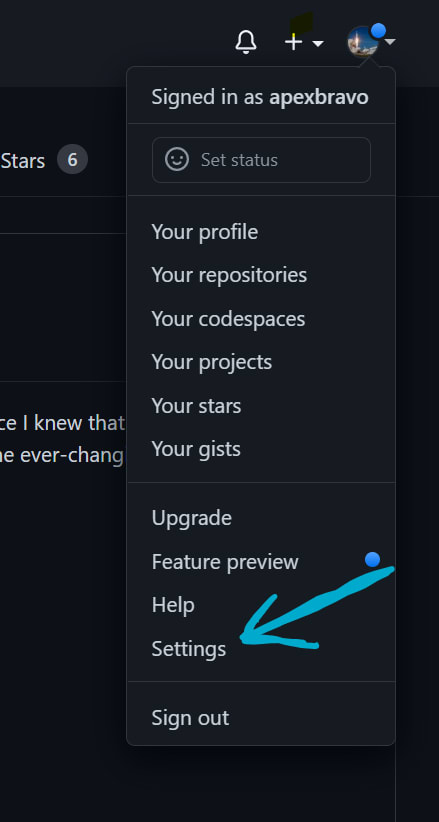
-Kindly log on to your GitHub account.

-Select the settings option.
-Select on the SSH and GPG keys option and click .
new SSH key
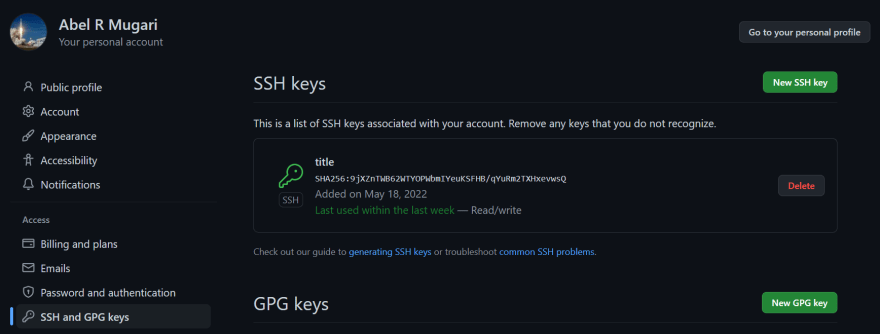
- Copy all the contents of the personalaccount_key.pub file and paste them inside the key input, then as for the title you can put anything of your choice.

Log out of that account and do the same for the other account.
STEP 3 : Creating an SSH config file
Then back inside your .ssh folder, we want to create an SSH config file that allows you to define specific settings for each host (account). I created mine by typing the following command on my BASH:
touch config
After creating it open with any text editor, paste the following text and edit it accordingly .
#Default GitHub
Host github.com
  HostName github.com
  User personalaccount
  IdentityFile ~/.ssh/personalaccount_key
 IdentitiesOnly yes

# Other github account: work
Host githubwork
HostName github.com
  User workaccount
   IdentityFile ~/.ssh/workaccount_key
   IdentitiesOnly yes
STEP 4 : Registering your keys to ssh-agent
In the following step, we now have to add the newly created keys to the ssh-agent which manages your identities so that you don't have to enter your passphrases every time you use your SSH keys.
You start the ssh-agent using the following command on bash:
eval "$(ssh-agent -s)"
Add the SSH keys
ssh-add personalaccount_key
ssh-add workaccount_key
You can also check if your SSH keys are working by using :
ssh -T githubwork
We are done, next, I want to show you how you are going to clone your repos and associate the commits with your name.
Cloning your repositories
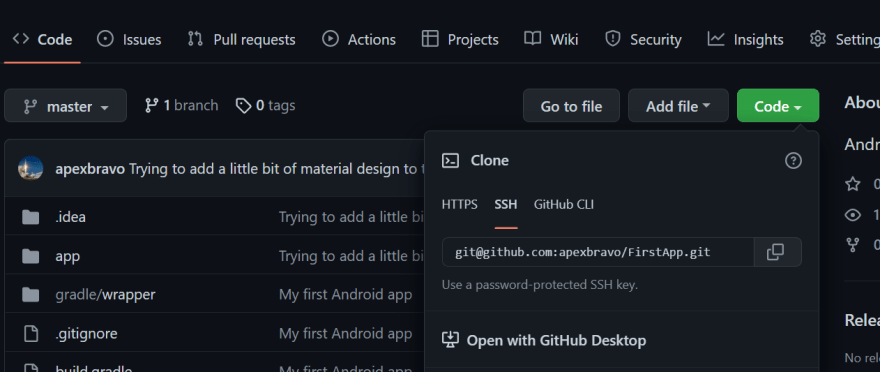
git clone git@github.com:personalaccount/FirstApp.git
Associating you commits with your name
After cloning you have to go on that particular file and open
Git BASH there and paste the following commands:
git config user.name "personalaccountname"
git config user.email "personalaccount@gmail.com"


Top comments (0)