
By: Peter Solymos
ShinyProxy is a great way to deploy containerized Shiny apps to production and it is only 1 click away.
ShinyProxy is one of the most popular options to host any type of containerized web application, including but not limited to Shiny apps. It provides authentication, authorization, application isolation, scalability, and a lot more with extensive documentation.
ShinyProxy is free and open-source. Although free here means that you are free to do anything with the software within the broad limits of the Apache 2 license. But you will have to manage your server and pay for hosting it.
Is there a simple setup process?
Setting up ShinyProxy can be a bit intimidating if this is the first time you are venturing into this realm. Tutorials about the installation process, configuration, and custom domains are great. But you might wonder if there is an easier way to fast forward the process.
This is the reason Analythium Solutions published the ShinyProxy 1-click app in the DigitalOcean marketplace. We have been successfully using the setup reflected in the tutorials and the 1-click app for some years with our consulting clients. Automating the system setup is beneficial for our own purposes. Releasing it as a marketplace app, however, means that others can benefit from our learnings too.

This post is a screenshot-based demo of the setup process explaining how you can reclaim an hour of your day. There is also a video version:
An error occurred.
Try watching this video on www.youtube.com, or enable JavaScript if it is disabled in your browser.
ShinyProxy 1-click app tutorial video
What is the Marketplace?
The DigitalOcean Marketplace is a collection of so-called 1-click apps, which are pre-configured machine images that can be used to spin up virtual machines in minutes.
The apps are maintained by DigitalOcean or different vendors. Apps include WordPress for blogging, RStudio image for computing applications, our ShinyProxy image, and a lot more.
Get started
DigitalOcean has a simple and intuitive browser-based dashboard and prices are predictable pricing.
Signup
When you create a DigitalOcean account, you can choose to sign up with an email address or with Google or GitHub single sign-on (SSO) following the prompts after clicking the 'Sign Up' button. Once you sign up, you can set up two-factor authentication to protect your account. You can consider using this referral link and get $100 free credits on sign-up.
Login
To log into your account, click on the 'Sign In' button in the top right corner. This should take you to a form where you can sign in using email and password, or use Google or GitHub SSO. Once you pass login, you'll be prompted to type in a 6-digit verification code that you receive to the email address that you have used for signup.
Add your SSH key
Ideally, you should add your SSH key to your DigitalOcean account before creating the creating resources (virtual machines, etc.). This way your SSH key can be deployed to the new servers and accessing those through the command line will be straightforward.
To set up an SSH key, follow this guide. Once your SSH key is generated you will see two files (these fine names might be different depending on how you generated them), one public, one private. These two files are cryptographically matched, like a key and a lock.
Open the public key file (e.g. .ssh/id_rsa.pub) in a text editor, copy the content. Now go to your DigitalOcean Dashboard, under Settings find Security. Click 'Add SSH Key'. Paste here the contents of the public key file. Add a name, that will remind you which one is yours.
Spin up a "droplet"
Now you signed up and logged in to your account and see your dashboard. The top navigation has a search bar to quickly find your resources, a 'Create' button with a dropdown listing the most common actions. This is where you can find an option to create a new Droplet. What is a "droplet"? A droplet is a small part of the ocean, and this is how DigitalOcean refers to its virtual machines.
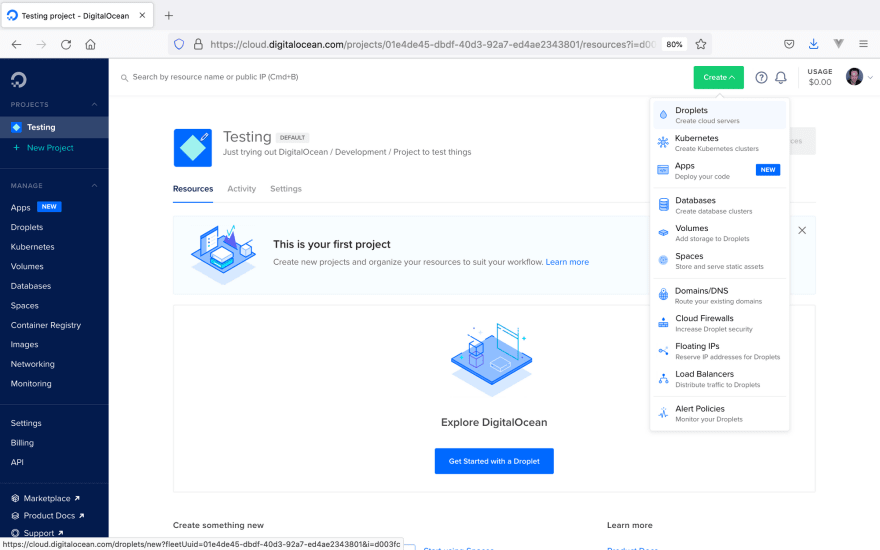
Click the 'Create' button and select the 'Droplets - create cloud servers' option. This will take you to a page where you can set the specifications for the new Droplet. You can create the new Droplet as a fresh Linux server (you can select many different Linux distributions, including Ubuntu, Debian, etc., and different versions), or you can use one of your saved images to replicate a given setting.
Search and select the ShinyProxy 1-Click app. This is a pre-configured image on Ubuntu 20.04.

After the image is selected, you can choose a plan based on hardware configuration and pricing (see Droplet pricing here).
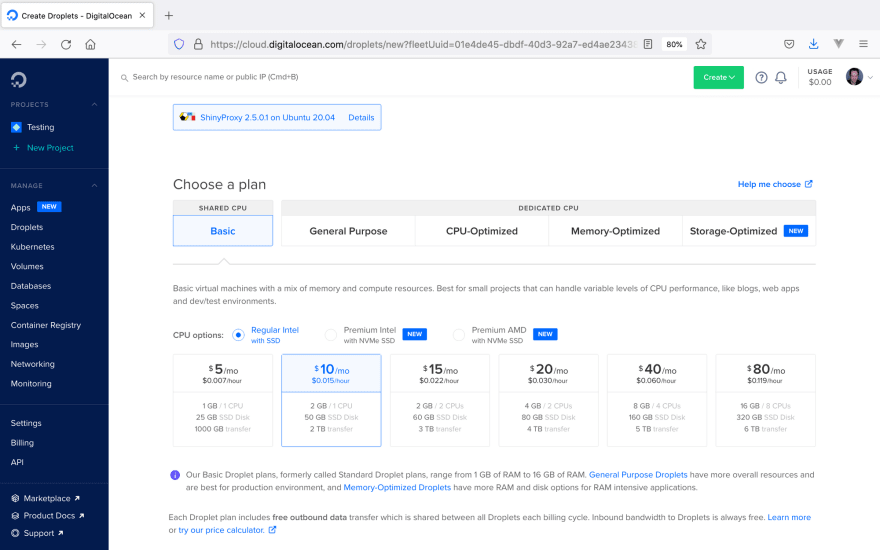
Next, you can pick your data region, I picked Toronto (Canada) here, feel free to choose what's closest to you.

Finally, you can add additional monitoring (recommender: this allows collecting more refined monitoring data and is required for alerts).
Authentication can be based on a root password or using SSH keys. If you select SSH key-based authentication, password-based authentication will be turned off by default.
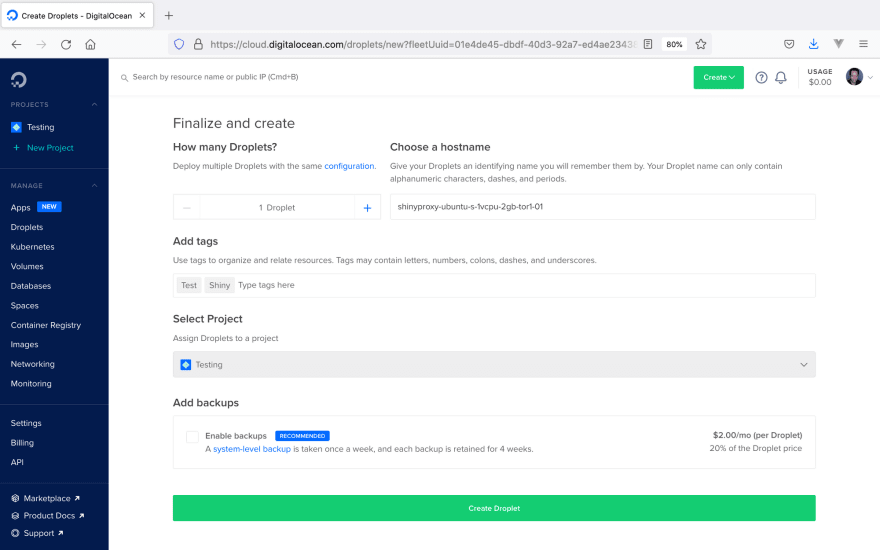
Finally, you can specify how many Droplets you wish to create with the same specifications, you can edit the hostname (this is how the new Droplet will show up in the dashboard), or add backup for 20% of the Droplet price.

If everything looks good, you can click the 'Create Droplet' button at the bottom and wait for your Droplet to be provisioned.
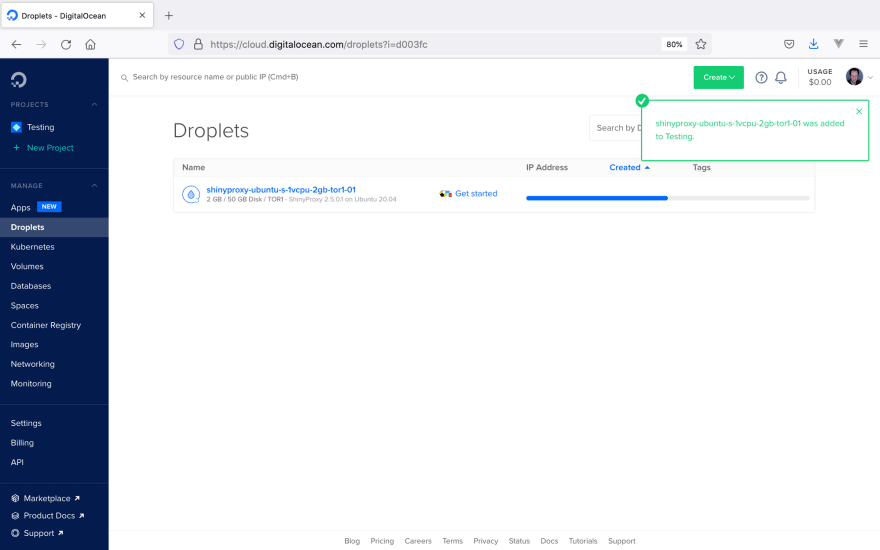
Once the progress bar reaches 100% you can copy the IP address and visit the droplet in the browser or in the terminal.
In the meantime you can study the 1-click app information on what to do next once the virtual machine is up.

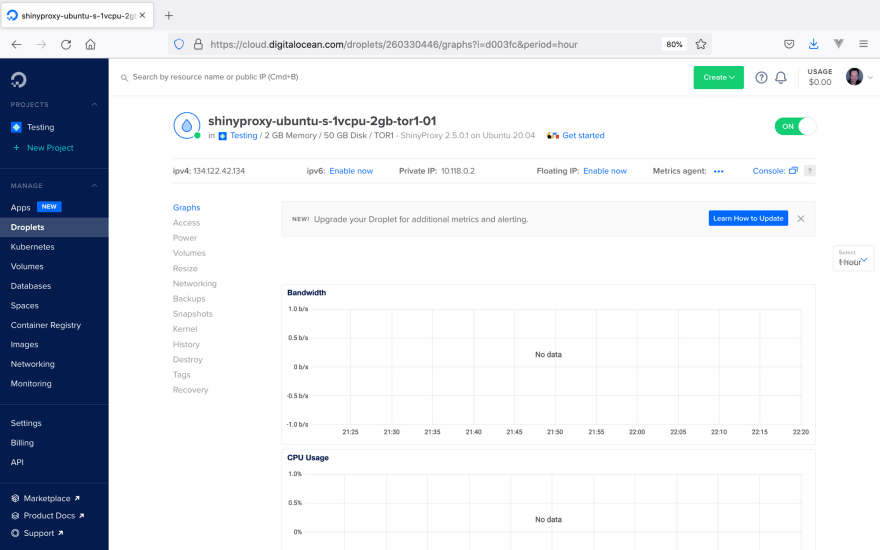
Click on the droplet name to see the relevant dashboard. The green dot indicates a healthy instance, but you might have to wait another minute before you see CPU and memory usage info. Click on the 'ipv4' address, it will copy the address to your clipboard.
API Creation
In addition to creating a Droplet from the ShinyProxy 1-Click App via the control panel, you can also use the DigitalOcean API.
As an example, to create a 4GB ShinyProxy Droplet in the SFO2 region, you can use the following curl command. You’ll need to either save your API access token to an environment variable or substitute it into the command below.
curl -X POST -H 'Content-Type: application/json' \
     -H 'Authorization: Bearer '$TOKEN'' -d \
    '{"name":"choose_a_name","region":"sfo2","size":"s-2vcpu-4gb","image":"analythium-shinyproxy-20-04"}' \
    "https://api.digitalocean.com/v2/droplets"
Log in using the ShinyProxy UI
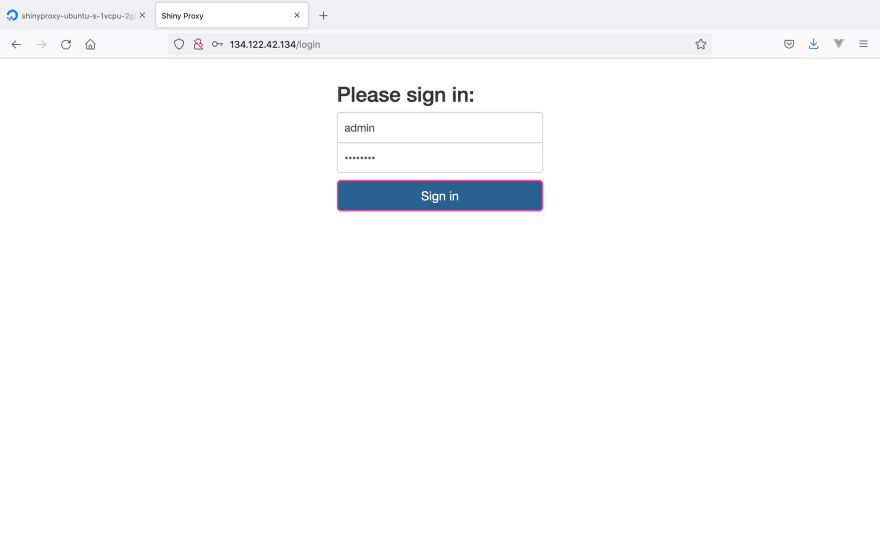
It takes some time for all the services, including Docker and ShinyProxy to come online. Once your new droplet with the ShinyProxy 1-Click app is up and running, you can visit your droplet's IP address. Use admin/password or user/password as user name and password to log into your ShinyProxy instance.
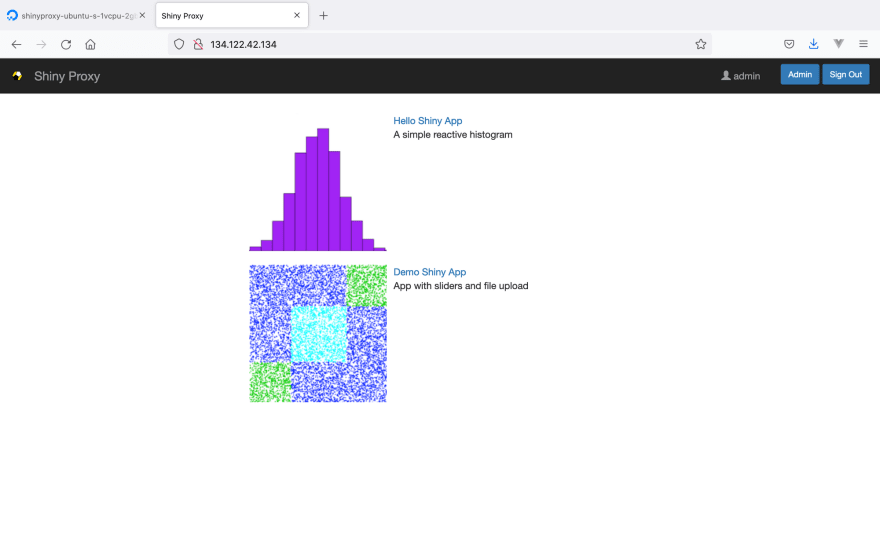
Once you are in, you'll see two demo R Shiny applications. Try them to make sure Docker is running fine.
Now you can modify the configuration to deploy your own apps. This will require you to access the droplet through a secure shell (SSH).
Log in through SSH
Secure shell or ssh is a command-line tool and also a cryptographic network protocol for operating network services securely over an unsecured network.
SSH provides a secure channel connecting an SSH client application with an SSH server (the standard port for SSH is 22).
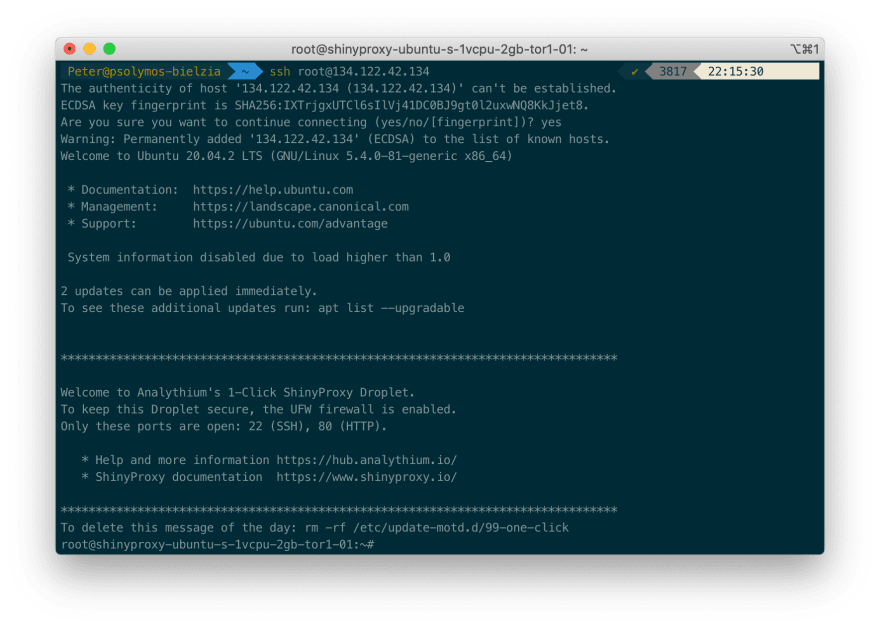
You'll be able to log into a new Droplet if your SSH key was added on droplet creation:
ssh -i c:/.ssh/id_rsa root@142.93.156.135
This will use the SSH private key (c:/.ssh/id_rsa) to let you into the server as the root user (superuser).
I used the full path to tell ssh where to find the private key (using the -i flag) that will be matched with the public key already on the server. You'll be asked to add the server to your list of trusted hosts on the first login, just answer yes.
Edit /etc/shinyproxy/application.yml to configure your instance. Pay special attention to authentication: it is set to simple. You should change user names and passwords, possibly the authentication type.
Pull Docker images and add those to the configuration file to deploy your Shiny apps.
Then restart ShinyProxy for the changes to take effect using sudo service shinyproxy restart.
All this is explained in the following posts:
- ⚙️ Advanced Configuration for ShinyProxy
- 🔄 Update Existing Shiny Apps in ShinyProxy
- 🚀 The Quickest Way to Add New Apps to ShinyProxy
You can also go ahead and set up a custom domain name and HTTPS:
Don't forget to destroy (and not just power off) your droplet if you don't need it any longer to avoid any unwanted changes.
Conclusions
The ShinyProxy 1-click app is a machine image that helps you get your production server up and running in no time. The usual setup process can take anywhere between 30 minutes to an hour. With the 1-click app, it takes only a few minutes. It is still valuable to understand the details, but the app can be a real-time saver in the long run.
Further readings
- ShinyProxy website
- ShinyProxy forum: Q&A website under the ShinyProxy category
- 1-Click App Support
- DigitalOcean product documentation

Top comments (0)